Safe Brake Line Repairs
If you want to know how to use a brake line flaring tool, the first thing to understand is that this is not just another workshop job. Brake repairs sit in the safety-critical category. A poor flare can leak fluid, pull air into the line, weaken pedal feel, and create a real risk on the road. That is why experienced mechanics do not treat brake line flaring as a quick squeeze-and-send job. They slow down, prep the tube properly, match the flare to the fitting, and inspect the finished result like it matters, because it does.
A lot of failed DIY brake flares come from the same few mistakes. The tubing is cut crooked. The inside edge is not deburred. The line sits too high or too low in the die block. The first stage is rushed. The second stage is forced. Or the wrong tool is used altogether. On the bench, the flare may look close enough. Under pressure, vibration, road shock, heat, moisture, and years of service, that "close enough" repair can turn into a comeback or something worse. That is why a proper brake line flaring tool and the right method matter so much.
This guide is written to solve that problem in plain English. It explains why brake lines use double flares, what the main brake pipe flaring tool options do, how the two-stage process works, how to check your result, and what mistakes to avoid. If you want the broader context first, our flaring tool overview explains how different flare styles fit different trades and why brake work needs its own approach.
This article stays focused on automotive brake flaring. We are not drifting into general plumbing or refrigeration technique here except where it helps explain what brake tools are not designed to do. That matters because some buyers search for a brake tubing flaring tool and get shown mixed kits meant for all sorts of tube work. The result is confusion. A proper brake flare repair needs the right tool, the right flare type, the right tubing preparation, and the right level of care.
Australian conditions make that even more important. Coastal air around Sydney can speed up corrosion at exposed fittings. Brisbane humidity can make old line grime harder to ignore. Melbourne cold snaps can make brittle, tired line ends more obvious when you start working them. A solid flare has to survive all of that, not just look tidy for five minutes in the shed. That is why this guide is built around safe practice first and convenience second.
Why Brake Lines Need Double Flares
Brake lines carry hydraulic pressure, not mild flow. When you press the pedal, the braking force depends on fluid staying sealed in the line so pressure can travel cleanly to the wheel ends. That is why double flares are so common in brake repair. A single flare leaves the edge of the tubing thinner and more exposed. A double flare folds the tube material back on itself, which creates a stronger end profile and gives the fitting a more durable sealing surface. That extra strength matters in a system where failure is not acceptable.
Pressure is only part of the story. A brake line also lives with constant vibration, suspension movement, road shock, and heat cycling. On older vehicles, it may also have years of corrosion, grime, and previous repair history working against it. A single flare may look fine when the car is standing still, but the real test is repeated service over time. Double flares resist that environment better because the formed end is less likely to split or distort when the fitting is tightened and re-tightened during servicing.
That is why many professional mechanics treat double flaring as the default mindset for brake work unless the vehicle clearly calls for a different profile such as a metric bubble flare. The key point is not "double is always better at everything". The key point is that brake lines are a high-pressure hydraulic system, so the flare style has to suit that duty. If the seat calls for a double flare, you use a double flare. If the seat calls for a bubble flare, you use that. Matching the fitting matters more than habit.
Australian vehicle standards and roadworthy expectations do not care whether a repair looked easy to do in the shed. They care whether the braking system is safe, sealed, and fit for use. Under the Australian Design Rules (ADR), braking systems must meet specific performance and integrity standards — and a sloppy flare on a brake line puts that compliance at risk. That is why single-versus-double flare strength is not just theory. A weak flare can crack at the lip, fold unevenly, or seal poorly against the seat. On a road car, ute, or work vehicle, that can show up as a slow leak, a soft pedal, or poor braking response. None of those are small problems.
When people search for brake line flaring or how to use a brake pipe flaring tool, they often want the practical reason behind the process. The practical reason is simple. Double flares are used because brake systems need a stronger, more stable tube end than low-pressure line work. The extra forming step is there to improve the joint, not to make the job harder. Once you understand that, the two-stage tool process makes much more sense.
Many failed brake flares do not fail because the yoke was weak. They fail because the tubing was cut badly, the line height in the block was wrong, or the flare type did not match the fitting seat. Tool choice matters, but prep and match-up matter just as much.
There is also a big difference between a line that can be assembled and a line that can be trusted. Plenty of poor flares will let you tighten the nut. That does not mean they will hold. A good mechanic knows the finish of the flare face, the evenness of the fold, and the condition of the tubing all tell a story. Double flares are stronger when done correctly, but even a double flare can be unsafe if the setup is sloppy.
On real jobs, this matters most when the repair is made in awkward positions. A rear line near a bracket, a front section close to heat and road grime, or an underbody run with limited clearance all put pressure on the mechanic to work quickly. That is where understanding why the double flare matters helps you resist rushing. The extra care is not about perfectionism. It is about giving the brake system the strongest end connection the fitting was designed to use.
Flare Types, Tools and Applications at a Glance
Not all flare types are interchangeable, and not all tools cover every system. The table below gives you a quick reference so you can match the right tool to the right job before you start cutting tube.
| Flare Type | Common Application | Typical Tool | Notes |
|---|---|---|---|
| Double flare (SAE) | Australian, US, and older Japanese brake lines | Imperial 93-FB or equivalent SAE double flare tool | Most common brake flare in Australian workshops; two-stage forming process |
| Bubble flare (metric) | European and many modern imported vehicles | Imperial 293-F metric bubble flare tool | Cannot substitute a double flare tool; fitting seat profile is different |
| Single flare | Low-pressure lines only (fuel, not brake) | Basic flaring cone tool | Not suitable for brake hydraulic systems; too weak under pressure |
| 45° inverted flare | Brake and fuel systems on some US-market vehicles | SAE 45° flaring tool or kit | Confirm seat angle before forming; do not mix with 37° fittings |
| HVAC flare (45° or 90°) | Refrigeration and air conditioning copper line | Dedicated HVAC flaring tool | Different material, different duty — not a brake repair tool; see our HVAC flaring guide for context |
Brake Line Flaring Tools Explained
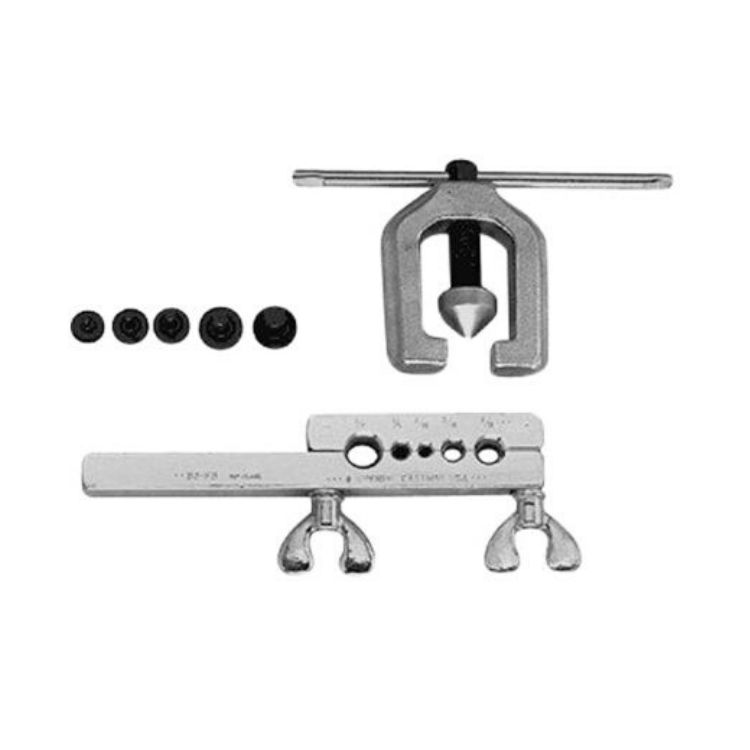
A brake line flaring tool is designed to do one thing well: form the correct flare on brake tubing without crushing, twisting, or splitting the line. Most double flare tools use a clamp bar or die block, a yoke, and a forming adapter. The clamp bar holds the tube at the correct projection height. The first stage presses the adapter into the tube to create a bubble-like shape. The second stage folds that shape inward to create the finished double flare. Once you understand those stages, the tool stops looking mysterious.
For SAE-style double flares, a dedicated option like the Imperial 93-FB flaring tool is the kind of setup mechanics look for when they want a brake-focused tool rather than a general tube-forming kit. The value of a tool like this is not just the brand name. It is the way it is built around the job. The bar needs to grip the tube evenly. The yoke needs to line up properly. The forming parts need to match the tube size cleanly. A proper double flare repair depends on all of that.
Metric systems are where many buyers get caught. If the vehicle uses bubble flares, you need a metric-capable solution rather than assuming your standard double flare tool will cover it. That is why the Imperial 293-F metric tool matters. It is the sort of option you look at when the repair involves metric brake line flaring and the fitting seat is built for a bubble flare profile. Using the wrong tool here is one of the fastest ways to waste tubing and create a repair you cannot trust.
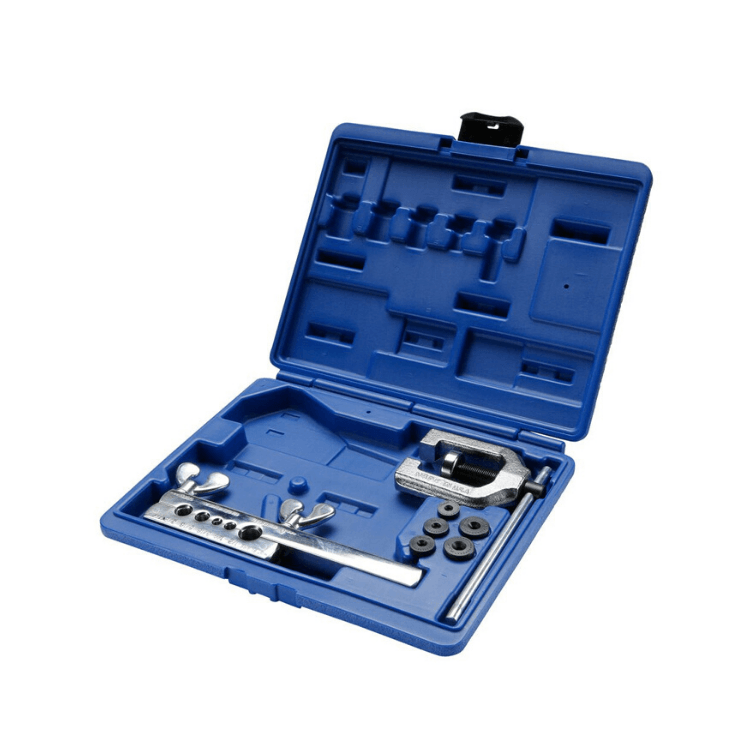
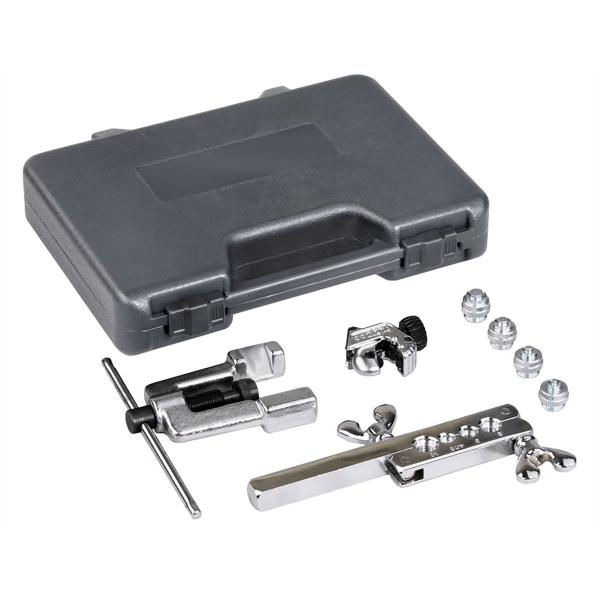
Some buyers want a full case with more than just the bar and yoke. That is where a set such as the Robinair 6503 complete kit can make sense. A brake flare kit can suit workshops, apprentices, or mechanics who want the main forming parts together in one case rather than piecing things together one tool at a time. The right kit depends on whether you mostly do SAE double flares, need metric coverage, or want a broader repair setup.
It also helps to know what the tool components actually do. The clamp bar or die block holds the line and controls projection height. The adapter, often called the button in workshop talk, creates the first-stage shape. The yoke applies force in a controlled way so the flare is formed rather than crushed. Some kits also include cutters or extra dies. Those extras are handy, but the core of the job still comes back to clean holding, correct height, and straight, even forming pressure.
If you work across trades, you may notice that brake tools and refrigeration tools are talked about together online. They are not the same job, which is why it helps to understand the difference between brake repair tools and flaring tools for HVAC. Both shape tubing, but the flare types, materials, and risk profile are different. For brake work, stay in the brake lane and choose a tool that matches the fittings and tube sizes you actually service.
Brake lines are a safety-critical system. Under ADR braking performance requirements, the entire hydraulic circuit must remain sealed and fully functional. A flare that looks built tough on the bench but was formed with the wrong tool, wrong height, or wrong flare type can fail under road load. If you are not confident in the result, do not put the vehicle back on the road. Redo the flare or refer the job to a qualified mechanic — no worries, that is the right call.
For buyers comparing tool styles, the real decision is not just brand versus brand. It is SAE versus metric, individual tool versus kit, and occasional DIY brake line flaring versus repeat workshop use. Once you know which of those lanes you are in, the tool choice becomes much clearer.
If your work is mostly older Australian, Japanese, or US-style brake repairs, a solid double flare tool is often the starting point. If you regularly touch European or imported systems, metric capability moves higher up the list. That is why a good workshop does not just own "a flaring tool". It owns the right flaring tool for the fitting systems it actually sees.

How to Use a Brake Line Flaring Tool
The core process of using a brake line flaring tool is simple on paper but unforgiving in practice. You cut the tube square, deburr it, clamp it at the right height, run the first stage to create the bubble form, run the second stage to fold that shape into the finished flare, then inspect it carefully. If any one of those steps is off, the final flare may look passable but fail when tightened or pressurised. The table below shows the job in the order most mechanics follow it.
| Step | What You Do | Why It Matters | Result to Look For |
|---|---|---|---|
| Cut tube | Cut the brake line cleanly and square | A crooked cut makes the flare form unevenly | Flat, even tube end with no crushed edge |
| Position tube | Clamp the line flush at the correct projection height | Too high or too low changes the finished flare shape | Tube held firmly without slipping |
| First stage | Use the adapter to create the first-stage bubble form | This sets up the material fold for the final double flare | Even formed shape with no tearing |
| Second stage | Remove the adapter and press the flare inward | This creates the finished double flare sealing face | Smooth, centred, even fold |
| Final check | Inspect the flare and test the connection | A tidy-looking flare can still be wrong if it is cracked or off-centre | Clean flare face, no splits, good fit against the seat |
If you are learning how to use a brake line flaring tool for the first time, the biggest mental shift is understanding that the first stage is not the finished flare. New users often think the tool should create the final shape in one go. It should not. The first stage prepares the tubing. The second stage completes the fold. If you rush straight to the end shape, the tubing can split, skew, or flare too thin.
The other key point is height. Most bad flares start there. If the tube sits too proud in the die block, the flare can mushroom too much and fold poorly. If it sits too low, there may not be enough material to form a strong sealing lip. That is why experienced mechanics are picky about line projection. The tool may be doing the forming, but the setup decides whether the forming starts from the right place.
This is also where a proper complete double flaring guide helps. The process sounds simple until you see how much the setup affects the outcome. A good flare is not the result of brute force. It is the result of clean prep, straight clamping, and controlled stages.
Another point many beginners miss is feel. A proper tool gives you a steady sense of resistance as the adapter forms the tube. If the pressure suddenly jumps, goes crooked, or feels rough, stop and check alignment before you keep winding. A brake pipe flaring tool works best when you let the parts do the shaping instead of forcing them harder every time something feels wrong.
Step-by-Step Brake Line Flaring Process
The first job is cutting the brake line square. Use a proper cutter and avoid crushing the tube as you go. If the line is old, corroded, or already out of round, do not try to save the last damaged section just because it is convenient. Cut back to clean material. A proper brake line repair tool setup cannot rescue bad tubing. It can only work properly on tubing that is sound enough to be formed.
Once the cut is made, deburr the inside and clean the outer edge. This step gets skipped all the time in DIY brake line flaring, and it shows. Burrs create stress points. They can also distort the first-stage forming process and stop the flare folding evenly. A quick cleanup here saves a lot of grief later. Keep it controlled. You want a clean edge, not a thinned wall.
Before you clamp the line in the die block, make sure the fitting nut is already on the tube. Every mechanic has forgotten this at least once. It is an annoying mistake on the bench and a worse one when access is tight under the vehicle. Once the nut is on, position the tubing in the block at the correct height for the size you are working with. This is one of the most important moments in the whole job. If the line height is wrong, everything that follows is compromised.
Now run the first stage. With a standard double flare setup, the adapter is placed against the tubing and the yoke is tightened to form the initial bubble shape. Keep the tool straight and apply pressure evenly. Do not jerk it. Do not lean it sideways. The goal here is a neat, centred first-stage form, because that shape becomes the material that folds into the finished flare. If the first stage is lopsided, the final flare will usually be lopsided too.
After that, remove the adapter and run the second stage. This is the fold that creates the finished double flare. Again, keep the yoke aligned and apply pressure in a controlled way. There is no prize for crushing the line harder than needed. A proper tool will form the flare; you do not need to bully it. When the stage is complete, release the tool and inspect the flare face closely. It should be smooth, centred, and even around the lip.
Inspection is not optional. Look for cracks, thin spots, skewed lips, or a flare that looks oval rather than round. Then check how the flare sits against the fitting seat. If the fit looks wrong, start again. Brake work is not the place to talk yourself into accepting a bad result. If you are working on a metric system and the fitting clearly calls for a bubble profile instead, step back and review the tool choice. That is where guides on bubble flaring for metric systems become useful.
Once assembled, the joint should be tested properly as part of the brake system service process. That means confirming the line seals, the pedal feels right, and there are no leaks under operating conditions. On vehicles that live near the coast or in heavy wet-weather use, pay extra attention to tubing condition around the repair area. A perfect flare on poor surrounding line is still not a dependable repair.
When beginners ask how to use a brake pipe flaring tool without wasting tubing, the honest answer is this: slow down and practise the setup, not just the press. Most wasted tube comes from poor height, poor deburring, or poor alignment. The tool is only as good as the hands using it. Spot on preparation is what separates a repair you can trust from one you quietly hope holds.
If a flare looks almost right but not quite, do not fit it anyway "just to see". Brake repairs are one of the few jobs where redoing the tube on the bench is almost always cheaper than trusting a questionable result under pressure.
For buyers building a workshop setup, this is where it helps to compare the tool you want against the range of brake flaring tools available, especially if you are deciding between a single dedicated tool and a broader brake flare kit.
Common Brake Flaring Mistakes
The most common mistake is an uneven flare. This usually starts with a crooked cut, poor clamping, or the yoke not being centred during forming. The finished flare may look okay from one angle, but when you turn it in the light the lip is thicker on one side than the other. That can stop the fitting from seating evenly and lead to leaks or a weak joint.
Cracked flares are another classic problem. These can come from over-tightening the forming stage, poor tube prep, damaged or brittle tubing, or trying to form a flare on line that should have been cut back further. Once a flare is cracked, it is done. There is no "close enough" fix. Start again with sound material.
Wrong height positioning is one of the biggest hidden causes of bad results. Many DIY users blame the tool when the real issue is that the tube was set too high or too low in the block. Too much projection can create an oversized first stage and a messy fold. Too little projection can leave a thin, weak flare with poor sealing shape. Height is not a small detail. It is the backbone of the whole job.
Dirty tubing also causes trouble. Brake line ends often carry rust, coating residue, dirt, or cutting swarf. If that material is trapped during forming, the flare face can end up marked or uneven. On older vehicles, this is especially common. Clean the line properly before you form it. A tool cannot make a clean flare from a dirty starting point.
Skipping deburring deserves its own warning because it is so common. The inside lip left by cutting can distort the first-stage bubble and create stress that shows up later as a crack. Deburring is a tiny step that has an outsized effect on the final result. If someone says they are getting repeated poor flares, this is one of the first things worth checking.
Weak folds happen when the second stage is rushed, misaligned, or started from a poor first-stage shape. The final flare may sit there and hold the nut, but the fold itself is not robust. Under brake pressure and vibration, that can become the weak point. This is one reason a good automotive brake flaring habit is to inspect every flare from more than one angle and never rely on a quick glance.
There is also the tool mismatch problem. Some users try to do metric brake line flaring with a standard double flare mindset, or they use a brake tubing flaring tool meant for a different seat style. If the system needs a bubble flare, use the correct metric-capable tool and process. If it needs a double flare, use that. A tool mismatch is not a technique problem. It is a planning problem.
When the same mistakes keep happening, go back to the basics rather than forcing harder. Check tube condition. Check cutter technique. Check deburring. Check line height. Check whether the flare type matches the fitting. Most repeat failures are hiding in one of those checkpoints.
One more mistake worth calling out is reusing questionable fittings or nuts just because they still thread on. A good flare still needs a good seat and a clean mating surface. If the fitting is damaged or the seat has already been chewed up by a poor repair, even a nice new flare can struggle to seal properly. Good brake line flaring is about the whole joint, not just the last step in the tool.
Brake Line Flaring Safety in Australia
Brake systems are not a casual repair area. In Australia, the expectation is simple: a repaired brake line must be safe, properly sealed, and fit for service. The Australian Design Rules set out braking performance requirements that apply across all registered vehicles, and the roadworthy standards in each state build on that foundation. The practical rule does not change regardless of your state or the age of the vehicle. If you are not confident the flare is right, do not put the vehicle back into use on the strength of hope.
Material choice matters here too. Use brake tubing and fittings that are suitable for automotive brake repair and confirm they match the vehicle's needs. If a supplier describes a line or fitting as meeting DOT-type or similar brake use requirements, do not assume that replaces checking the actual application. Confirm the tube material, fitting type, size, and seat style. Good repair work starts with correct parts, not just a correct-looking flare.
This is also where the DIY versus professional question becomes important. Plenty of capable home mechanics can learn how to use a brake line flaring tool well. But skill matters. So does inspection. So does knowing when a corroded line should be replaced further back rather than patched in the easiest spot. If the tubing is badly rusted, access is poor, or you are unsure about the flare type, there is nothing weak about handing the job to a qualified professional. Fair dinkum, that is often the safest call.
For vehicle-specific braking standards and compliance information relevant to registered vehicles in Australia, the Australian Design Rules published by the Department of Infrastructure are the authoritative reference for braking system requirements.
Australian conditions can also affect brake line decisions in ways people underestimate. Coastal corrosion can travel further along a line than the visible bad section suggests. Outback dust and grime can hide line condition around brackets and clips. Repeated wet weather can leave fittings harder to inspect cleanly. Good brake flaring safety is not just about the last 20 mm of tube in the tool. It is about the whole repair context.
When should you seek professional help? The short answer is when you are uncertain about the flare type, uncertain about the tubing condition, uncertain about your result, or uncertain about the vehicle going back on the road safely. A brake flare is not the job to "learn on the customer car" or take a chance with because the line almost sealed on the first go. Safety first really does mean redo it or refer it when the repair is not clearly right.
That same logic applies to material quality. A perfect flare on poor line is not a safe repair. A correct flare type on the wrong tube wall or damaged fitting is not a safe repair. Brake work rewards honesty. If the line condition or the access makes a partial repair doubtful, replacing more of the run is often the better call. It takes more time up front, but it reduces the risk of a second failure just past the section you fixed.
Master Brake Line Flaring
Learning how to use a brake line flaring tool properly comes down to a simple rule: respect the process because the braking system depends on it. Cut the line square. Deburr it properly. Set the correct height. Run the first stage cleanly. Run the second stage straight. Inspect the finished flare closely. If it is not right, remake it. Those habits matter more than speed, and they matter more than trying to muscle a cheap tool into doing a job it was not built for.
For SAE-style double flares, the Imperial 93-FB flaring tool is the kind of dedicated setup that can make the process more consistent and easier to trust. If you need a broader case setup, the Robinair kit is worth comparing. If you handle metric systems, the Imperial 293-F style of tool is the smarter path. The right choice depends on the repairs you actually do, not on whichever kit happens to be cheapest that day.
The safest way to master brake line flaring is to focus on repeatable quality, not just finishing the line. Good mechanics know that a ripper flare on sound tubing is worth more than a rushed repair that only looks okay from a distance. If you want to compare suitable tools available Australia-wide, review the product and category options already linked through this guide and match the tool to the fittings and systems you service most often.
If you are unsure which brake flare kit or brake line repair tool suits your work, browse our full range of brake flaring tools or contact us for a quote to confirm compatibility. A few careful questions up front can save wasted tubing, wasted labour, and the bigger problem of a repair that should never have left the workshop.