
Understanding Double Flares
If you want to know how to use a double flaring tool, the first thing to understand is why the double flare exists in the first place. It is there because single flares can fail when pressure, vibration, and repeated heat cycles start working on the joint. A double flare gives the tube end more strength, more support, and a better chance of sealing properly in high-pressure automotive work. That is why mechanics trust it for brake lines and other pressure-heavy jobs where a weak flare is not just annoying, but risky.
A lot of people see a double flaring tool and assume it is just a normal flaring tool with extra steps. That is only partly true. The real difference is in what those extra steps do. A single flare opens the tube once. A double flare forms the tube in two stages so the end folds back on itself. That creates a stronger sealing edge and helps maintain better wall support at the flare. When you are working on brake systems, that extra strength matters.
This is where many DIY jobs go wrong. The user cuts the line a bit crooked, skips deburring, sets the tube at the wrong height, then forces the tool harder when the flare starts forming badly. The finished result may look close enough on the bench, but under brake pressure it can leak, crack, or sit badly on the fitting seat. That is why learning the correct method matters far more than just owning the tool.
This guide explains the whole process in plain English. We will cover double flare vs single flare, how the two-stage forming process works, how to use a double flaring tool for brake lines, what tool types make sense, and what best practices help you get a clean, dependable result. If you want the broader context first, our flaring tool overview explains where different flare styles fit across the wider trade. For HVAC work specifically, poor flare joints are one of the leading causes of refrigerant leaks — our best leak detectors buying guide covers how to find them once the system is commissioned.
The focus here stays on brake and high-pressure work because that is where the double flare really earns its keep. We will mention other flaring contexts only where they help explain why double flaring is different. The aim is simple: help you understand the process well enough to make safer, cleaner, more reliable flares without guesswork.
Double Flare vs Single Flare
The easiest way to understand double flare vs single flare is to think about what each tube end is being asked to do. A single flare opens the tubing outward once to create the sealing face. That can work in lighter-duty applications, but it leaves the flare lip thinner and more exposed. A double flare starts with a bubble-like first stage, then folds that material back into itself. That second step creates a stronger flare edge with more support behind it.
That strength difference is the reason double flares are so important in brake work. Hydraulic brake systems see repeated pressure, vibration, and shock loads from road use. A flare that looks fine at rest can still fail after tightening, heat cycling, and regular service. A properly made double flare resists that better because the flare lip is not just stretched thin and left on its own. It is reinforced by the folded-back wall.
Pressure is only one part of the story. Application differences matter too. In low-pressure line work, a single flare may be acceptable where the fitting style and duty allow it. In brake systems, the safety trade-off is very different. Saving a little time with a single flare is not worth much if the connection is more likely to leak or crack later. That is why mechanics and experienced home users learn quickly that cost versus safety is not really a close contest in this area.
There is also the question of when double flare is required. In many brake repairs, the fitting design and application make the choice clear. If the system is built for a double flare seat, that is what the line needs. If it uses a bubble flare, that is a different process again. That is why it helps to compare double flare work with our bubble flare comparison article when you are dealing with mixed vehicle types or trying to work out whether a metric fitting is asking for something different.
Australian buyers also run into confusion because online guides often mix US, European, and general plumbing advice into one page. That is not very helpful. The real question is not which flare type sounds tougher. The real question is which flare type matches the fitting, the pressure, and the job. For brake work, the double flare usually wins because it is designed for exactly that sort of higher-stress environment.
A lot of failed flares are blamed on the tool when the real problem was using the wrong flare style for the fitting. Even a neat-looking single flare is still wrong if the seat was designed for a double flare.
Another reason pros favour the double flare is repeat service. Brake fittings get loosened and tightened during repairs, line replacement, and restoration work. A stronger flare tends to hold up better over time, especially on older vehicles where the rest of the line system may already be dealing with age, corrosion, or vibration fatigue. That is why the double flare is not just a technical preference. It is a practical one.
For comparison, the broader HVAC flaring tools article shows how other flaring styles are used in different trades. That contrast helps make the brake-line case clearer. Double flare work is not just "another flare". It is a flare style chosen because the application demands more from the joint.
Flare Types, Tools and Applications
Before diving into the forming process, it helps to see how the double flare fits alongside other common flare types. The table below gives a practical reference for the main options you will come across in brake and high-pressure line work, so you can confirm the right tool path before cutting any tube.
| Flare Type | Typical Application | Recommended Tool | Key Watch-Out |
|---|---|---|---|
| Double flare (SAE) | Automotive brake lines — Australian, US and older Japanese vehicles | Imperial 93-FB or equivalent dedicated double flare tool | Two-stage process; rushing stage one leads to a failed stage two |
| Bubble flare (metric) | European and many modern imported vehicles | Imperial 293-F metric bubble flare tool | Cannot substitute a double flare tool; fitting seat profile is different |
| Single flare | Low-pressure lines only — not brake systems | Basic flaring cone tool | Too weak for hydraulic brake duty; avoid on safety-critical systems |
| 45° HVAC flare | Refrigeration and air conditioning copper line | Dedicated HVAC copper flaring tool | Different duty and material — not a brake repair tool; see our HVAC flaring guide |
| 37° industrial flare | Hydraulic and instrumentation systems | Specialised 37° flaring tool | Not interchangeable with brake or HVAC flare fittings |
How Double Flaring Works
The reason a double flare is stronger comes down to the two-stage process. In stage one, the tubing end is formed into a short bubble shape with the help of an adapter. That first stage is not the finished flare. It is the setup stage. It creates the material shape needed for the second step to work properly.
In stage two, the bubble is folded back into itself to form the finished double flare. That fold-back is the whole point of the method. Instead of leaving one thin flare lip exposed, the process creates a double-wall style edge at the sealing face. That gives the flare more support and helps it hold shape better when the fitting is tightened.
This is where the mechanical advantage of the tool matters. A proper double flaring tool uses the yoke and adapter to apply force in a controlled way. The aim is to form the metal, not crush it. When the tool is lined up properly and the tube is clamped at the correct height, the forming pressure works with the tubing rather than against it. That is why clean prep and tool alignment matter so much.
Wall thickness maintenance is another big reason double flares are preferred in brake systems. A single flare can leave the lip thin and vulnerable. A double flare keeps more support at the flare edge by folding material back. That does not make the flare invincible, but it does give it a better chance of surviving service loads and sealing properly over time.
People often ask why the first stage looks a bit like a bubble flare. The answer is simple. That first-stage bubble shape is the raw material for the second-stage fold. Without it, the double flare would not have enough material to form the reinforced sealing lip cleanly. That is why rushing straight to the final shape does not work. The first stage is not optional. It is what makes the second stage possible.
If you have ever wondered why a badly made double flare often looks thin, split, or uneven, it is usually because something went wrong before the second stage even started. The line may have been cut poorly, clamped at the wrong height, or formed off-centre in the first step. By the time the second stage folds it back, the damage is already baked in.
The practical takeaway is that every good double flare begins with a good setup. Once the line is cut square, deburred, and clamped correctly, the tool can do its job. If the setup is poor, the second stage is really just hiding the problem rather than fixing it. That is why tradies who do this work regularly treat stage one with the same care as the final fold.
Using a Double Flaring Tool
The process for using a double flaring tool is straightforward once you understand what each stage is trying to achieve. First, the tubing is cut square and deburred. Then it is clamped in the die block at the correct projection height. Stage one uses the adapter to create the initial bubble form. Stage two folds that form inward to create the finished double flare. After that, the flare is inspected closely and the final connection is pressure checked as part of the system test.
| Stage | Action | Why It Matters | Result to Look For |
|---|---|---|---|
| Prep | Cut the tube square and deburr inside and out | A bad cut or burrs distort the flare before forming even starts | Clean, even tube end with no crushed edge |
| Stage 1 | Use the adapter to create the initial bubble form | This sets up the material needed for the fold-back stage | Even first-stage form with no tearing or skew |
| Stage 2 | Remove the adapter and fold the flare inward | Creates the double-wall flare face used for sealing | Smooth, centred double flare with even lip thickness |
| Inspection and test | Check the flare shape, seat fit, and pressure integrity | A tidy-looking flare can still be unsafe if cracked or off-centre | No splits, no thin spots, no leak signs under test |
When people ask how to use a double flaring tool, the biggest mistake is thinking stage one is just a warm-up. It is not. Stage one decides whether stage two has a fair chance of succeeding. If the initial bubble is off-centre or poorly formed, the final fold usually follows it into failure.
The second common mistake is using force instead of control. A double flare tool should not need heroic effort if everything is set correctly. The bar should grip the line properly, the yoke should line up cleanly, and the stages should progress with steady pressure. If it feels rough, crooked, or suddenly much harder than expected, stop and check the setup instead of winding harder.
Inspection is the last part of using the tool, but it is not a throwaway step. The finished double flare should be smooth, centred, and even. The lip should not be cracked or visibly thin. The flare should sit naturally against the fitting seat rather than rocking or looking skewed. This is especially important when learning how to double flare a brake line because a bad flare can still thread together and only reveal the problem later under pressure.
Brake lines are a safety-critical system under the Australian Design Rules (ADR). A registered vehicle's braking circuit must remain sealed and pressure-rated at all times. A double flare that looks spot on but was formed with the wrong height, poor prep, or misaligned yoke can still fail under real road loads. If you are not confident the flare is right, do not put the vehicle back in service — fair dinkum, it is always cheaper to remake the flare on the bench than to deal with the consequences on the road. For ADR braking requirements, see the Australian Design Rules published by the Department of Infrastructure.
After assembly, the joint needs a proper leak test as part of the brake or hydraulic system service process. A flare that only looks good is not enough. It needs to seal under real operating conditions. That is the difference between a workshop success and a comeback job.
It also helps to remember that the tube nut has to be on the line before you start forming the flare. That sounds obvious until you forget it. Plenty of people have made a perfect flare and then had to cut it off because the nut was still sitting on the bench. It is a small step, but it is part of the rhythm of doing the job properly.
Double Flaring Brake Lines Specifically
Brake line work is where the double flare matters most. If you are looking up how to use a double flaring tool for brake lines, you are dealing with a high-pressure hydraulic system that depends on reliable sealing. That means the flare type, tube size, fitting seat, and material all need to match the job. Brake systems are not an area for making assumptions based on what "looked about right" on another vehicle.
Repair work is often discussed alongside standards such as SAE J1047, especially when talking about brake tubing, fittings, and flare quality. The safe way to use that sort of reference is not to memorise one code number and treat it like a magic answer. The safe way is to confirm the actual tubing type, fitting style, and repair method required for the vehicle you are working on. That includes checking whether the line is imperial or metric and whether the fitting expects a double flare or another style.
Metric versus imperial sizing is where plenty of confusion starts. Older American-style systems often line up with double flare expectations that many mechanics already know well. European systems may use different fitting styles and often bring bubble flares into the conversation. That is why it helps to read the dedicated brake line flaring guide alongside this one when you are trying to sort out whether the issue is technique, tool choice, or flare type mismatch.
European versus American fittings also matter because the seat design is what decides the flare, not the user's preference. If the seat is designed for a bubble flare, a double flare is not the right answer. If the seat is designed for a double flare, that is what you need to produce. This sounds obvious, but a lot of failed repairs start with someone assuming any neat flare is better than the correct flare.
Australian vehicle considerations mainly come down to being practical. We see a mix of imported and local-market vehicles, different fitting conventions, and plenty of older brake systems still on the road. Add coastal corrosion in places like Sydney, wet-weather grime in Brisbane, and the general wear that comes with ageing vehicles, and you can see why good flare inspection matters just as much as good flare formation. A repair that is built tough from the start is the only kind worth doing on a safety-critical system.
If you are working on a system where the fitting style is not obvious, stop and confirm before forming the line. That little pause is cheaper than wasting tubing and much cheaper than fitting the wrong flare into a brake system. A double flare brake line tool is only the right tool when the fitting and application say it is the right tool.
This is also why training matters. A person who understands the fitting seat, the tube material, and the flare style will usually make better decisions than someone who is only copying a tool movement. Brake line work rewards careful thinking as much as steady hands.
Double Flaring Tool Types
Not every double flaring tool is aimed at the same user. Some tools suit occasional repair work. Some are better for repeated workshop use. Some come as a simple dedicated tool. Others are sold as a double flare tool kit with more accessories in the case. The right choice depends on how often you use it, what fittings you see, and how much consistency you need.
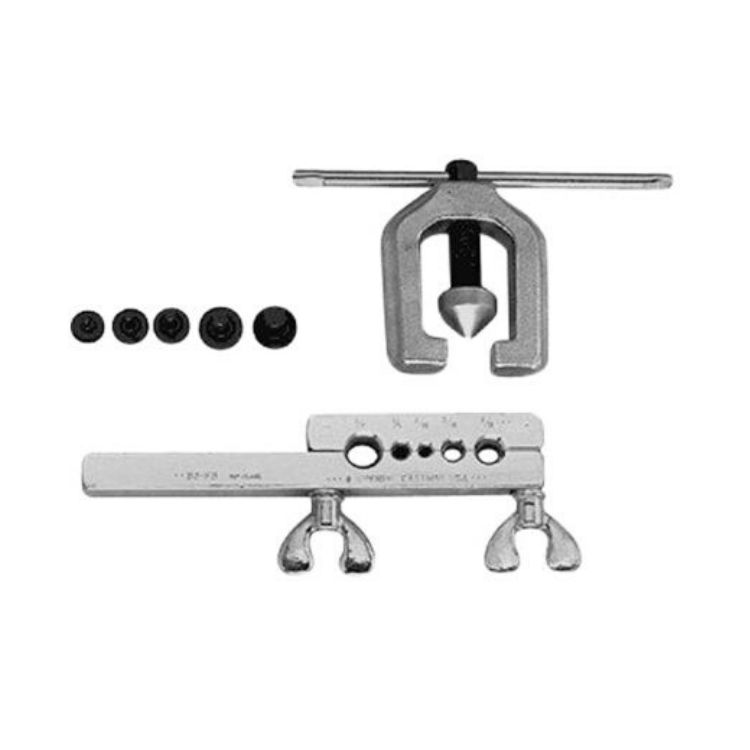
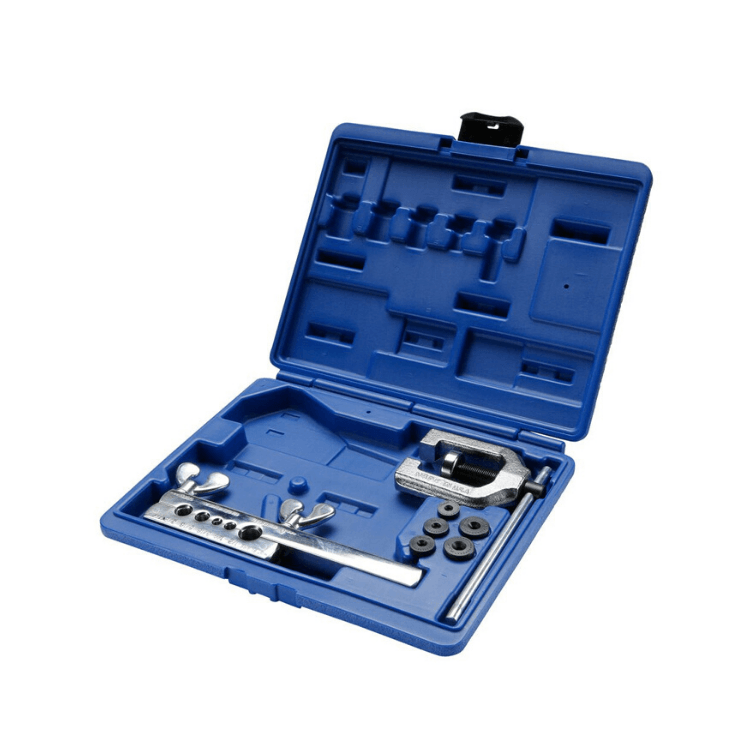
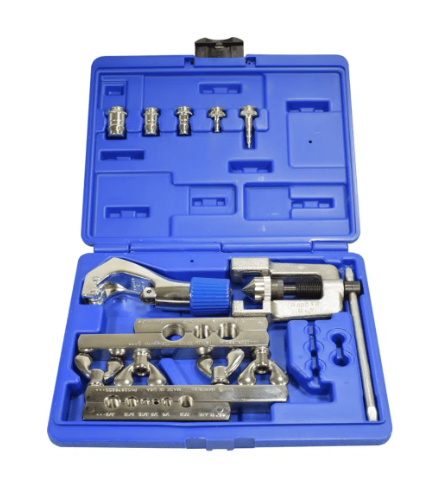
The Imperial 93-FB double flare setup is the sort of tool people look at when they want a recognised option for standard manual double flaring work. It has strong relevance for brake-line repair because that is the exact sort of job where a dependable manual tool matters. When buyers search for an imperial double flaring tool, this is the kind of product they usually mean.
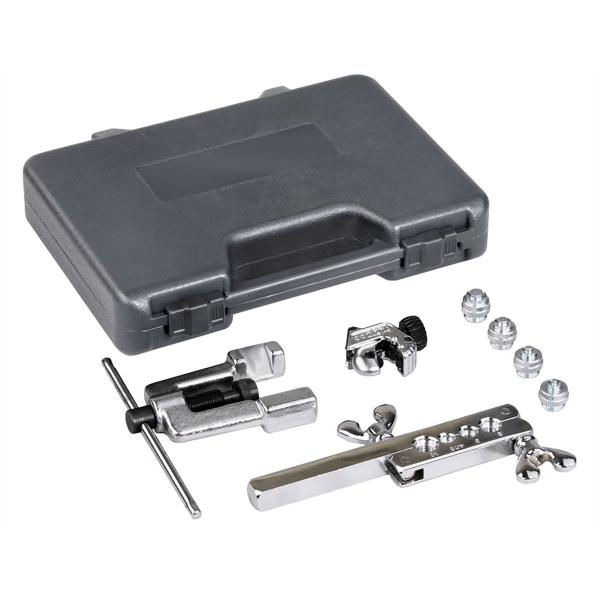
The Robinair 6503 set sits more in the kit conversation. If you are comparing a broader case setup rather than a bare-bones tool, the Robinair name comes up because people want a package that covers the main forming steps in one place. That is why searches for a robinair double flaring tool often come from mechanics who want convenience as well as flare capability.
Mastercool options also appear in the wider automotive flaring space. The safe way to discuss them here is simply to note that Mastercool is another name buyers compare when they are looking across manual, kit-based, or higher-end tool choices. Exact fit, coverage, and accessories vary by model, so it is smart to confirm the actual kit contents and intended use before assuming one Mastercool tool is the same as another.
Hydraulic versus manual is another useful distinction. Manual tools are common because they are straightforward, portable, and often good enough for regular repair work when used properly. Hydraulic designs can make sense where repeat volume, larger workshop use, or reduced operator effort matter more. The key point is not that one is universally better. It is that the tool style should match the workload.
Professional versus entry-level choice comes back to consistency. An entry-level tool may be fine for light use if the setup is careful and the expectations are realistic. A professional shop doing regular brake line repairs will usually value stronger clamping, smoother alignment, and more repeatable results. That is why it helps to compare actual application needs against the broader double flaring tools collection rather than picking only on price.
One final point: a tool type does not remove the need for skill. A better tool helps, but it does not forgive poor cuts, poor height, or poor alignment. That is why tool choice and technique should always be thought about together.
For buyers in Australia, local availability matters too. A great-looking tool is not much use if you cannot source it easily or if it does not suit the kinds of fittings you actually see on the vehicles in your workshop. That is why experienced tradies usually think about stock, support, and common use cases together rather than treating the purchase like a one-off gadget buy.
Double Flaring Best Practices
The best double flares start long before the yoke is tightened. Clean, square cuts are essential because a crooked cut sets the whole job up badly from the start. If the tube edge is crushed, angled, or rough, the adapter is already fighting a bad starting point. That is why good mechanics slow down at the cut rather than trying to save time there and lose it later.
Proper tube positioning is just as important. The tubing needs to sit at the correct height in the die block so there is enough material for stage one and stage two to work properly. Too high and the flare can mushroom badly. Too low and the finished lip can come out thin and weak. Height is not a small setup detail. It is one of the main reasons a flare succeeds or fails.
Consistent pressure application matters too. The tool should be wound steadily and squarely, not jerked, rushed, or forced at an angle. If something feels wrong halfway through, the smart move is to stop and inspect the setup. Winding harder rarely fixes a flare that has already started badly.
Inspection procedures should be treated as part of the job, not as an afterthought. Look for a smooth flare face, even lip thickness, no cracks, and good centring. Then check how the flare meets the fitting seat. If it looks odd, remake it. Trying to talk yourself into accepting a poor flare is one of the fastest ways to create a leak path.
Leak testing requirements matter because the flare has to work under pressure, not just look tidy on the bench. Any brake or hydraulic system repair should be checked properly as part of the final test process. A flare that is doubtful before pressure testing is already telling you something useful. Listen to it — no worries about taking the extra time to recheck before sign-off.
If a double flare looks almost right but not quite, remake it. Brake and high-pressure line work are not the place to hope the fitting will pull a bad flare into shape for you.
On real jobs, the extra minute spent checking the cut, deburr, height, and alignment is usually the cheapest minute in the whole repair. It is much cheaper than wasting a line section, much cheaper than refitting the joint, and much cheaper than a comeback from a leak you could have caught on the bench.
Good best practice also means using sound tubing in the first place. A perfect technique cannot rescue tubing that is already badly corroded, split, or out of round. That is especially important in Australian conditions where coastal air, road grime, and age can hide damage until the line is cut and exposed. The safer decision is always to start with good material rather than hope the flare will fix a bad section.
There is also value in consistency. If you use the same careful prep routine every time, the flare result becomes easier to judge. If your process changes from job to job, it is harder to tell whether the problem came from the line, the setup, or the tool. That is why the best mechanics usually have a steady routine and stick to it.
Achieve Perfect Double Flares
Learning how to use a double flaring tool properly comes down to a handful of repeatable habits. Start with a clean square cut. Deburr the tube carefully. Set the correct height in the block. Form the first-stage bubble cleanly. Fold it back in stage two with steady pressure. Inspect the finished flare properly and test the joint under the correct system procedure. Those steps are what separate a dependable double flare from one that only looks good at a glance.
For brake-line work, that matters because the double flare is there for a reason. It gives the joint more strength and more support in the sort of high-pressure service where single flares are simply not the better trade-off. That is why the technique is worth learning well rather than rushing through it once and hoping for the best.
If you are comparing tool options, the Imperial and Robinair choices linked through this guide are a ripper place to start for most brake repair work. Browse the full range of double flaring tools to compare more than one style in context and match the tool to your actual fitting types and repair volume. If you are unsure which setup suits your work, talk to our team to confirm compatibility or contact us for a quote. A bit of guidance up front is usually cheaper than buying the wrong tool and learning that the hard way.
To review a dedicated product option, see the Imperial 93-FB double flare tool discussed above and match the tool to the flare type, fitting style, and repair work you actually do. That is the safest way to get professional results without guesswork.