
Metric Brake System Flaring for Australian Workshops
Metric Brake System Flaring
If you work on European vehicles, Japanese imports, or any brake system that uses metric line fittings, a normal double flare tool will not always get you where you need to go. That is where the bubble flaring tool comes in. It is built for a different flare shape, a different fitting seat, and a different set of brake line expectations. Get that wrong, and the job can look tidy on the bench but leak once the system is tightened and pressure tested. No worries if you have not struck this before — plenty of good mechanics have been caught out the first time they crossed from SAE to metric brake work.
This is why metric brake repairs catch a lot of people out. They already know how to double flare a brake line, so they assume the same tool and process will cover every vehicle that rolls into the shed. It will not. A bubble flare has a round, convex shape that is designed to seat correctly in matching metric brake fittings. A double flare folds the tube back on itself and suits a different fitting style. They are not interchangeable just because both live in the brake world.
For Australian workshops, this matters more than ever. We see a mix of local-market cars, imported vehicles, European brands, Japanese systems, and older restorations that do not all follow the same flare rules. A mechanic doing general service work in Brisbane, Sydney, Melbourne, or Perth can move from one brake line standard to another in the same week. That is why understanding the correct flare type is not some niche detail. It is a basic part of doing reliable brake repairs — built tough and done right, every time.
This guide is built to clear that up. We will explain what a bubble flare is, how it compares with a double flare, why the Imperial 293-F bubble flare tool matters in metric brake work, how to make a clean bubble flare, and when a bubble flare tool belongs in your regular kit. If you want the wider context first, our flaring tool overview gives a broader look at how different flare styles fit different jobs.
The focus here stays on metric brake system flaring. We are not drifting into unrelated brands or unrelated tool categories. The whole point is to help you choose the right flare method for the right fitting, avoid common mistakes, and get professional results on vehicles that need ISO-style bubble flares instead of the more familiar double flare approach.

What is a Bubble Flare?
A bubble flare is a round, convex flare formed on the end of brake tubing so it can seal properly against a concave fitting seat. Visually, it looks different from a double flare because the tube end is formed into a smooth, outward bubble rather than being folded back into itself. That shape is the reason the tool and process are different. A bubble flare is not just a half-finished double flare — fair dinkum, it is its own flare design, made to match its own fitting style.
In practice, bubble flares are commonly associated with ISO and DIN-style brake systems, especially on European vehicles and many Japanese applications. That is why people searching for a metric bubble flare tool or brake flaring tool metric are usually trying to solve a fitment problem. They have a vehicle with metric brake lines and a fitting seat that will not accept a standard double flare correctly.
The fitting side matters just as much as the flare. A bubble flare sits into a concave fitting interface, so the flare shape and the seat shape have to work together. If you make the wrong flare for the seat, the joint may tighten, but that does not mean it is correct. A poor match can distort the flare, seal badly, or fail under service pressure. That is why the flare type should always follow the fitting design, not personal preference or habit.
Metric tubing sizes are a big part of the bubble flare conversation too. In brake work, common sizes are often discussed in millimetres rather than the imperial sizes some mechanics are more used to. That is why bubble flare jobs often overlap with conversations about 4.75 mm, 6 mm, 8 mm, and 10 mm tubing. Those size references matter because a tool must match the tubing you are actually forming, not just the brand badge on the case.
This is also where bubble flare work can confuse people crossing over from other trade areas. If you come from plumbing or HVAC, you may already know about other flare styles and other fittings. The basic principle is similar in that the flare must match the seat, but the exact shape and application are different. That is why our article on HVAC flaring options is useful only as a contrast. It helps show why brake-line flare selection has to be much more exact.
A lot of people call a bubble flare "almost a double flare", but that shortcut causes plenty of trouble in workshops. A real bubble flare is a finished metric brake flare, not a halfway point on the way to something else. Treating it as close enough is how leaks happen.
In simple terms, a bubble flare exists because certain brake systems were designed around that shape. If the car uses it, the right tool is not optional. That is why bubble flare knowledge matters so much in modern mixed-fleet servicing across Australia — whether you are in a city workshop or a regional shed.
Once you understand that the flare and the fitting are a matched pair, the rest of the process becomes much easier to follow. You stop asking which tool is more popular and start asking which tool matches the seat in front of you. That is the better question every time, and it will save you tube, time, and call-backs.
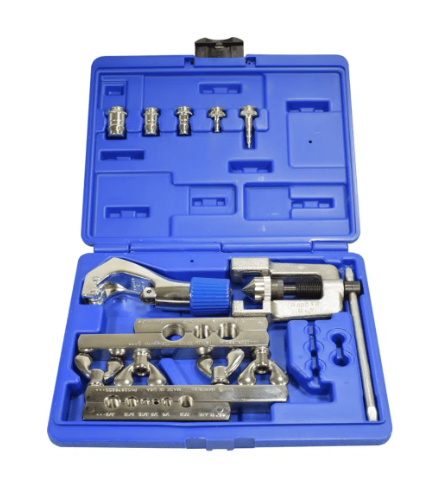
Bubble Flare vs Double Flare
The easiest way to understand bubble flare vs double flare is to compare the shape, the standard behind it, the vehicle types that use it, the tubing sizes you usually see, the tool required, and the kind of fitting seat it works with. Both belong in brake-line work, but they are not doing the same job and they are not meant to seal in the same way. Spot on flare selection is the difference between a clean repair and a callback.
| Feature | Bubble Flare | Double Flare |
|---|---|---|
| Shape | Round, convex bubble shape | Folded flare with the tube wall doubled back on itself |
| Standard reference | ISO and DIN-style metric brake systems | SAE-style brake systems |
| Vehicle use | European vehicles and many Japanese applications | Many American systems and older brake-line repair patterns |
| Typical sizes | 4.75 mm, 6 mm, 8 mm, and 10 mm metric tubing | 3/16 inch and larger imperial sizes depending on system |
| Tool required | Dedicated metric bubble flare tool (e.g. Imperial 293-F) | Double flare tool (e.g. Imperial 93-FB, Robinair 6503) |
| Fitting interface | Seats into a concave fitting surface | Matches a different seat style designed for the double flare profile |
| Forming stages | Single-stage operation — finished bubble is the correct result | Two-stage operation — first bubble is folded back into a second stage |
The biggest workshop mistake here is assuming one tool can cover both jobs because the tubing looks similar. It cannot. A bubble flare tool creates the finished convex flare in one operation. A double flare tool usually creates a first-stage bubble and then folds it back into a second-stage flare. That extra stage is the difference. If the fitting wants a bubble flare, stopping at the correct bubble shape is the right answer. Turning it into a double flare would actually make it wrong for that fitting — a ripper mistake if you are not watching for it.
This is why our double flaring guide is useful as a companion read rather than a substitute. It shows clearly that the double flare belongs to a different fitting system and a different service logic. Comparing the two helps mechanics understand why one neat flare is not automatically the correct flare.
Vehicle background matters too. European brake line flaring often points you toward ISO bubble flare systems. Japanese vehicles can also bring metric brake flare requirements into the workshop. American systems more often lead the conversation toward double flares. In Australia, with so many imported vehicles and mixed fleets on the road, that comparison is not academic. It is the difference between choosing the correct repair method and making extra work for yourself.
The practical rule is simple. Check the fitting, confirm the flare type, confirm the tubing size, then choose the tool. That order matters more than brand preference or habit — and it will keep the repair solid every time.
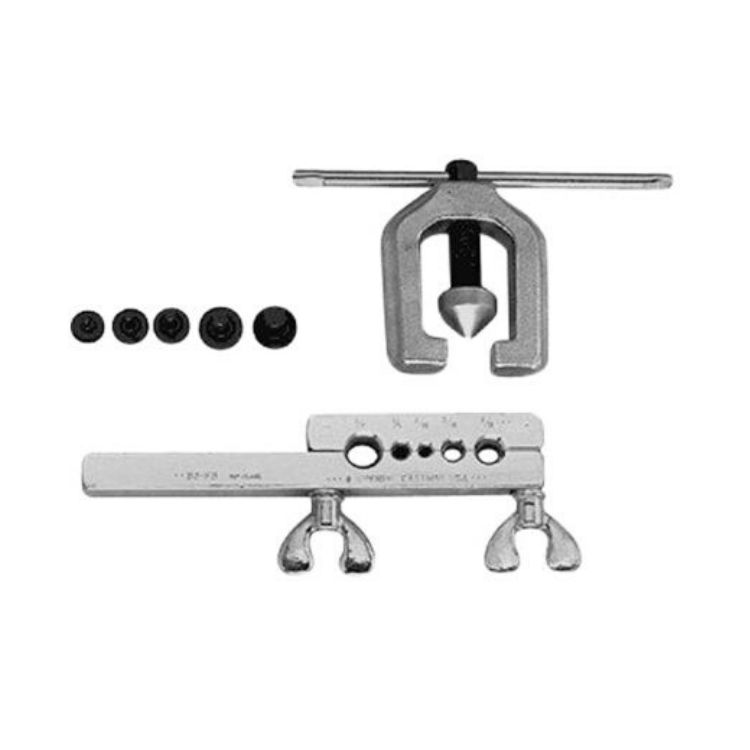
Imperial 293-F Metric Bubble Flaring Tool
The Imperial 293-F Metric Bubble Flaring Tool matters because it is built specifically for the kind of metric brake work that catches general flare kits out. If you are working on European or Japanese vehicles and need a one-operation bubble flare, a tool like this makes sense because it is designed around the correct finished shape rather than trying to be all things to all jobs. No worries about over-engineering — it does exactly what metric brake work needs, and that is the point.
When people search for the imperial 293-f bubble flaring tool, they are usually looking for a purpose-built answer to metric brake line repairs. That is the key point here. The value is not just the name on the tool. The value is that the design matches the flare style required by many metric brake fittings.
The size range matters too. This tool is commonly associated with metric tubing sizes from 4.75 mm up to 10 mm, which puts it squarely into the sort of work that comes up on imported vehicle brake systems and broader metric service jobs. That is a strong reason it stays relevant in Australian workshops where metric brake line sizing is part of normal daily work rather than some rare edge case.
Its one-operation bubble flare approach is another reason it stands out. Unlike double flare tools that need the second fold-back stage, the Imperial 293-F is aimed at producing the finished bubble flare in the one correct forming action. That helps remove one of the most common mistakes in mixed-fleet repairs, where a mechanic keeps going into a second stage simply because that is what they are used to doing with a double flare tool.
From a design and operation point of view, the real benefit is fit for purpose. A metric bubble flare tool should hold the line correctly, align the forming action properly, and help the user produce a neat convex flare that suits the matching concave fitting seat. That sounds basic, but in brake work, basic and correct is exactly what you want. A ripper result here means a leak-free connection that stays sealed through heat cycles, road vibration, and repeated servicing.
For Australian buyers, availability matters as much as the design. A tool can look excellent in a catalogue, but if it does not match the local mix of imported and metric-service vehicles, or if it is hard to source when needed, it loses practical value fast. That is why it helps to compare the dedicated product against the wider range of metric flaring tools rather than treating every flare kit as interchangeable.
The Imperial 293-F covers metric tubing from 4.75 mm to 10 mm in a single-stage bubble forming action. If you service European or Japanese vehicles regularly, this is the tool that stops you reaching for a double flare kit out of habit and ending up with the wrong flare for the seat.
Used properly, a tool like this helps take the guesswork out of metric brake flaring. It does not replace good preparation or careful inspection, but it does put the correct flare style within reach when the job calls for it.
That is what gives it value in a real workshop. It is not trying to be universal. It is trying to be correct for the jobs that need it, and that is exactly how specialty brake tools should be judged — mate, that is the standard worth holding to.
How to Make a Bubble Flare
If you want to know how to make a bubble flare, start with the same discipline you would use for any brake line repair. Cut the tubing cleanly and square. If the cut is rough, angled, or crushed, the flare is already starting from a bad position. After cutting, deburr the inside and clean the outer edge so the forming action is not fighting swarf or distortion. Good prep is what separates a clean first attempt from a job that needs doing twice.
Once the line is prepared, position it in the correct die or clamp for the tool you are using. Height matters here. Too high and the bubble can mushroom badly. Too low and there may not be enough material for the flare to form properly. This is one of the most common reasons people think the tool failed when the real issue was setup. Take a moment to check the projection height before you wind on any pressure — it is worth it.
With a metric bubble flaring tool such as the Imperial 293-F, the forming action is a single-stage operation. That is the big difference from double flare work. You are not making the first-stage bubble and then folding it inward. You are making the finished bubble flare that will seat against the concave fitting. That is why it helps to slow down and remind yourself what the finished shape is meant to be before you start winding on pressure.
Apply pressure steadily and keep the tool aligned. The aim is to form the bubble flare cleanly, not crush the tube. A correct bubble flare should look even, rounded, and centred. It should not be torn, lopsided, or flattened where it should be smooth. If it looks wrong, remake it. Brake line flaring is not the place to hope the fitting will somehow correct a poor flare — that is a shortcut that ends in a call-back or worse.
Inspection criteria are simple but important. Check that the flare is symmetrical. Check that the surface is smooth. Check that the flare shape matches the fitting seat you intend to use. Then check the assembled connection properly under pressure as part of your leak test. A flare that looks good on the bench but leaks under system pressure is still a failed repair.
If you are learning how to bubble flare brake lines, it also helps to keep the job mentally separate from double flare work. The line may be brake tubing, but the finished flare is different. If you keep that distinction clear, you are much less likely to slip into the wrong process by habit.
When changing from double flare work to bubble flare work, say the finished flare type out loud before you start. It sounds simple, but it helps stop that muscle-memory mistake where someone keeps going into a second stage that the fitting never wanted. Old habits in the shed can be stubborn — this one quick check is worth every second.
Another practical reminder is to make sure the tube nut is already on the line before you form the flare. That small oversight wastes more brake tube than most people like to admit. Good flare work comes from good habits, and that is one of them. Fair dinkum, it is the kind of thing that only needs to happen once before you add it permanently to your process.
It also helps to practise on spare tubing before you commit to the line you actually need. A few test flares tell you a lot about projection height, tool feel, and whether your prep routine is working properly. That is cheap learning compared with redoing a fitted brake line later.
When You Need a Bubble Flare Tool
You need a bubble flare tool when the brake fitting and vehicle system call for a bubble flare, not because the tool happens to be sitting nearest to hand. In practice, that often means European vehicle brake work, many Japanese vehicle systems, and any job where the brake line sizing and fitting seat point clearly toward metric flare standards. If the fitting is concave and the system is metric, the bubble flare tool is the one to reach for — spot on, every time.
This is why bubble flare tools matter so much in Australian import vehicle servicing. Workshops across the country see a mix of European brands, Japanese models, and newer imported vehicles that do not all follow the same brake flare patterns as older local-market systems. If your toolkit only covers double flares, you are going to run into jobs where the tool does not match the fitting. That is a problem that a bubble flare tool solves cleanly.
Metric brake line sizing is another clue. If the job is being discussed in 4.75 mm, 6 mm, 8 mm, or 10 mm terms rather than the imperial sizing many mechanics first learn, that is a strong sign you should slow down and confirm whether a bubble flare tool belongs in the job. It does not guarantee it, but it is one of the warning flags that says "check the fitting before you start." A few seconds of confirmation here beats a ruined line every time.
A professional mechanic toolkit should reflect the reality of the fleet being serviced. That means a bubble flare tool is not some obscure specialist item if you work across imported cars, mixed fleets, or general brake-line repairs on modern vehicles. It is simply one of the tools needed to match the systems you actually see. Any tradie worth their salt working in the current Australian import vehicle market should have one in the kit.
This is where the broader brake line flaringFlaring Tool Guide for Brake and HVAC Work in Australia article helps too. It gives the wider brake repair context, while the bubble flare discussion here narrows in on the metric and fitting-specific side of the job. Together, they help workshops avoid the trap of treating every brake flare as basically the same.
You also need a bubble flare tool when you want to avoid forcing a wrong-method repair onto the vehicle. That sounds obvious, but it is the real reason the tool earns its place. It is there so the correct flare can be produced for the correct system, rather than improvising and hoping the line seals. In other words, the tool is not there to make the job more complicated. It is there to stop the repair becoming more complicated later because the wrong flare was forced into the wrong fitting.
Australian ADR Compliance and Bubble Flare Standards
This section matters more than most DIY guides let on. In Australia, road-registered vehicles must comply with the Australian Design Rules — the ADRs — and brake systems sit near the top of that compliance list. ADR 31 covers brake system performance and ADR 35 covers braking requirements for specific vehicle classes. What that means in practice is that a brake line repair must produce a dependable, leak-free result that holds up under the load, temperature, and road conditions the vehicle is designed for. A mismatched or poorly formed bubble flare puts that compliance at risk.
For workshops across New South Wales, Victoria, Queensland, Western Australia, and the other states and territories, roadworthy certificate requirements reference the ADRs as their baseline. A vehicle presenting for inspection with a brake line flare that does not match the fitting seat, leaks under pressure, or was formed with the wrong tool for the fitting style can be failed and sent back for repair. That is not a theoretical risk. It is a regular occurrence in workshops that have not kept pace with the metric brake systems on imported vehicles.
The ISO bubble flare standard is the relevant reference for metric brake systems. ISO 4038 covers the bubble flare geometry, and the matching fittings are designed to work with that specified shape. When a vehicle's brake system was engineered to that standard, the repair has to meet it too. Using a double flare on an ISO bubble flare fitting because the tool was already on the bench is not a shortcut — it is a compliance failure waiting to happen.
For Australian mechanics and DIYers who want to understand the broader standards landscape around automotive brake components and fittings, Standards Australia is the right place to start. It covers the Australian-adopted versions of ISO standards relevant to hydraulic brake fittings and tubing, and it helps cut through confusion about which standard applies to which vehicle and system type.
The practical takeaway is simple. If the vehicle uses a metric ISO bubble flare system, the repair must produce a correct ISO bubble flare. That means the right tool, the right tube size, the right fitting, and a proper pressure test before the vehicle goes back into service. That is not just good workshop practice. In Australia, it is the compliance baseline for any brake repair on a road-registered vehicle — built tough and done right.
Australian Design Rules ADR 31 and ADR 35 require brake systems on road-registered vehicles to perform reliably under all load and temperature conditions. A bubble flare made with the wrong tool, the wrong technique, or fitted to the wrong seat can result in a failed roadworthy inspection, voided insurance, and — most critically — a brake system that cannot be trusted when it matters. Match the flare to the fitting. Test it under pressure. Do not compromise on brake line work.
Bubble Flare Safety and Standards
Bubble flare safety starts with one idea: the flare has to match the fitting seat exactly enough to create a dependable seal under brake pressure. That is why discussions around ISO bubble flare specifications matter. You do not need to turn every job into a lecture on standards. You do need to understand that the flare profile, tube size, fitting, and seat all have to work together — and that when they do not, the problem usually shows up at the worst possible moment.
Proper seating requirements are a practical safety issue, not just a technical one. A bubble flare is designed to sit into a concave fitting interface. If the flare is the wrong shape, off-centre, badly formed, or made for the wrong fitting style, the joint may tighten but still not seal correctly. That is why careful inspection matters just as much as the forming step. Looking is not testing. A pressure test under load is the only way to be sure.
Pressure testing is where the truth comes out. A finished flare should never be judged only by how neat it looks in your hand. It has to survive the actual system test. Brake repairs are too important to rely on looks alone. Any experienced tradie will tell you the same — the flare that looked ripper on the bench and leaked at 50 km/h is the one that sticks in your memory.
Australian vehicle compliance is not about memorising one perfect phrase from a standard. It is about doing the repair in a way that is safe, suitable for the vehicle, and consistent with proper workshop practice. That means confirming the flare type, using the correct tubing and fittings, forming the flare cleanly, and pressure testing it properly before the vehicle goes back into service. Those steps are not negotiable on a safety-critical system.
Professional installation matters when the job is beyond your confidence, the tubing condition is poor, or the fitting style is unclear. There is nothing clever about gambling with a brake line because the flare "looked about right." A cautious mechanic who stops to confirm the correct flare type will nearly always do a better repair than someone who powers on with the wrong assumption. No worries about asking questions — that is what good workshop culture looks like.
In short, standards talk is only useful if it improves the real job. For bubble flares, that means using the correct tool, matching the flare to the seat, confirming the line size, and pressure testing the finished connection like it matters — because it does.
Get Metric Bubble Flaring Right
A bubble flaring tool earns its place when you are working on metric brake systems that need a true bubble flare rather than a double flare. That is the big takeaway. European and Japanese vehicles, metric brake line sizing, and concave fitting seats all point toward a different flare logic than the double flare jobs many mechanics learned first. Once you understand that distinction, the tool selection becomes straightforward — and the repair becomes something you can be confident in.
The Imperial 293-F bubble flare tool stands out because it is built around that exact metric brake task. It suits workshops and repairers who want the right flare style rather than forcing a double flare tool into jobs it was never meant to do. If you are working across imported vehicles regularly, it is a ripper addition to the tool kit.
If you are comparing broader options, the wider range of metric flaring tools is the practical place to review what suits your workflow. If you are unsure whether the job calls for a bubble flare, talk to our team to confirm compatibility or contact us for a quote. A few careful questions up front are a lot cheaper than cutting lines twice or fitting the wrong flare into a brake system. No worries about asking — it is always the smarter move.
To review the direct product path, see the Imperial 293-F metric bubble flare tool and match it to the vehicles, fitting styles, and metric brake work you actually service. That is the safest way to get metric bubble flaring right without guesswork — spot on from the first flare to the last.