Why Proper Evacuation Matters in HVAC Systems
If you are installing, repairing, or commissioning an air conditioning system, learning how to set up a vacuum pump properly is one of the most important skills you can develop. It is the stage where the system is cleaned internally before refrigerant is introduced, and it directly affects performance, reliability, and long-term system health.
Many issues that appear later, including poor cooling, unstable pressures, compressor strain, and repeat service calls, can often be traced back to poor evacuation. That is why experienced HVAC technicians treat this step as critical rather than optional. It is not just about connecting a pump and waiting. It is about building a clean, controlled setup that removes moisture, air, and contaminants properly.
If you are building your setup or upgrading your tools, you can explore the vacuum pumps collection at HVACShop.com.au to match your equipment with the type of work you handle daily.
A system is not ready because the pump ran for a certain amount of time. It is ready when the micron level is low and stable during a decay test.
Why Proper Evacuation Matters in HVAC Systems
Even when pipework looks clean and sealed, the inside of an HVAC system can still contain moisture and air after installation or servicing. This contamination may not be visible, but it has a direct effect on how the system performs once refrigerant is introduced.
Moisture inside the system can freeze at restriction points, leading to blockages that affect flow. It can also react chemically with refrigerant oil, forming acids that damage internal components over time. Air and non-condensable gases distort pressure readings, making diagnosis harder and reducing efficiency.
Evacuation solves these problems by lowering pressure inside the system so that moisture boils off and is removed by the vacuum pump. The result is a clean, dry internal environment that allows the refrigerant to operate as intended.
Water boils at room temperature under deep vacuum conditions. This is why proper evacuation removes moisture without needing heat in most HVAC systems.
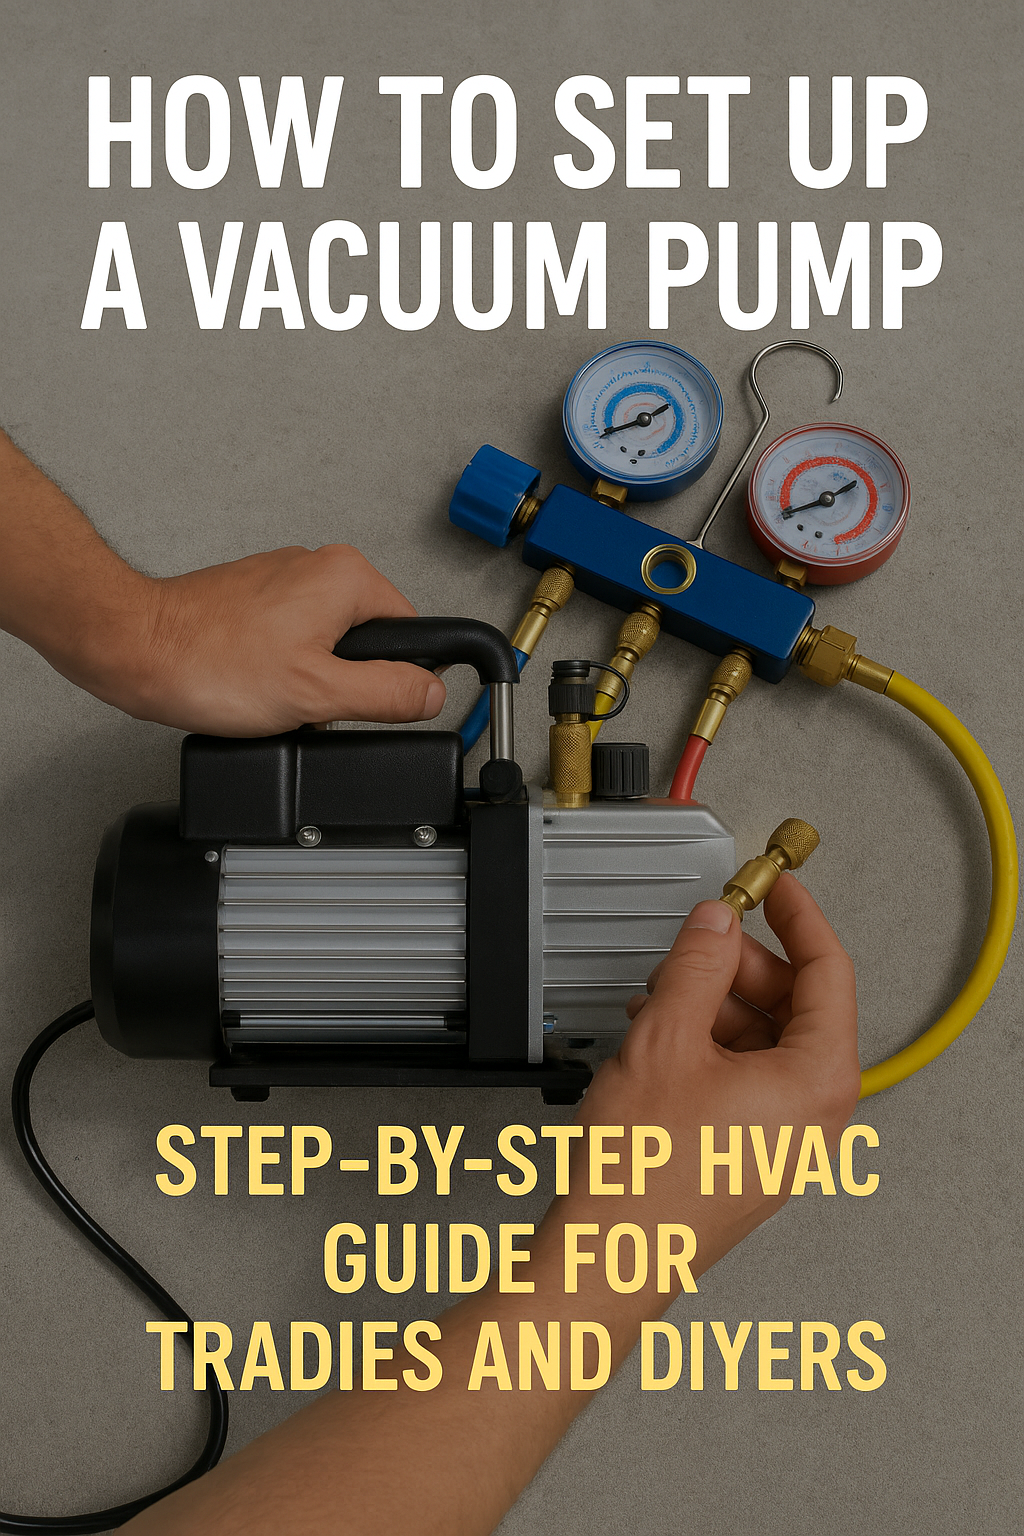
Tools Required for a Proper Vacuum Pump Setup

Before starting, it is important to understand that the quality of your setup directly affects how quickly and effectively the system can be evacuated. A good setup reduces restriction, improves flow, and makes it easier to confirm results accurately.
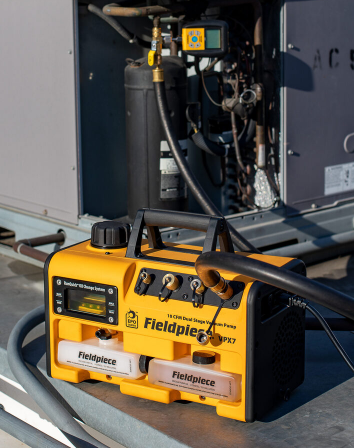
Vacuum Pump
A two-stage vacuum pump is standard for most residential and commercial work. The pump must be capable of achieving a deep vacuum consistently and handling the system sizes you work on regularly.
Hoses and Manifold Setup
The hose configuration plays a major role in evacuation speed. Larger diameter hoses with fewer restrictions allow vapour to move more freely. Poor hose setups are one of the most common reasons for slow pull-down times.
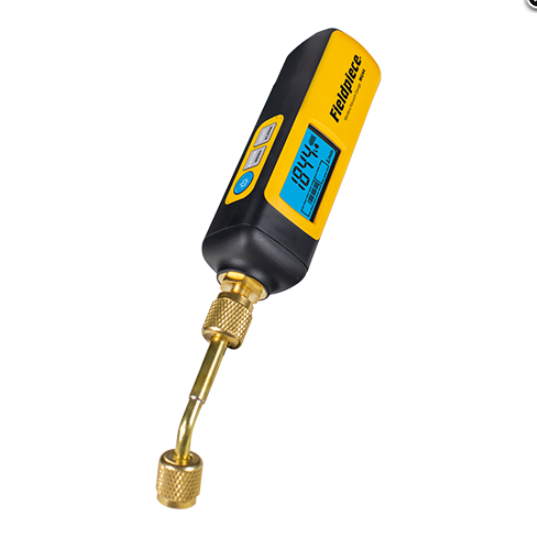
Micron Gauge
A micron gauge provides an accurate measurement of vacuum level. Without it, there is no reliable way to confirm that the system is dry. This tool is essential for professional work.
Valve Core Removal Tool
Removing Schrader valve cores reduces restriction and improves evacuation efficiency. This is especially useful on larger systems or when targeting deeper vacuum levels.
Vacuum Pump Oil
Fresh oil is critical for pump performance. Contaminated oil reduces efficiency and limits how deep the vacuum can go.
Typical HVAC evacuation targets:
• 500 microns – acceptable baseline
• 250–350 microns – preferred range
• Below 200 microns – deep evacuation, depending on the application
Step-by-Step: How to Set Up a Vacuum Pump
Setting up a vacuum pump correctly is a structured process. Each step builds on the previous one, and skipping details often leads to longer evacuation times or unreliable results.
Step 1: Inspect and Prepare Equipment
Start by checking the vacuum pump oil. If it appears cloudy, dark, or contaminated, replace it before starting. Clean oil allows the pump to operate efficiently and reach deeper vacuum levels.
Inspect hoses, seals, and fittings. Even a small leak in the setup can prevent proper evacuation and lead to misleading micron readings.
Step 2: Connect the System
Attach hoses to the system service ports and connect them to the vacuum pump. Ensure all fittings are tight and properly seated. Avoid unnecessary hose length, as this increases restriction.
Step 3: Install the Micron Gauge
Place the micron gauge at the system side rather than directly on the pump. This gives a more accurate reading of what is happening inside the system.
Step 4: Remove Valve Cores

Using a valve core removal tool, remove Schrader cores to improve flow. This can significantly reduce evacuation time and improve results.
Step 5: Start the Vacuum Pump
Turn on the vacuum pump and open the system valves. Monitor the micron level as it drops. The rate of change provides useful insight into system condition.
Step 6: Monitor the Vacuum Process
Watch how the micron level behaves. A steady drop indicates effective evacuation, while slow or unstable readings may suggest leaks, moisture, or restrictions.
Step 7: Perform a Decay Test
Once the target vacuum is reached, isolate the system and observe the micron level. A stable reading confirms that the system is dry and leak-free.
Step 8: Shut Down the Pump
Close system valves first, then turn off the pump. This prevents backflow and maintains vacuum integrity.
Step 9: Prepare for Charging
After confirming stability, reinstall valve cores and proceed with refrigerant charging according to manufacturer guidelines.
Common Evacuation Problems and Their Causes
Many evacuation issues come down to setup quality rather than equipment failure. Understanding these problems helps avoid wasted time on site.
| Problem | Likely Cause | Impact |
|---|---|---|
| Vacuum stalls above 1000 microns | Leaks or poor oil condition | Incomplete evacuation |
| Micron rises quickly | Moisture or system leak | Failed decay test |
| Slow pull-down | Restricted hoses | Longer job time |
| Inconsistent readings | Gauge placement issues | Misdiagnosis |
Real Tradie Insight
“Once I improved my vacuum setup and stopped rushing it, I noticed a big drop in call-backs. The systems just performed better from day one.”
Vacuum Pump Maintenance and Best Practices
Maintaining your vacuum pump ensures consistent performance. Regular oil changes, clean storage conditions, and proper handling all contribute to better results over time.
It is also important to cap ports when not in use and avoid contamination. A well-maintained pump reduces job time and improves reliability.
Safety and Compliance in Australia
Working with refrigeration systems involves safety and compliance responsibilities. Always follow proper handling procedures and local regulations. For official guidance, refer to Safe Work Australia for workplace safety standards.
FAQs
Do I need to evacuate every system?
Yes. Even new systems contain moisture and air that must be removed.
How long should evacuation take?
Time varies depending on system size and conditions. Always rely on micron readings instead of time.
Is a micron gauge necessary?
Yes. It is the only reliable way to confirm deep vacuum.
Mastering Vacuum Setup for Better HVAC Performance
Knowing how to set up a vacuum pump properly is a fundamental HVAC skill. It improves system efficiency, protects components, and ensures reliable performance from the start.
By using the right tools, following a structured setup, and confirming results with proper measurement, you can deliver better outcomes on every job. If you are upgrading your setup, start by choosing the right vacuum pump and evacuation gear suited to your workflow.