Getting the Bend Right
If you’ve ever wondered why one refrigerant line looks neat and runs quiet, while another one rubs, vibrates, or cracks later, the answer is often simple: the bend was wrong.
In HVAC work, “pipe bending radius” sounds like a workshop-only topic. But it shows up everywhere. It shows up when copper won’t sit behind trunking. It shows up when insulation won’t fit over a flattened bend. It shows up when a line set buzzes on a bracket because the bend forced the tube into the wrong spot.
Most call-backs linked to pipework don’t start as a “big failure”. They start as small stress points. A tight bend that pinches slightly. A corner that’s been forced into place. A curve that looks fine until the unit vibrates for a few months. Radius is often the quiet cause.
The goal of this guide is to help you get bends that are strong, round, and repeatable. Not just “looks okay from two metres away”. The kind of bends that pass inspection, protect oil return, and don’t create future call-backs.
We’ll cover what bend radius really means, how to measure it, how to calculate bend allowances, and what changes when you’re bending suction lines versus liquid lines. We’ll also keep it Australian and job-focused, with practical notes for Brisbane humidity, Sydney coastal air, and Melbourne cold snaps where copper can feel a bit stiffer on winter mornings.
If you want a broad refresher first, read Choosing the right Pipe Bender. This article zooms in on bending radius and specifications, because getting the radius right is what protects the tube, the flow, and your finish quality.
One quick language note: tradies often say “pipe” when they mean “tube”. In HVAC, we’re usually bending copper tube (ACR style) for refrigerant lines. The bend rules still apply. What matters is the outside diameter, the wall, and how the bend is formed.
And here’s the real-world target: your bend should land where you want it without you pushing, pulling, or twisting the run to “make it fit”. If you’re forcing copper into place, you’re storing stress. Stress is what turns into noise, rub-through, and cracks later.
Understanding Bend Radius and Angles
Bend radius is the “size” of the curve in your bend. A big, gentle bend has a large radius. A tight bend has a small radius. The tighter you go, the higher the risk of kinking, flattening, or wrinkling if the tube is not supported properly.
In HVAC, minimum bend radius is mainly about two things. First, keeping the tube round so flow stays clean and predictable. Second, keeping the copper strong so it doesn’t crack later from vibration or stress.
Radius matters for flow because a tight bend increases turbulence and pressure drop. On a suction line, that can affect performance and oil movement. On a liquid line, a crushed section can become a restriction that is hard to diagnose later. Even if the system “runs”, the bend can still be a weak point.
Most benders and bend charts talk about centre-line radius (CLR). That’s the radius measured to the centre of the tube wall, not the inside edge or the outside edge. CLR is useful because it stays consistent across wall thickness and it matches how bending tools are designed.
Minimum bend radius explained
Minimum bend radius is the smallest curve you should make without damaging the tube. The catch is that “minimum” depends on the tube, the tool, and the method. A proper bender with the right former can do a tighter bend than bending by hand. A cheap or worn former can flatten tube even at a “safe” radius.
So instead of chasing one magic number, think in checkpoints. Can your bender support the tube properly? Are you bending soft copper coil or hard drawn straight lengths? Are you keeping the tube aligned with the former? Those are the real controls that decide whether your radius stays healthy.
A useful jobsite mindset is “smooth and supported beats tight and forced”. If the only way to hit a corner is to crank a tight bend with poor support, you’re usually better off changing the route, adding clearance, or using a tool that can form the radius properly.
Why radius matters for flow
Flow problems from bad bends usually show up as restrictions, noise, and vibration. A kink is obvious. But a flat spot can be sneaky. The system may still cool, but you’ve made the line less efficient and harder to service later.
Oil return is another reason radius matters. Refrigerant lines are not just “gas pipes”. They carry oil back to the compressor. Sharp bends, repeated tight bends, and poor routing can create oil hang-up points. That’s why good bending is part of good piping practice, not a separate “nice to have”.
If you want the bigger picture on routing, protection, and how installs stay neat behind covers, read HVAC accessories that protect line sets and improve finishes. Bend radius sits inside the wider job of making lines that drain, support, and last.
On real installs, radius also affects insulation and finish. A bend that’s a bit oval can make armaflex split at the seam, or it can make trunking lids fight you. When you’re working fast, those little hassles turn into time leaks across the day.
Center-line radius (CLR) calculations
Here’s a simple way to picture CLR. If you drew a line down the centre of the tube, the curve of that centre line is the CLR. Many benders are built around a fixed CLR because the former is a fixed shape.
If you know your CLR and your bend angle, you can work out how much tube length is “used” inside the bend. That matters for accurate measuring and for bends that land in the right spot without forcing the tube.
On jobs where everything is tight, that accuracy is what stops copper being pushed into place. Forced copper looks messy and it stays stressed. Stress is what turns into rub-through, vibration cracks, and annoying call-backs.
When you’re measuring, think about where the bend actually starts and ends. Most benders form a bend between two “tangent points”. If you always mark from the same reference point and you always seat the tube the same way, your CLR behaviour becomes predictable.
Common HVAC bend angles (90°, 45°, offset)
In day-to-day HVAC work, most bends are 90° corners, 45° changes, and offsets. Offsets are the ones that catch people out, because you’re doing two bends and they must line up in the same plane. One small twist and your tube looks like a corkscrew.
Angles also link to springback. Copper will “relax” a little after you bend it. Soft copper will spring back less than hard copper, but it still happens. The cleaner your method, the more predictable your final angle becomes.
When you’re working in a ceiling or a plant room, it’s easy to focus only on “making it fit”. But your aim should be “making it fit without stress”. That’s the difference between a neat install and one that slowly works loose.
Tech Specs
Bend radius is best managed by tool choice. A bender former sets the centre-line radius (CLR). If you need tighter bends, you need a bender designed for that radius and tube size. Don’t force a tighter radius than your former can support, because that’s when flattening and kinks show up.
Tube Size and Bending Specifications
Tube size is the starting point for bending specs. Bigger tube needs more support. It also shows damage more clearly. A slightly oval bend on 1/4" might still look “fine”. The same oval on 7/8" can be obvious, hard to insulate, and more likely to vibrate.
In HVAC, we commonly talk in imperial sizes for copper (like 1/4" and 3/8"), even though we measure runs in metres and clearance in millimetres. That’s normal. The key is to keep your measuring consistent on the job so your bends land where you want them.
If you’re ever unsure about what you’re actually holding in your hand, the sizing and tube O.D. sections in this pipe bender selection guide are a helpful reference. Bend quality starts with matching the right former to the right outside diameter, not “close enough”.
The table below gives practical guidance using a rule-of-thumb approach. It is not a replacement for a bender’s manufacturer specs. Different benders and dies have different CLR. Use this table to think in radius “multiples” and to stay conservative when you’re unsure.
| Common HVAC tube size | Outside diameter (approx, mm) | Wall thickness note | Conservative radius mindset | When tighter bends are realistic |
|---|---|---|---|---|
| 1/4" | 6.35 | Varies by tube type; confirm tubing marking/datasheet | Use a sweep where possible; avoid hand-kinks in tight spots | With a matched former and careful alignment |
| 3/8" | 9.52 | Varies by tube type; confirm tubing marking/datasheet | Conservative bending helps keep the tube round under insulation | With a lever/ratchet bender designed for the size |
| 1/2" | 12.70 | Varies by tube type; confirm tubing marking/datasheet | Prefer supported bends and avoid “push bends” by hand | With correct former, steady bend, and no twisting |
| 5/8" | 15.88 | Varies by tube type; confirm tubing marking/datasheet | Be careful with tight turns near wall penetrations | With correct tool support; watch ovality as a quality check |
| 3/4" | 19.05 | Varies by tube type; confirm tubing marking/datasheet | Conservative sweeps reduce restriction and help oil movement | With robust bender support; avoid twisting under load |
| 7/8" | 22.22 | Varies by tube type; confirm tubing marking/datasheet | Plan sweeps where possible; tight bends amplify mistakes | Only when the bender is designed for the tube and radius |
Soft versus hard copper changes how bends behave. Soft (annealed) copper coil is more forgiving and tends to form smoothly when supported. Hard copper (hard drawn) fights more, springs back more, and can wrinkle or crack if you try to bend too tight or too close to an end.
If you’re bending hard copper, tool support becomes non-negotiable. Trying to “hand bend” hard copper to a tight radius is how you get kinks, ripples, and wasted tube. In winter, when copper feels stiffer, this gets worse. Melbourne early-morning installs can make bad habits show up fast.
A practical rule on hard copper is to avoid bending close to critical points. If you’re bending right near a flare, right near a braze, or right where a line passes through a wall, you’re stacking risk. Give yourself room so the tube can form cleanly and you still have straight length where you need it.
Aluminium bending has its own rules. Aluminium can crack if you bend it too tight or if the material has work-hardened. It also marks easily. If you’re dealing with aluminium sections, stay conservative, use proper tools, and test on offcuts first. If you’re unsure, the safest move is to follow the manufacturer’s bend guidance for that material and application.
Now, a point that matters in modern installs: refrigerant type and manufacturer requirements can change what “acceptable” pipework looks like. R32 and R410A systems still use the same basic copper bending principles, but the safest habit is to follow the unit maker’s piping instructions for minimum bend quality, routing rules, and any special requirements for the application.
If you’re working on systems where the piping detail matters (and it usually does), keep a close eye on R32 Compatibility and Tool Requirements. Even when your bend radius is fine, the bigger failures often come from poor routing, poor support, and rushed workmanship around joints and terminations.
One more important point: “tube bending” versus “pipe bending”. In most trades, pipe refers to nominal bore sizes and wall schedules, and tube refers to outside diameter. In HVAC, when you say “pipe bending radius”, you’re usually talking about tube outside diameter and keeping the copper round. So always think in outside diameter and the bender former size.
Calculating Bend Allowances
If you want bends that land perfectly, you need to think about bend allowance. Bend allowance is the length of material that is “used up” in the curved section of the bend.
This matters on real jobs because the difference between “looks neat” and “forced into place” is often a few millimetres. Forced copper is stressed copper. Stressed copper is more likely to vibrate, rub, and crack later.
In practice, bend allowance is what stops you ending up short. It’s also what stops you ending up long and then trying to “pull the bend around” to make it line up. If you’ve ever had a line that only fits when you hold it with one hand and swear with the other, that’s usually allowance and planning.
Bend allowance formulas
A simple bend allowance method that works well on-site is based on arc length. The idea is easy: the bend is part of a circle, and the arc length depends on the radius and the angle.
Arc length can be estimated as: arc length = (bend angle ÷ 360) × (2 × π × CLR). You don’t need to love maths. You just need to understand that bigger radius or bigger angle uses more length.
Here’s a simple example. If you have a 90° bend and your tool’s CLR is 50 mm, the arc length is about a quarter of the circle: (90 ÷ 360) × (2 × π × 50). That works out to roughly 78.5 mm of tube “used” in the bend.
On a big commercial job with repeat bends, this kind of thinking helps you pre-measure runs so your bends land clean on brackets, penetrations, and valve positions.
Even on small splits, it helps. Indoor unit exits are often tight. If you take the time to mark and allow properly, the pipework sits naturally, your flare sits straighter, and the trunking finish is cleaner. Those are the details customers notice, even if they don’t know why.

Springback compensation
Springback is when the tube relaxes a little after you bend it. It’s normal. Soft copper will still spring back. Hard copper usually springs back more.
The practical way to manage springback is to test on an offcut of the same tube. Bend to your target angle. Let it relax. See what angle it settles on. Then adjust your technique by a small amount to hit the final angle you want.
The key is to avoid “bend past, then yank back” as your normal method. Pulling a bend back can work-harden the copper and increase the chance of cracking later, especially near vibration points.
Springback is also why consistency matters. If you change tools, change operators, or change material type mid-job, expect the “feel” to change. Test early, then keep it consistent for the run.
Material elongation factors
When you bend tube, the outside wall stretches and the inside wall compresses. That’s part of bending. If you bend the same spot again and again, you keep stretching and compressing the same copper. That’s how tube gets tired.
This is why clean measuring matters. One accurate bend is better than three “correction” bends. If you miss the angle, it’s often safer to remake the section than to keep reworking the same curve.
On vibration-prone installs, like condenser brackets on a lightweight wall or long vertical risers, tired copper is not your mate. A bend that has been worked multiple times is more likely to crack where it’s been stressed.
Precision measuring techniques
Good measuring is simple and repeatable. Mark your start points clearly. Keep your marks consistent (centre line marks are usually easiest). Keep the tube in the same plane as you bend. And always dry-fit your route mentally before committing to the first bend.
On tight installs, measure clearances for insulation, not just bare copper. A bend that fits bare copper can become a problem once insulation is on. This is common behind indoor units where you have limited depth and trunking needs a clean exit.
Another practical habit is to plan your bend order. If you make the hardest bend first, you might block access for the second bend. If you do a simple bend first, you might create a reference line that keeps the rest in the right plane.
When you’re doing offsets, the “plane control” is everything. A neat offset is two clean bends in the same plane. A messy offset is two bends plus a twist, which then becomes a stress point when you clamp it down.
Australian measurement standards (metric focus)
In Australia, most site measurements are metric. That’s good. Use millimetres for bend planning, especially when you are working around brackets, penetrations, and cover clearances. Keep imperial tube size in mind for the bender former, but keep the layout in metric so the install lines up clean.
If you’re working with apprentices, this is a simple win: teach them to think in millimetres for clearances and offsets. It reduces mistakes, especially when jobs mix trunking sizes, wall penetration sleeves, and equipment spacing.
Pro Tip
Make a “test coupon” from offcut tube. Write the tube size, tool used, and the springback you saw for 45° and 90°. Keep it in the van. That one small habit saves time when you’re under pressure on-site.
Refrigerant Line Bending Best Practices
Refrigerant lines are not decorative. They affect performance, reliability, and serviceability. Bending best practice is about keeping the tube round, keeping the run supported, and keeping the routing friendly for oil return and vibration control.
It’s also about future servicing. A bend that blocks access to a flare nut, hides a joint where it can’t be inspected, or forces insulation to tear is a bend that makes the next tech’s day harder. On commercial maintenance, that matters.
Suction line vs liquid line considerations
Suction lines are larger and usually insulated. They also carry returning oil. That means bends should be smooth and not crushed. A tight, flattened bend on a suction line can make noise and reduce capacity. It can also make insulation difficult, which can create condensation issues later in humid areas like Brisbane.
Liquid lines are smaller and can be easier to bend, but they can still be damaged. A kink or flat spot on a liquid line can become a restriction that looks like a “mystery” fault later. So the rule stays the same: support the bend and keep it round.
One common trap is bending too close to a flare. If the copper is still slightly oval or stressed near the flare seat, you can end up with a flare that looks fine but is more likely to weep later. Give yourself straight length and a clean, round section where the flare is formed.
Oil return angle requirements
Oil return depends on good pipework layout. Bend radius plays a part because sharp or damaged bends can slow flow and become oil hold-up points. On vertical sections, oil return becomes even more important. If you’re not sure what the manufacturer expects for your system type, confirm it in the unit manual and design notes.
If you want a strong overall framework for how installs stay tidy and protected behind covers, go back to line set protection and finish accessories and check your routing against the core principles: support, drainage, protection, and service access.
Where oil return problems show up on-site is usually “we did everything right, but the compressor sounds rough” or “the system is noisy under load”. Before you chase exotic faults, look at the basics: long runs, repeated tight bends, and any spots where lines dip and rise unpredictably.
Trap and riser specifications
Many systems use traps and riser strategies to support oil return in vertical runs. The exact details vary by manufacturer and system design. The best habit is to follow the manufacturer’s guidance and keep bends clean and supported so traps do their job properly instead of becoming random restrictions.
A common mistake is forcing a bend to “make it line up” with a riser. That creates stress and can shift the trap position. Plan your bends so the tube naturally lands where it should, without having to push or pull the run into place.
On multi-storey jobs, a small bend mistake gets amplified because the run is long. If the bottom section is forced, the top section usually becomes a fight as well. Clean planning early makes the entire riser cleaner and faster.
Vibration loop bending
Vibration loops are used to reduce stress from compressor vibration and movement. Bend radius matters here because a loop that is too tight can concentrate stress, and a loop that is flattened is not a good spring. The loop should be smooth, round, and positioned so it cannot rub on brackets or walls.
On coastal jobs around Sydney, corrosion and vibration can team up. If copper is rubbing and the bend is stressed, problems can show up earlier. Give your bends space, support, and clean routing so the tube is not fighting the building.
A good loop also needs clearance. If you build a loop and then clamp it hard against a bracket, you’ve removed the benefit. Plan the support points so the loop can do its job without turning into a rub point.
Manufacturer warranty compliance
Most manufacturers expect refrigerant pipework to be installed to their guidelines. That includes bend quality. If a line is kinked, crushed, or routed poorly, it can become a warranty argument later. So take photos where it makes sense, keep notes on what you did, and keep the work neat and consistent.
The safest approach is to treat bend quality like brazing quality. If you wouldn’t accept a messy braze joint, don’t accept a stressed bend hidden behind insulation.
When in doubt, confirm the “how to confirm” basics: check the unit manual, check the line set spec, and check the minimum clearances for service. If you can’t verify it, don’t assume it.
Common Bending Problems and Solutions
Most bending problems come from a small set of causes: wrong tool for the tube size, poor alignment, bending too tight, or trying to correct the same bend over and over. The fix is usually to slow down and follow a repeatable method.
A good way to think about quality is “round, smooth, and in one plane”. If you tick those three boxes, most bend issues disappear. If you miss one of them, problems start stacking up.
Kinking causes and prevention
Kinks happen when the inside wall collapses. This is common when you try to bend too tight without support, or when you twist the tube as you bend. Kinks are not “a bit ugly”. They are a serious restriction and a weak point. In most cases, the best fix is to cut it out and redo the section.
Prevention is straightforward. Use the correct former size. Keep the tube seated. Bend smoothly. And make sure your bend is in one plane. If you are trying to bend in a ceiling space and you can’t keep alignment, that’s a sign you need a different tool or a different bend plan.
If you’re getting repeated kinks on the same size, don’t blame the copper first. Check the former condition, check alignment, and check whether you’re bending too close to the end of the tube where it can’t support itself properly.
Flat spots and wall thinning
Flat spots are often caused by poor support or a worn former. They can also happen if you bend the tube against a hard edge, like a knee, a timber, or a bracket. Flat spots reduce the internal area and can create noise and flow losses.
Wall thinning is harder to “see”, but it can show up as a shiny stretched area on the outside of the bend. If a bend looks stretched, uneven, or marked, treat it with caution. A thin section is more likely to crack later under vibration.
In high-vibration areas, even small flat spots can become the first place a crack starts. If the bend is near a compressor, near an outdoor unit connection, or where pipes run through metalwork, be more conservative. Clean bends last longer.
Rippling and wrinkling
Ripples and wrinkles usually show up on the inside of the bend. They can happen when the tube compresses too much, especially on hard copper or when the bend radius is too tight. Mild rippling can be a sign you are pushing the limits of the tool and tube. Heavy rippling is a red flag that the bend is not healthy.
If you see wrinkling, treat it as a warning that your radius is too tight for your setup. That’s the moment to change the plan, not to keep pushing and hope it “looks better” after insulation.
Springback issues
If your bends keep landing “open”, you are seeing springback. The fix is to account for it with a controlled extra bend, not a bend-and-yank correction. Test on offcuts, record what you see, and repeat the same approach.
Springback issues often get worse when you rush. A slow, steady bend gives more consistent results than a quick hit. That matters when you’re trying to land offsets neatly behind trunking.
Quality inspection methods
Inspection does not need to be fancy. Look down the tube. Check for oval shape. Run your hand along the bend and feel for a sharp point or crease. Check that insulation will slide over smoothly. Check that the bend does not push the run into a rub point.

If you want to sharpen your basics and improve bend quality fast, read proper manual bending techniques. Good radius is not just “radius”. It is setup, alignment, and control.
Another quick inspection habit is to think about “future movement”. If the bend sits hard against a bracket, wall, or edge, ask yourself what happens when the unit vibrates. If the answer is “it will rub”, change it now while access is easy.
Repair vs replace decisions
If a bend is kinked, replace it. If a bend is badly flattened, replace it. If a bend is only slightly oval but it sits in a critical point (like near a flare, braze, or bracket), replace it rather than hoping it will be fine.
Repair attempts can cost more time than replacement, and they can leave hidden weak points. On a busy job, the best decision is often the one that prevents a future return visit.
That decision is even easier when you remember what a call-back costs: travel time, setup time, customer confidence, and sometimes lost refrigerant. A clean remake today is usually cheaper than a messy repair tomorrow.
Did You Know?
A bend can look “okay” but still create noise and vibration if it has ovality or a hidden flat spot. If a system has an odd hiss or buzz and you’ve checked the basics, inspect the tight bends first.
Australian Standards and Compliance
Pipe bending radius is a workmanship issue, but it sits inside a bigger compliance picture. In Australia, refrigerant pipework is not just “plumbing”. It is part of a refrigerant system, and there are standards and licensing rules that apply.
AS/NZS standards like the AS/NZS 1677 series are commonly referenced for refrigerant safety, and the AS/NZS 5149 series is commonly referenced for refrigerating systems and heat pumps. You don’t need to memorise these documents to do good work, but you do need to respect the intent: safe installation, safe operation, and safe service practices.
In practical terms, that means following manufacturer instructions, using correct materials, pressure testing and evacuation methods, protecting pipework from damage, and keeping installations serviceable. Bad bends that kink or restrict lines can create performance issues and make fault-finding harder later.
Licensing awareness matters as well. ARCtick requirements exist for refrigerant handling work in Australia, and on real jobs that means the right people doing the right tasks, plus sensible record keeping where required. Even when the paperwork is light, the workmanship still has to be right.
Electrical safety also matters when you are using powered tools (including electric benders, vacuum pumps, and other jobsite equipment). For a clear reference point, review Electrical safety requirements and keep your workflow safe and job-ready.
For a practical HVACShop reference that ties standards outcomes and ARCtick-minded job habits together, see AS/NZS compliance notes for refrigerant/vacuum connections. On commercial sites, this kind of internal reference helps teams work the same way, especially where inspection and documentation expectations are higher.
On real jobs, compliance is also record keeping. If you’re on commercial sites, you may need to document test results and installation details. Clean, repeatable bends help because your pipework layout is easier to inspect and easier to explain.
One last jobsite reality: standards and manuals won’t save a rushed bend. The best compliance habit is a simple one: if a bend looks stressed, sits hard against an edge, or doesn’t stay round, fix it before you insulate and close up. That’s how you avoid hidden failures.
Apply Perfect Bends on Every Job
If you only take one thing from this guide, take this: bend radius is not about making copper “look pretty”. It’s about keeping the tube round, keeping flow clean, and keeping stress out of the line set.
When you understand centre-line radius, when you account for springback, and when you measure bend allowance properly, your bends land where you want them. That means less forcing, less vibration, and fewer call-backs.
Quick reference for everyday work: Before you bend, confirm tube size and tool former size match. During the bend, keep the tube seated and in one plane. After the bend, inspect for ovality, flat spots, and rub points, then think about insulation clearance, not just bare copper.
Training and certification: The fastest way to improve bending is practice on offcuts, with a simple goal: same angle, same plane, same finish, every time. If you’re training apprentices, slow them down early. A calm bend is quicker than fixing a kink later.
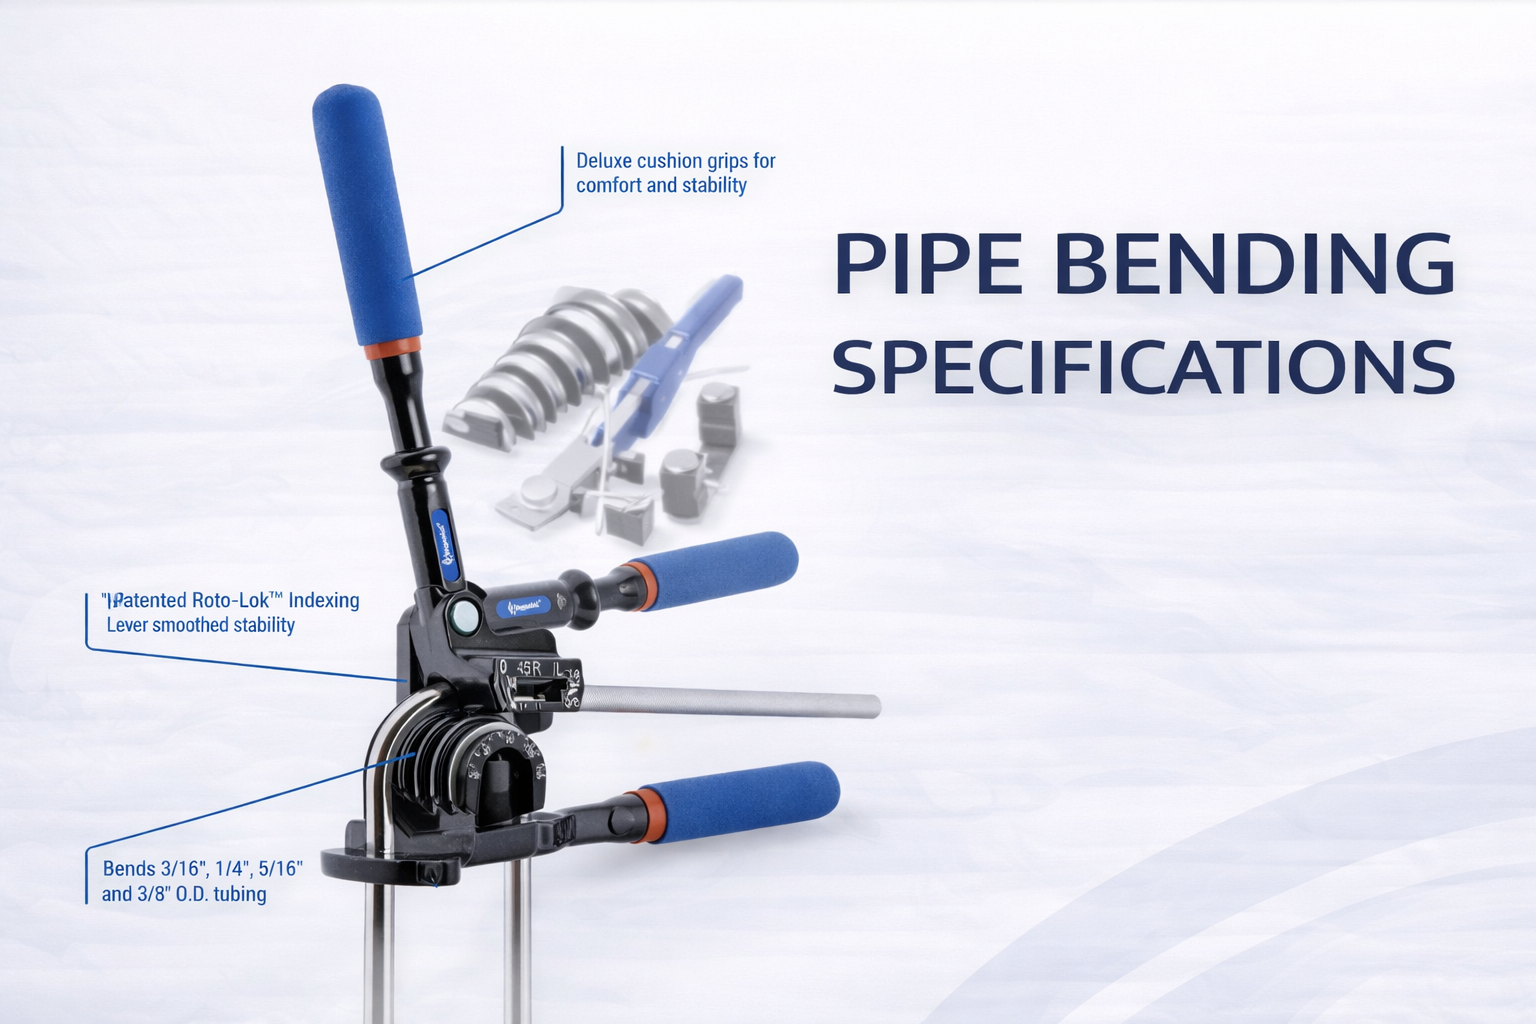
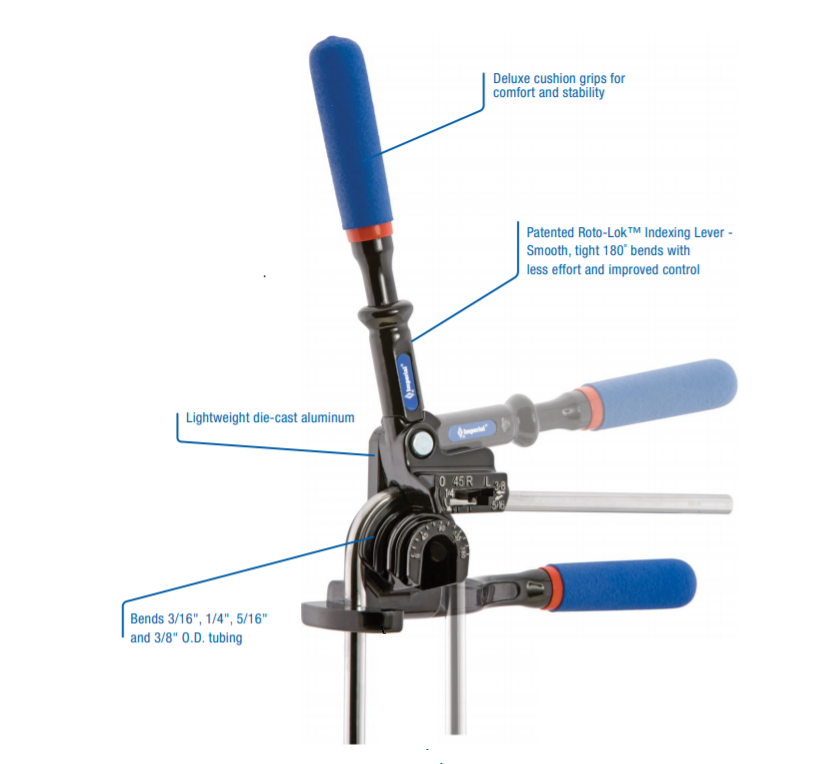
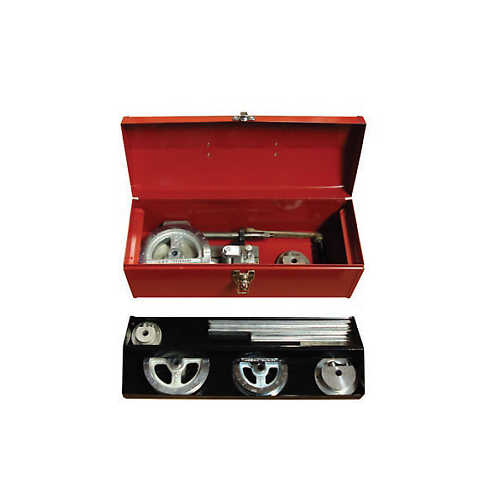
Tools and equipment: The right bender makes radius control easier. If you’re planning your kit, use pipe bender types and selection to match the tool to the job. For day-to-day browsing, you can also explore quality pipe bending tools and narrow down by the tube sizes you actually bend.
If you want a hand choosing a bender that suits your tube sizes and the kind of work you do, talk to our team to confirm compatibility. If you’re quoting jobs where bending accuracy matters (like repeat installs or tight riser work), contact us for a quote and we’ll help you map the right setup to your workflow.
And if you’re building your bending setup from scratch, it’s worth browsing our collections when you’re ready to compare options across the range. The best bending radius is the one your tools can repeat, job after job, without stress and without rework.