Refrigerant changes state and temperature as pressure rises and falls, so pressure readings tell you a lot about what the air-conditioning system is actually doing. If the pressure is wrong in any part of the circuit, the refrigerant may not cool properly, and the vent temperature will usually show it. That is why understanding auto refrigerant gauges is one of the most useful skills in vehicle air-conditioning diagnosis.
When a customer says the aircon is weak, takes too long to cool, cycles strangely, or feels fine one day and poor the next, gauge readings help move the job away from guessing. They do not tell the whole story on their own, but they are often the fastest way to see whether the system is undercharged, overfed, restricted, contaminated, or simply being affected by poor airflow.

That matters because car A/C faults are rarely solved properly by topping up refrigerant without diagnosis. Low charge is common, but it is not the only pattern. A worn compressor can create similar symptoms. So can a stuck expansion valve, blocked condenser airflow, internal contamination, moisture, or a service connection problem that gives you false readings. A good tech reads the pressures, then asks whether those readings make sense for the conditions in front of them.
On jobs where contamination, oil residue, or moisture is suspected, proper cleaning materials can also become part of the repair process. That is why it can help to keep suitable products from the cleaning chemicals collection in mind when you are restoring a system after repairs rather than just checking pressures and sending the vehicle back out.
Reading AC Pressures Using Auto Refrigerant Gauges
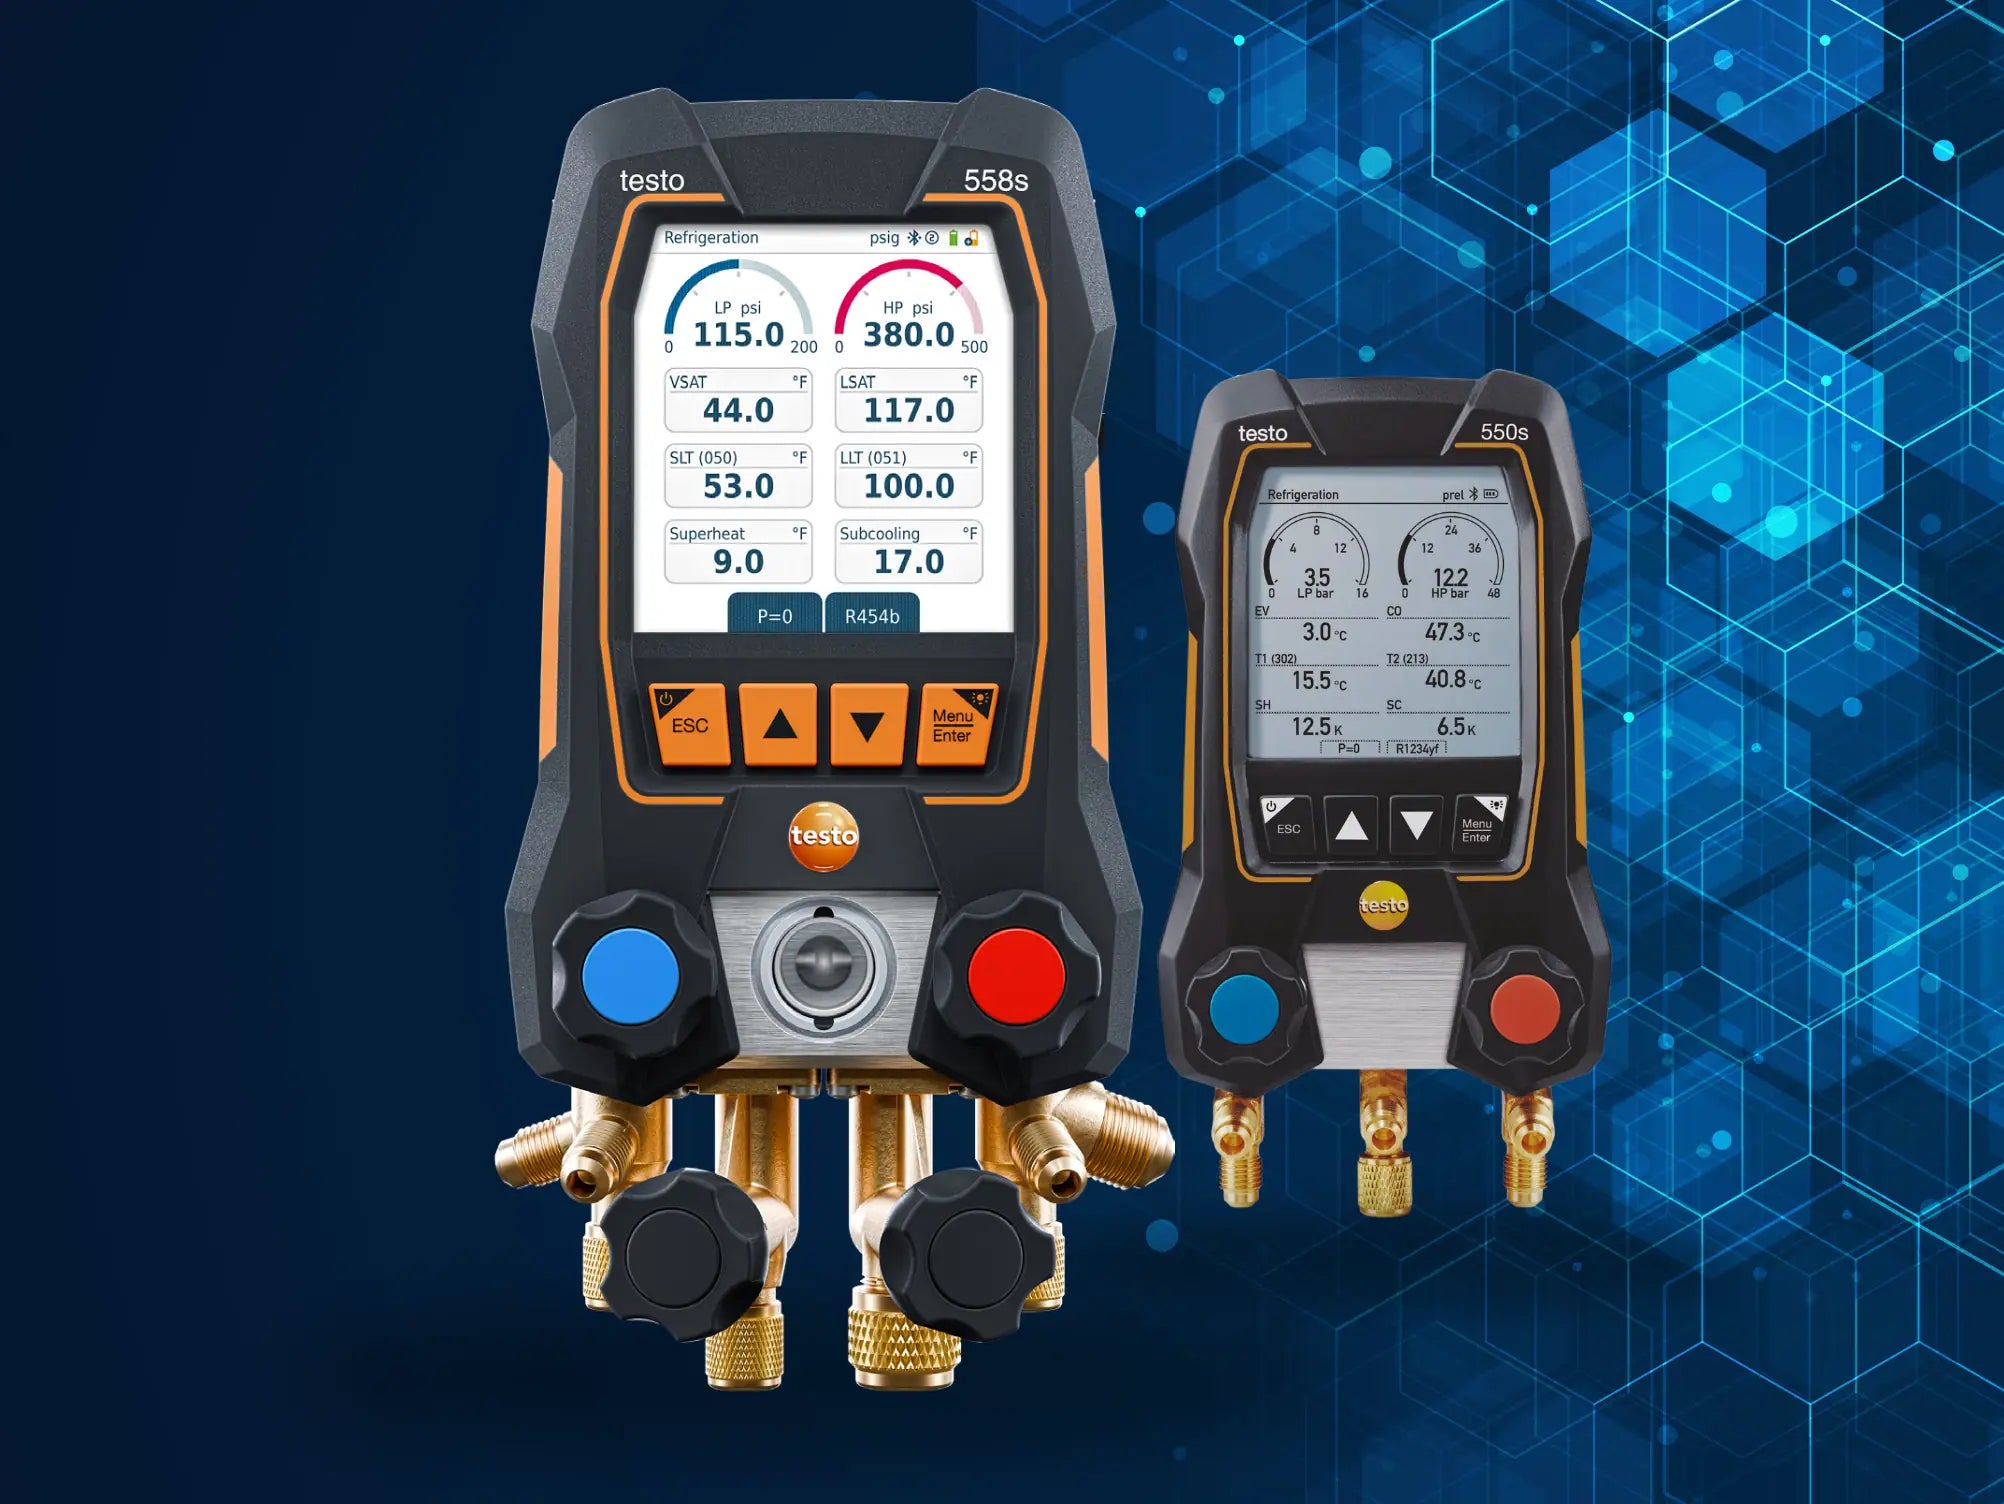
Automotive air-conditioning gauges usually show more than one unit of measure. Depending on the set, you may see MPa, bar, kPa, and PSI on the face. This matters because service information, workshop notes, and vehicle data can all use different units. You need to be able to translate them comfortably, otherwise small misunderstandings turn into bad calls.
Unit conversion quick reference: 1 MPa = 10 bar = 1000 kPa = 145 PSI
In a standard manifold layout, the red gauge reads the high side and the blue gauge reads the low side. The high side tells you what is happening after the compressor, where refrigerant is being compressed and pushed toward the condenser. The low side tells you what is happening after the expansion device and evaporator, where refrigerant pressure is lower and heat absorption takes place.
There is no single pressure reading that is “correct” for every car in every workshop on every day. Ambient temperature changes the condensing pressure. Humidity changes the heat load. Engine speed changes compressor output. Condenser fan performance changes heat rejection. Cabin load, recirculation setting, and even how long the system has been running all affect the numbers.
That is why strong diagnosis is not about memorising a magic pressure pair. It is about knowing the normal relationship between the two sides and understanding how that relationship changes under different operating conditions.
As a rough working guide, if ambient temperature is around 20°C, many systems may show roughly 1.3 to 2.0 MPa on the high side and roughly 0.12 to 0.25 MPa on the low side. In PSI terms, that is often somewhere around 188 to 290 PSI on the high side and 17 to 36 PSI on the low side. Under moderate workshop conditions, some systems may also sit around 1300 to 1600 kPa high side and 150 to 250 kPa low side when the engine is held around 1500 to 2000 RPM. Those numbers are useful as orientation, but they are not a substitute for the manufacturer procedure or for proper observation.
Pro Tip: Always let the readings stabilise before making the call. A quick glance straight after connection can mislead you, especially on systems with cycling compressors, variable displacement control, or heat-soaked engine bays.
Understanding What Pressure Actually Tells You
Pressure is best understood as a clue to refrigerant temperature and refrigerant state. In simple terms, pressure tells you how hard the system is working and whether refrigerant is likely boiling and condensing where it should. That is why pressure diagnosis works so well when combined with component temperatures and airflow checks.
High-side pressure reflects how effectively the condenser is rejecting heat. If airflow through the condenser is poor because the fan is weak, the fins are blocked, or the condenser is heat-soaked, high-side pressure usually climbs. The system may still cool for a while, but it works harder and becomes less stable. In hot Australian conditions, especially in traffic or on dark vehicles carrying a high cabin load, this can be the difference between acceptable cooling and a customer comeback.
Low-side pressure reflects how refrigerant is being metered and how well the evaporator is being fed. If the low side is too low, the evaporator may be starved. If it is too high, the evaporator may be overfed or the compressor may not be pulling down properly. That means low-side readings are often the first clue, but not always the final answer.
The key point is that pressure is relational. A low low-side reading means one thing if the high side is also low, another if the high side is normal, and something else again if the high side is very high. That is why experienced technicians read patterns, not just numbers.
Why Ambient Conditions Change the Diagnosis
Ambient temperature changes the expected condensing pressure because the system has to reject heat into the outside air. When outside air is hotter, condensing pressure will usually be higher. That is normal. The mistake is assuming a pressure is too high without checking ambient conditions first.
Humidity also matters because it affects cabin heat load. On humid days, the system is not just cooling the air. It is also removing moisture. That extra load can change how fast pressures settle and how the vent temperature behaves.
Condenser airflow matters just as much. A system that behaves normally on the highway but struggles at idle often points to fan performance or condenser airflow rather than charge alone. Likewise, a system that seems acceptable in mild weather can show its faults quickly on a hotter day when the condenser is under more stress.
This is why a proper gauge diagnosis should always be paired with notes on ambient temperature, engine speed, blower speed, vent temperature, and condenser fan operation. Those extra observations do not slow the job down. They usually save time because they stop you chasing the wrong fault.
Common Diagnosis of Car AC Problems
A practical approach is to measure at idle first, then again at around 1500 to 2000 RPM. That gives you a useful comparison. The readings do not need to be perfect. What matters is how they move and whether the pressure split becomes more believable as compressor speed increases.
Not Enough Refrigerant or a Failing Compressor
When both the low-pressure and high-pressure readings are lower than expected, one of the first possibilities is low refrigerant charge. That is common on older vehicles with slow leaks from service ports, hose crimps, condensers, compressors, or seals. In those cases, the system still works, but it no longer carries enough refrigerant mass to produce the pressure relationship you want.
However, low readings on both sides can also point to a compressor that is no longer creating enough pressure difference. Internally worn compressors may still engage, make normal noises, and appear functional, but they do not move refrigerant effectively under load.
The useful workshop test is to raise engine speed and observe what happens. If the readings move further apart, with the high side rising and the low side dropping, the compressor is usually still doing its job and the system may simply be undercharged. If the readings move closer together instead, or do not separate enough to create a believable pattern, compressor efficiency becomes a stronger suspect.
On these jobs, do not stop at the obvious. If a compressor has failed internally, you may also be dealing with contaminated oil, debris through the system, drier replacement, and an expansion device that should not be trusted. That is also where suitable products from the cleaning chemicals range can become relevant during cleanup and restoration rather than treating the repair as compressor replacement alone.
Expansion Valve Problems
Expansion valve faults usually show up as pressure relationships that do not make sense for the system load. If both sides are higher than expected, the valve may be stuck open and overfeeding the evaporator. In that case, refrigerant is not being metered properly and the system loses the pressure difference needed for efficient cooling.
At the other end of the pattern, if the low side drops into a vacuum or very low reading while the high side stays lower than expected or only modestly elevated, the evaporator may be starved by a stuck shut valve or another restriction. This is a common place where people misread the problem as simple low charge.
The difference is that a restriction changes the flow pattern. It can create a strong low reading downstream of the fault because refrigerant cannot feed the evaporator properly, while the high side may not build the way you would expect if mass flow through the system is reduced. That is why reading both sides together matters so much.
Moisture in the System
Moisture is one of the most annoying faults in automotive A/C because it can create changing symptoms. The system may cool, then stop cooling, then recover. The gauge readings may drift into a pattern that looks like a restriction, then return to something more normal later. That happens because moisture can freeze at the expansion valve or orifice area, temporarily blocking refrigerant flow. When the ice melts, flow returns and the fault appears to disappear.
This is why unstable readings deserve respect. If the low side occasionally pulls very low or into vacuum, then recovers while the high side also shifts around, moisture or contamination should be on the list. Recharging a wet system is not a fix. The proper repair is to recover, evacuate thoroughly, remove the moisture source, replace parts where required, and recharge correctly.
Did You Know? A system can show a moisture-related restriction without looking obviously damaged from the outside. That is one reason repeat top-ups are poor practice. They can hide the pattern without solving the actual problem.
Undercharged or Leaking System
Leak diagnosis should always sit alongside pressure diagnosis. If pressures suggest low charge, inspect the system before you assume it only needs refrigerant. Oil residue at hose ferrules, compressor front seals, condenser joints, service ports, or line connections often tells the story before the recovery machine does.
Some leaks are obvious. Others are slow enough that the system still cools for part of the season, then struggles when temperatures rise. In those cases, the customer may describe the problem as intermittent even though the leak is constant. That is why the visual inspection is still one of the best first steps in the job.
If the leak is not obvious, recover the refrigerant properly, inspect further, and confirm the fault before recharging. Guessing here usually leads to call-backs and unhappy customers.
How to Read Pressure Patterns More Reliably
One of the best habits in automotive A/C diagnosis is to read the pressures in stages rather than all at once. Connect carefully, note the static pressure if relevant, then start the engine and let the system settle. Watch the initial pull-down. Check idle behaviour. Then bring the engine speed up and observe how the pattern changes. This gives you a much better sense of compressor response and system load than a single reading taken at one moment.
You also want to pair gauge readings with vent temperature and condenser airflow. If the pressures look reasonable but vent temperature remains poor, airflow or blend-door issues may be part of the fault. If the high side is too high but the condenser fan is lazy, pressure may be the result rather than the root cause. Good diagnosis is about linking symptoms, not just collecting numbers.
| Pressure Pattern | Likely Direction of Diagnosis | What to Check Next |
|---|---|---|
| Both sides low | Low charge or weak compressor | Raise RPM, compare pressure split, inspect for leaks |
| Both sides high | Overcharge, overfeeding, or poor condenser airflow | Check fan operation, condenser condition, charge history |
| Low side very low or vacuum, high side not normal | Restriction or expansion device problem | Check for valve faults, contamination, moisture pattern |
| Pressures unstable or drifting | Moisture, contamination, control instability | Check evacuation history, drier condition, intermittent freezing |
Common Mistakes When Using Auto Refrigerant Gauges
A very common mistake is treating gauges as if they deliver a diagnosis on their own. They do not. They provide evidence. If you connect a manifold and immediately decide the system is undercharged because the low side is low, you can easily miss a restriction, compressor fault, or airflow issue.
Another mistake is trusting a poor connection. A leaking service connection or bad hose seal can distort the reading and make the job messy at the same time. If the connection is unstable, your diagnosis is unstable. This is one reason technicians value good service hardware and why preparation matters before the gauges even go on.
Skipping basic visual inspection is another trap. Bent condenser fins, blocked airflow, poor fan operation, oily joints, and damaged service ports can all influence what the gauges say. Pressures should confirm your thinking, not replace observation.
One more mistake is reading pressures too early. Some systems need a little time to stabilise, especially in warm engine bays or after the vehicle has just arrived. Reading too fast can make a normal pull-down pattern look like a fault.
Australian Workshop Context Matters
In Australia, automotive A/C diagnosis often happens in conditions that are not gentle. High ambient temperatures, long idle periods, urban traffic, dusty condensers, and strong cabin heat loads all affect system behaviour. A vehicle that seems acceptable in mild winter conditions can show clear weaknesses once summer heat builds up. That makes pressure testing even more useful, because it helps separate a genuinely weak system from one that is just being asked to do more work.
It also means the quality of the repair matters. A system that is only “just acceptable” after a recharge can quickly become a comeback once temperatures climb. Good diagnosis protects the workshop, not just the vehicle.
Why Cleaning Can Matter After Pressure Diagnosis
Pressure readings often tell you there is a deeper issue, but not every deeper issue is solved by replacing one part. If a compressor has worn internally, if moisture has been sitting in the system, or if oil and residue have spread through the lines, cleanup becomes part of the job. That is where the repair process can benefit from proper chemical support, not as a shortcut, but as part of doing the work properly.
Using suitable options from the HVAC cleaning chemicals collection can help support post-repair cleanup workflows where appropriate. The exact process always depends on the system design and the type of failure, but the broader point stays the same: reliable pressure diagnosis and reliable repair quality go together.

Tech Specs: Pressure readings are only meaningful when interpreted alongside ambient temperature, engine speed, condenser airflow, and system condition. A believable pressure pattern matters more than a single isolated number.
Get the Right Tools and Setup
These pressure patterns are a strong starting point, but every vehicle still has its own system design, control strategy, and service procedure. Good diagnosis comes from combining pressure readings with proper inspection, vent temperature checks, airflow checks, correct refrigerant identification, and stable service connections.
It also comes from respecting what the system is telling you. If the readings say the system is wet, restricted, overfed, weak, or contaminated, the answer is not to force a simple recharge and hope. The answer is to keep following the evidence until the fault is properly understood and repaired.
If you are tightening up your workflow, it makes sense to support that process with reliable service practices and the right consumables. For workshop cleanup and maintenance support, you can browse the cleaning chemicals collection at HVACShop.com.au. Used in the right context, that kind of support can help reduce contamination-related issues and improve the quality of the final repair.
In the end, diagnosing AC pressures using auto refrigerant gauges is not about chasing perfect numbers. It is about understanding system behaviour. When you read pressures in context, check airflow, pay attention to stability, and treat contamination seriously, you get faster answers and more dependable outcomes.
Frequently Asked Questions
What is a normal car AC pressure reading?
It depends on ambient temperature, humidity, airflow, and engine speed. Under moderate conditions, many systems may sit somewhere around 25 to 35 PSI on the low side and 150 to 250 PSI on the high side, but the correct reading always depends on the vehicle and the test conditions.
Why is my low side pressure too low?
A low low-side reading can point to low refrigerant charge, a restriction, a stuck expansion device, moisture freezing in the system, or a compressor problem. The reading should always be judged together with the high side and the operating conditions.
Can high pressure damage the system?
Yes. Excessive high-side pressure can place extra strain on the compressor, hoses, seals, and condenser. If left unresolved, it can reduce cooling performance and shorten component life.
Do I need to clean the AC system?
If contamination, oil residue, or moisture is present, proper cleaning can be an important part of the repair process. It helps reduce repeat failures and supports better long-term performance after the faulty parts have been addressed.