Understanding Refrigerant Recovery Methods in HVAC Work
Refrigerant recovery is one of those HVAC tasks that looks simple from the outside but makes a huge difference to safety, compliance, and job quality. If recovery is rushed, done with the wrong setup, or handled with poor hose management, you can lose time, lose refrigerant, and make the rest of the service process harder than it needs to be. That is why a reliable refrigerant recovery unit is not just a workshop extra. It is a core part of day-to-day HVAC and refrigeration work.
For residential air conditioning, commercial systems, refrigeration service, and repair jobs, understanding the different refrigerant recovery methods helps you work faster and more cleanly. It also helps you choose the right machine, the right hose layout, and the right cylinder setup for the refrigerant charge you are dealing with.
This guide breaks down the three main recovery methods technicians use most often: liquid recovery, vapour recovery, and push/pull recovery. It also explains the safety side of the job, the equipment that actually matters in the field, and the practical thinking behind choosing a recovery unit that suits your workload instead of slowing it down.
In this guide:

Recovery speed is not just about machine horsepower. Hose restriction, cylinder condition, refrigerant type, and method selection all affect how quickly and cleanly the job gets done.
Safety First
Refrigerant recovery is not something to do casually. You are dealing with pressure, temperature change, different refrigerant classes, and equipment that needs to be matched properly. That means the recovery unit, manifold, hoses, and recovery cylinders and recovery unit options all need to be appropriate for the refrigerant and system you are working on.
High-pressure refrigerants create even less room for sloppy setup. If you are working on systems using refrigerants that operate at higher pressures, your hoses, gauges, and recovery equipment all need to be correctly rated. The same applies to recovery cylinders. A poor cylinder choice or an overfilled cylinder turns a routine service task into a safety issue very quickly.
Always wear safety glasses and suitable gloves before opening valves, connecting hoses, moving cylinders, or purging the machine. Refrigerant can cause frostbite, and pressure incidents happen faster than most people expect.
Good recovery work also depends on disciplined setup. Manifold ports should be clearly identified, hose routes should be short and logical, and all connections should be checked before you start the machine. In field conditions, recovery often becomes slower because of preventable restriction, loose connections, or poor hose routing, not because the machine itself is weak.
For Australian refrigerant handling rules and licensing context, ARCtick remains the practical reference point for what licensed handling requires. That matters because recovery is not just a convenience issue. It sits inside broader compliance obligations for refrigerant work.
Equipment Requirements
A good recovery setup usually includes a dependable machine, properly rated hoses, a manifold or service rig that suits the job, and a recovery cylinder in good condition. Most technicians also value a unit with decent condenser size, strong cooling performance, sensible portability, and protection features such as high-pressure cutout. On everyday service work, that balance between portability and real-world recovery speed matters more than catalogue claims alone.
Shorter hoses and fewer restrictions often improve recovery speed more than trying to rush the machine. A tidy setup with less pressure drop usually recovers refrigerant faster and more predictably.
Why Refrigerant Recovery Matters
Recovery is not just about pulling refrigerant out of a system because the rulebook says so. It matters because it protects the refrigerant from unnecessary release, protects the service technician from unsafe working conditions, and protects the rest of the job from contamination and bad procedure.
If you are opening a system for repair, replacing a component, diagnosing a fault, or decommissioning equipment, proper recovery is part of a professional workflow. It gives you control over what comes out of the system, how it is stored, and what happens next. That matters even more when the refrigerant charge is large or the system is worth a proper repair.
There is also a practical workshop reason. Good recovery work makes the next step cleaner. If the refrigerant is recovered correctly, the rest of the service path becomes easier: leak checking, repair, evacuation, and recharge. Poor recovery creates confusion, delays, and sometimes contamination that makes later diagnosis harder.
Different Recovery Methods

There are three main refrigerant recovery methods used in HVAC and refrigeration work: liquid recovery, vapour recovery, and push/pull recovery. Each has a place. The best method depends on how much refrigerant is in the system, whether the charge is mainly liquid or vapour, the system size, and how much setup time makes sense for the job.
Liquid recovery is usually the fastest method when you can transfer refrigerant while it is still in liquid form. Vapour recovery is slower, but it is also the most common everyday approach because many jobs end up finishing that way even if they start with liquid movement. Push/pull recovery is more specialised. It is useful where a larger liquid charge makes the extra setup worthwhile.
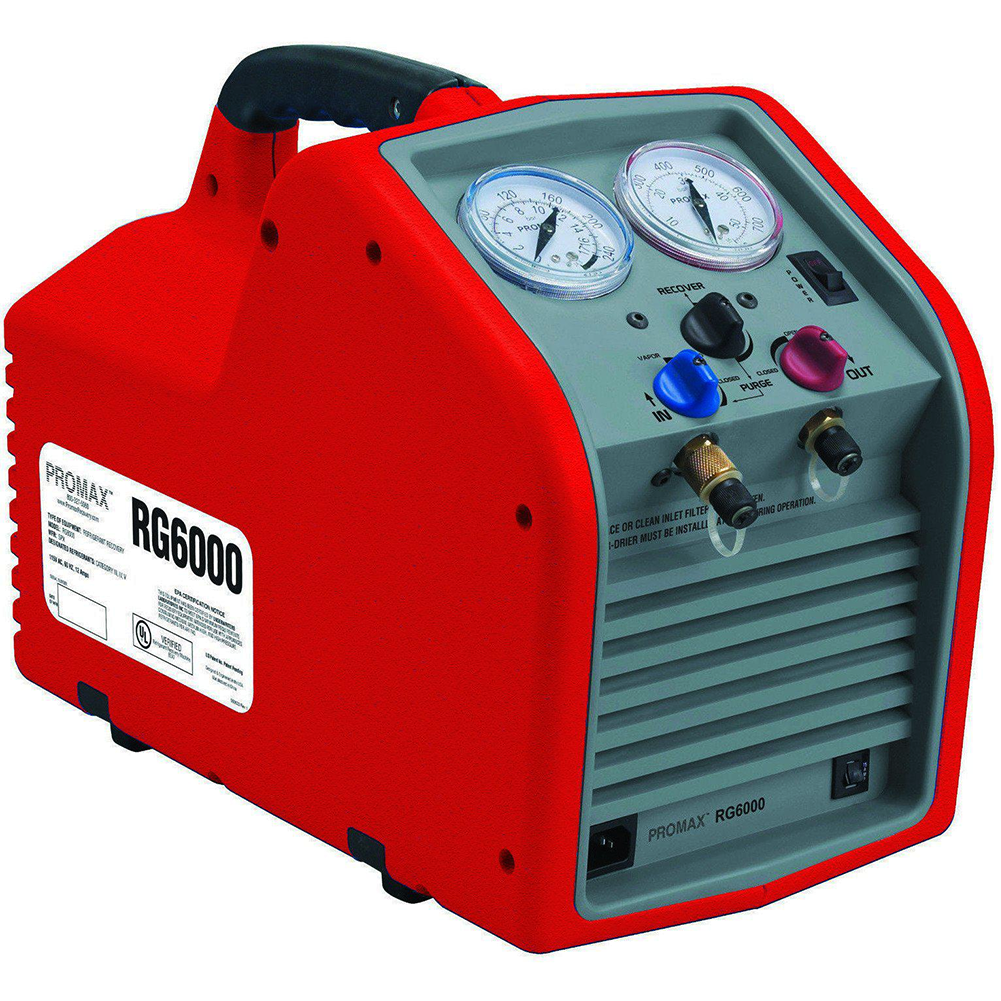
Featured Recovery Unit
A dependable recovery unit matters most when you want one machine that can cover everyday service work, stronger recovery jobs, and the method changes that happen between liquid, vapour, and push/pull setups.
Method 1: Liquid Recovery
Liquid recovery is normally the fastest method because you are moving refrigerant while it is still in liquid form. When conditions allow it, this saves time compared with pulling everything through the machine as vapour. On systems with a usable liquid path and enough charge to justify the setup, liquid recovery makes sense.
The general approach is to connect the system, manifold, machine, and cylinder so the liquid refrigerant can move efficiently to the recovery cylinder while the machine assists the transfer. This requires proper hose routing, shut-off control, and awareness of cylinder fill levels. A recovery cylinder that is not properly managed will slow the job down at best and create a dangerous situation at worst.
The advantage of liquid recovery is speed. The limitation is that not every system or field condition makes it practical. If the setup is awkward, the charge is small, or the access is poor, technicians often fall back to vapour recovery for the remainder of the job.
Always monitor cylinder weight and never overfill a recovery cylinder. Faster liquid transfer does not remove the need for careful cylinder management.
Method 2: Vapour Recovery

Vapour recovery is the everyday workhorse method for many technicians. The machine pulls refrigerant vapour from the system, condenses it internally, and sends it to the cylinder as liquid. It is not the fastest method, but it is flexible, familiar, and often the practical answer once the easy liquid movement is gone.
This is why so many field jobs end in vapour recovery even if they begin with a different approach. Once the liquid stage is finished or unavailable, vapour recovery is the standard path to pulling out the remaining charge cleanly.
Good vapour recovery depends on keeping restriction down, keeping the machine cool enough to condense efficiently, and using a cylinder setup that is not fighting the process. In practice, this is also where machine design shows up clearly. A better recovery unit tends to hold pace better on longer vapour pulls, especially in warmer ambient conditions. For surface temperature monitoring on evaporator and condenser components during this process, applying irreversible industrial temperature labels is a reliable way to track thermal limits without interrupting the recovery workflow.
If your work regularly involves vapour recovery on a mix of systems, it makes sense to compare refrigerant recovery unit options with an eye on real-world recovery performance, not just portability.
Method 3: Push/Pull Recovery
Push/pull recovery is used mainly where there is enough liquid refrigerant in the system to justify the extra setup. Instead of treating the job like a standard vapour pull from start to finish, the system and cylinder are arranged so pressure difference helps push liquid refrigerant out of the system while the machine supports the process.
This method can save serious time on larger charges, but it is not automatically the smartest choice on smaller jobs. In many everyday service situations, the extra hose arrangement, sight glass, and switching logic are not worth it unless the system volume is large enough to benefit.
Push/pull also demands more discipline. You need to monitor what is happening closely and know when the liquid stage is effectively complete so you can switch back to standard vapour recovery to clear the remaining refrigerant out of the lines and system.
Push/pull recovery usually makes the most sense only when the system has enough liquid charge to justify the extra setup. On smaller jobs, standard recovery is often faster overall once setup time is taken into account.
Refrigerant Recovery Unit Comparison
Not every recovery unit suits the same type of service work. Some are easier to carry and better for light residential calls. Some are stronger all-rounders for day-to-day split systems, refrigeration work, and regular field service. Others make more sense where the charge size is larger and recovery speed matters enough to justify a heavier machine.
| Feature | Compact Units | Mid-Range Units | Heavy-Duty Units |
|---|---|---|---|
| Best For | Residential and light service work | Everyday HVAC/R service calls | Larger systems and higher-volume recovery |
| Recovery Speed | Moderate | Fast | Very fast |
| Recovery Modes | Liquid, vapour, push/pull depending on setup | Liquid, vapour, push/pull | Liquid, vapour, push/pull |
| Portability | Very easy to carry | Balanced portability and performance | Usually larger and heavier |
| Typical Use Case | Split systems, smaller service jobs, light field work | Regular service vans and mixed HVAC jobs | Bigger refrigeration work and larger refrigerant charges |
| Best Buying Approach | Compare refrigerant recovery unit options by job size, refrigerant type, and how often you recover larger charges | ||
The right buying decision depends less on the label and more on your real workload. If most of your calls are smaller residential systems, portability matters. If you recover refrigerant regularly across mixed service jobs, a stronger all-rounder becomes more valuable. If you are also regularly handling larger charges, recovery cylinders and the rest of the setup start to matter just as much as the machine itself.
Choosing the Right Refrigerant Recovery Unit
Choosing the right recovery unit comes down to more than brand preference. The smarter decision is to match the machine to the type of work you actually do. A technician handling mostly residential split systems may value compact size and fast setup. A contractor doing mixed HVAC/R work may care more about recovery speed and all-round refrigerant coverage. Larger refrigeration or higher-charge work makes recovery cylinders, machine cooling performance, and heavier-duty capacity more important.
It also helps to think about the full workflow, not just the machine itself. Recovery speed depends on the unit, but also on hose size, hose length, manifold design, cylinder condition, refrigerant type, ambient conditions, and whether you are working mostly in liquid, vapour, or push/pull mode.
If you are comparing gear for real service work, the practical approach is to browse the full range of refrigerant recovery units and consider how often you also need matching recovery cylinder solutions for the type of jobs you handle most often.
Final Thoughts
Understanding refrigerant recovery methods helps technicians work more efficiently, more safely, and with fewer avoidable mistakes. Liquid recovery is usually the fastest when conditions suit it. Vapour recovery is the most common everyday method. Push/pull recovery is a valuable time-saver on larger liquid charges when the setup makes sense.
The best results come from matching the method to the system and matching the machine to the workload. A good recovery unit will not fix a poor setup, but it will make a strong setup faster, smoother, and more reliable over time.
If you are ready to compare suitable options, start with the full range of refrigerant recovery units here and use that as the starting point for both machine choice and recovery cylinder planning.