Introduction: Why Gauge Reading Matters in HVAC
If you operate with air conditioning or refrigeration systems, you must be able to read a refrigerant gauge. Refrigerant gauges are used to detect pressure levels inside air conditioning systems, which aids in diagnosing performance issues, ensuring safe refrigerant charging, and preventing compressor damage.
Whether you're new to the trade or looking to brush up on your skills, this guide will take you through the fundamentals of gauge reading, what each dial represents, and how to apply your readings in the field.
What Is a Refrigerant Gauge?
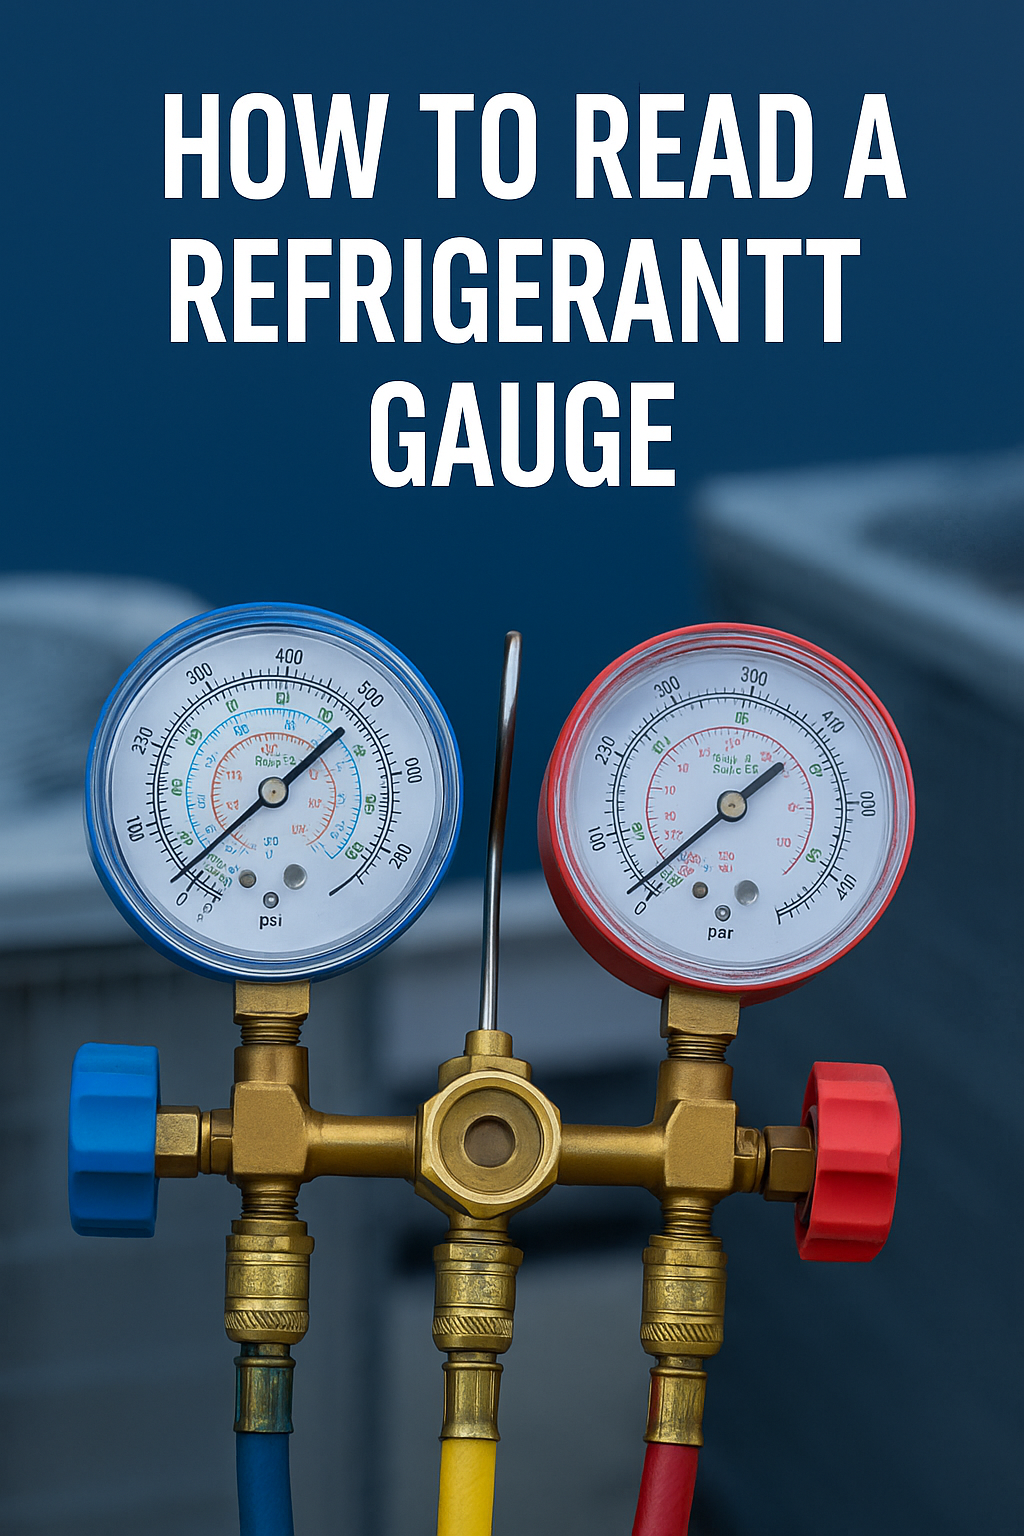
A refrigerant gauge is a diagnostic equipment that measures the pressure of refrigerant gases in HVAC systems. It's typically part of a manifold gauge set, which contains two gauges:
- Suction pressure is measured at the low side (blue).
- High side (red) - Measures discharge pressure.
These gauges aid in determining system operation and identifying potential issues such as undercharging, overcharging, and system limits.
Understanding the Colour Codes
Most HVAC gauge sets use standard colours:
- 🔵 Blue – Low-pressure side (suction line)
- 🔴 Red – High-pressure side (discharge line)
- 🟡 Yellow – Service line (connects to vacuum pump, recovery machine, or refrigerant tank)
These connections let you monitor pressure in real time and control refrigerant flow during servicing.
How to Read a Refrigerant Gauge: Step-by-Step
✅ Step 1: Determine the refrigerant type.
Check the system label to see the refrigerant you're working with (R410A, R134a, R22, etc.). Every refrigerant has a unique pressure-temperature relationship.
✅ Step 2: Connect Manifold Gauges.
- Blue hose → leads to the suction port (lower side).
- Red hose → leads to the discharge port (high side).
- Yellow hose → indicates refrigerant tank or vacuum pump.
Before connecting, make sure all of the valves are closed. Use quality refrigerant hoses and couplings to ensure a leak-free connection.
✅ Step 3: Power On the System
Start the HVAC system and let it run for 5-10 minutes to ensure stability. This allows the pressures to equalise, resulting in an accurate reading.
✅ Step 4: Read the Gauges
- Blue gauge (low side): Should read between 100–140 psi for R410A systems when operating normally
- Red gauge (high side): Should read between 350–400 psi depending on ambient temperature
Compare these readings with a pressure-temperature chart for your refrigerant.
✅ Step 5: Interpret the Readings
| Condition | Low Side Reading | High Side Reading | Possible Cause |
|---|---|---|---|
| Normal Operation | 100–140 psi | 350–400 psi | System running efficiently |
| Low Suction, High Head | Low | High | System restriction or dirty filter drier |
| High Suction, Low Head | High | Low | Overcharged or faulty compressor |
| Both Low | Low | Low | Low refrigerant charge or leak |
Pressure-Temperature Relationship
Understanding how pressure relates to temperature is critical. For example:
- R410A at 120 psi equals 40°C evaporation temperature.
- At 30 pressure, R134a has an evaporation temperature of around 2°C.
To ensure correct analysis, always use a P-T chart unique to your refrigerant.
Safety Tips
- Always wear safety goggles and gloves
- Never open manifold valves too quickly
- Avoid mixing refrigerant types
- Use certified equipment when recovering or recharging systems
When to Replace or Upgrade Your Gauges
If your analog gauge needles stick, or the housing is cracked, it's time for a replacement. Consider switching to digital manifold gauges for faster and more accurate readings — especially when servicing systems with new refrigerants like R32 or R1234yf.
👉 Browse digital manifold gauges or analog manifold gauge sets at HVAC Shop Australia.
Final Thoughts
Learning how to read a refrigerant gauge is one of the foundational skills in the HVAC trade. Once mastered, it opens the door to better diagnostics, safer servicing, and more confident system troubleshooting. Whether you're servicing a domestic split system or a large commercial rooftop unit, the ability to accurately read and interpret gauge readings will set you apart as a skilled technician.