Accuracy You Can Trust
On HVAC jobs, an anemometer is only useful if the reading is real.
You can do everything else right. Clean coil. Good refrigeration numbers. Fan running. Filters replaced. Then you take an airflow reading and it sends you down the wrong path because the meter has drifted.
That’s why anemometer calibration matters. Calibration is how you keep your airflow numbers honest, so you can make decisions you can stand behind.
When airflow numbers are wrong, the diagnosis is wrong. You chase refrigerant when the real issue is a restricted return. You blame duct design when the fan is actually fine. Or you miss a slow build-up fault because your “baseline” reading was off from day one.
This guide is written for Aussie tradies and techs who want straight answers. It explains what calibration is, why meters drift, what Australian calibration standards look like, and how to keep your tool kit audit-ready without turning your work into paperwork hell.
We’ll also keep it realistic for Australian conditions. Brisbane humidity can load sensors and filters faster than you expect. Sydney coastal air can bring salt and corrosion into grilles and plant rooms. Melbourne cold snaps can push you into heating work where small airflow errors can look like big performance problems.
If you want a quick refresher on what an anemometer is doing during HVAC airflow checks, it helps to start with anemometer accuracy importance before we zoom in on calibration and certificates.
And one more thing up front: this is not about “perfect lab numbers”. It’s about keeping your readings repeatable and defendable, especially when you’re doing commissioning, maintenance reporting, or any job where someone may later ask, “How do you know that reading was right?”
Why Anemometer Calibration Matters
Most anemometers don’t suddenly “break”. They slowly drift.
Drift is when the meter still turns on and still gives a number, but that number has moved away from the true airflow. The screen looks confident. The reading looks clean. And it can still be wrong.
That matters because airflow sits under everything. It changes coil performance, comfort, noise, dehumidification, and run time. If your airflow reading is off, you can easily misread the whole job.
Measurement drift over time
Drift can happen for simple reasons. Sensors age. Small knocks add up. Dust builds up in places you can’t see. Bearings and moving parts wear. Even storage in a hot ute can slowly affect electronics and plastics.
On real sites, it’s not just age. It’s how the tool lives. Roof spaces. Plant rooms. Coastal air. Fine dust. Vibration. A tool that lives loose in a toolbox will drift faster than one kept in a case and cleaned properly.
Impact of inaccurate readings
Inaccurate airflow readings cause two common problems.
The first is wasted time. You chase the wrong fault. You swap parts. You re-check things that were never the issue. You lose hours on a job that should have been simple.
The second is call-backs. You “fix” something that wasn’t broken, and the original complaint stays. Or you miss the real restriction, and the customer still has hot rooms, noisy returns, or poor humidity control.
A small airflow error can also snowball. If you record a wrong baseline today, every comparison you do later is polluted. That’s how a tool quietly ruins your reporting workflow.
System commissioning requirements
On commissioning jobs, airflow is often part of sign-off. It may be tied to ventilation performance, balancing outcomes, or proof that the system meets design intent.
In that world, “pretty close” is not always good enough. You need evidence. That’s when calibration moves from “nice to have” to “must have”, because your numbers are being used to support a decision, a certificate, or a handover.
Warranty and insurance implications
Calibration also touches the boring but important stuff: warranty and insurance.
Some suppliers, service contracts, and maintenance agreements expect you to use equipment that is maintained and checked. Some insurers may also ask questions after an incident. In those moments, having calibration and verification records can help show you took reasonable steps to measure safely and correctly.
This is not legal advice. It’s practical reality. If your paperwork is clean, the conversation is usually easier.
If you’re building a kit that stands up to site questions, it helps to standardise around professional measurement tools that are made for repeatable field work and proper record keeping.
Australian legal requirements
Australia does not have one single rule that says “every anemometer must be calibrated every X months” for all work. It depends on the workplace, the contract, and the type of job.
But many Australian worksites do have requirements. If you work on sites with audits, formal maintenance systems, or strict quality processes, you will often be expected to show that your measurement tools are fit for purpose.
Even on smaller jobs, the best habit is simple: if the reading matters, you should be able to back it up.
Australian Calibration Standards
When people say “Australian calibration standards”, they usually mean three practical things.
They mean the lab doing the calibration is competent. They mean the results are traceable to recognised standards. And they mean the paperwork (the certificate) actually contains what you need.
AS ISO/IEC 17025 requirements
For calibration laboratories, ISO/IEC 17025 is commonly referenced. In Australia, you may see it written as AS ISO/IEC 17025. The key idea is competence.
It covers how a lab proves it can do calibration properly. That includes trained staff, controlled methods, suitable equipment, and a quality system that reduces mistakes.
For you as a tech, you don’t need to memorize the standard. You just need to know what it gives you: confidence that the calibration result is not just a guess.
NATA accreditation explained
In Australia, NATA accreditation is a common way calibration competence is recognized. If a lab is NATA-accredited for a scope that covers your type of measurement, that’s a strong sign the process is being checked and controlled.
This matters most when your airflow numbers are used for commissioning, audit reporting, or any “prove it” work where someone outside your business is relying on the measurement.
It also matters when you run into disputes. A calibration certificate from a competent lab is easier to defend than a “trust me, mate” claim.
Traceability to national standards
Traceability sounds fancy, but it’s a simple chain.
It means the calibration result links back through a documented trail to recognized reference standards. In practice, it means your airflow readings can be connected to known references, not just “how the tool felt on the day”.
For job confidence, traceability is what makes your calibration more than a sticker.
Calibration certificate contents
A calibration certificate is not just a receipt. It’s the record that explains what was tested, how it was tested, and what the results mean.
At a practical level, you want it to show the tool identification (model and serial), the calibration date, the method used, the results (often at multiple test points), and the measurement uncertainty.
You also want it to clearly show who did the calibration and what the traceability basis is, so the record stands up if you need it later.
Tech Specs
A good calibration certificate should clearly identify the instrument, show results at test points, and state measurement uncertainty. If it’s vague, it won’t help you in an audit or a dispute.
Acceptable uncertainty levels
Uncertainty is one of the most misunderstood parts of calibration.
It does not mean the lab “isn’t sure”. It means the lab is being honest about the range the true value likely falls within, based on the method and equipment used.
What uncertainty is “acceptable” depends on what you’re doing. If you’re doing rough fault-finding, you might not need tight uncertainty. If you’re doing commissioning or compliance-driven reporting, you may need tighter confidence in the numbers.
The safest approach is to match the tool and the calibration quality to the job risk. If the decision is high-stakes, don’t treat it like a quick service check.
If you’re also building out the rest of your test kit for audit-friendly work, it can help to see the bigger picture in Australian HVAC standards and how measurement sits alongside electrical checks, temperature logging, and basic reporting.
Calibration Frequency: When to Service
The big question is always the same: how often should you calibrate an anemometer?
There isn’t one number that fits every tool and every workplace. But there are common patterns that work well in the field.
Think of calibration timing as risk management. The harsher the environment, the more critical the measurement, and the more your tool gets knocked around, the sooner you should service it.
| When to calibrate | Common timing | Why it matters | Practical notes |
|---|---|---|---|
| Routine schedule (baseline) | Many workplaces use annual calibration as a baseline | Prevents slow drift from becoming “normal” | Good starting point for general service work and basic reporting |
| Higher-risk or high-use environments | Some teams choose 6-month calibration for tighter control | More frequent checks reduce exposure to drift | Common where audits, commissioning, or quality systems are strict |
| After damage or a drop | Immediately, before you trust it again | Shock can shift sensors and moving parts without obvious failure | If the tool hit concrete or got crushed in the ute, assume risk |
| Before critical measurements | Before commissioning, dispute work, or formal reporting | You need defendable numbers when others rely on your results | If the job is high value, treat calibration as part of prep |
| Record keeping requirements | Align to site requirements and your QA system | Missing records can fail audits even if your work was good | Track dates, certificates, and tool serial numbers in one place |
The simplest takeaway is this: if you only calibrate when the tool “feels wrong”, you’re usually late. Drift is sneaky. It becomes your new normal.
If you want a safe starting point, follow the tool manufacturer’s guidance if you have it, then adjust for how and where you work. A tech who measures airflow once a week in clean offices has a different risk profile to a tech who measures airflow daily in dusty plant rooms and roof spaces.
Pro Tip
Set a calendar reminder for calibration before you get busy. Most “expired certificate” problems happen because the due date hits in peak season and nobody wants to pull the tool out of the kit.
Field vs Laboratory Calibration
When people ask “how to calibrate an anemometer”, the real question is usually this.
Should I do checks in the field, or should I send it to a lab?
The best answer is not “one or the other”. It’s both, but for different purposes.
In-house verification checks
Field checks are mostly about catching drift early.
They help you spot when a meter has moved, or when technique and setup are creating weird results. They can also keep you confident between lab calibrations.
But field checks usually do not replace laboratory calibration. They are often not traceable, not controlled, and not documented at the level needed for formal reporting.
NATA laboratory calibration
Lab calibration is about a controlled method and a proper certificate. That’s what supports audits, commissioning, and any job where documentation matters.
In a lab, conditions can be controlled. Methods are documented. Reference standards are used. Results are recorded properly.
The trade-off is time and cost. The tool is out of action while it is being calibrated, so you need to plan around it.
Pros and cons of each method
Field checks are fast, cheap, and easy to repeat. They help you catch problems early.
Lab calibration is slower and costs more, but it gives you formal documentation and higher confidence.
Think of field checks like checking your tyre pressure. It keeps you safe day-to-day. Lab calibration is like a full wheel alignment report when the car matters for long trips and performance.
Cost vs accuracy tradeoffs
Accuracy has a cost, but in HVAC it can also save money.
If calibration stops one big misdiagnosis, it can pay for itself quickly. That’s especially true on commercial sites where one wrong call can mean extra labour, site access delays, or repeat call-outs.
On the other hand, you don’t need “top tier” calibration for every rough check. Match the effort to the job risk.
Australian service providers
Across Australia there are calibration service providers and laboratories that handle airflow and instrumentation work. The important part is choosing a service that matches your needs.
If your measurements are used for formal outcomes, look for services that can provide the right level of documentation and traceability for your workflow.
If your measurements are mainly for service diagnosis, you still benefit from calibration, but you can focus on practical turnaround and keeping your kit consistent.
Competitor comparison: calibration support across common brands
Most calibration questions are not really about the brand. They are about the workflow.
Some techs prefer tools that are simple and rugged, with fewer moving parts. Others prefer tools that support reporting, logging, and consistent setup across a team.
If your crew uses a common ecosystem, it can be easier to standardize checks, training, and record keeping. That’s why some businesses compare ranges like Testo calibration-ready anemometers with alternatives such as Fieldpiece professional anemometers when they’re trying to build a consistent measurement kit.
The smart way to compare is not “which is best”. It’s “which suits our jobs and our reporting”. Ask practical questions. Is the tool easy to protect and clean? Can it be checked in-house between calibrations? Can you store certificates and serial numbers easily? Does the tool give stable readings in the conditions you actually work in?
And if you’re still choosing what to put in the kit, it can help to scan the broader range of anemometer selection and features so you’re not locked into one approach that doesn’t suit your normal work.
DIY Verification Between Calibrations
Even with a great calibration certificate, you still need day-to-day confidence.
This is where DIY verification checks matter. These are not “full calibration”. They are simple checks that help you spot drift, bad technique, or tool damage before it turns into a wrong diagnosis.
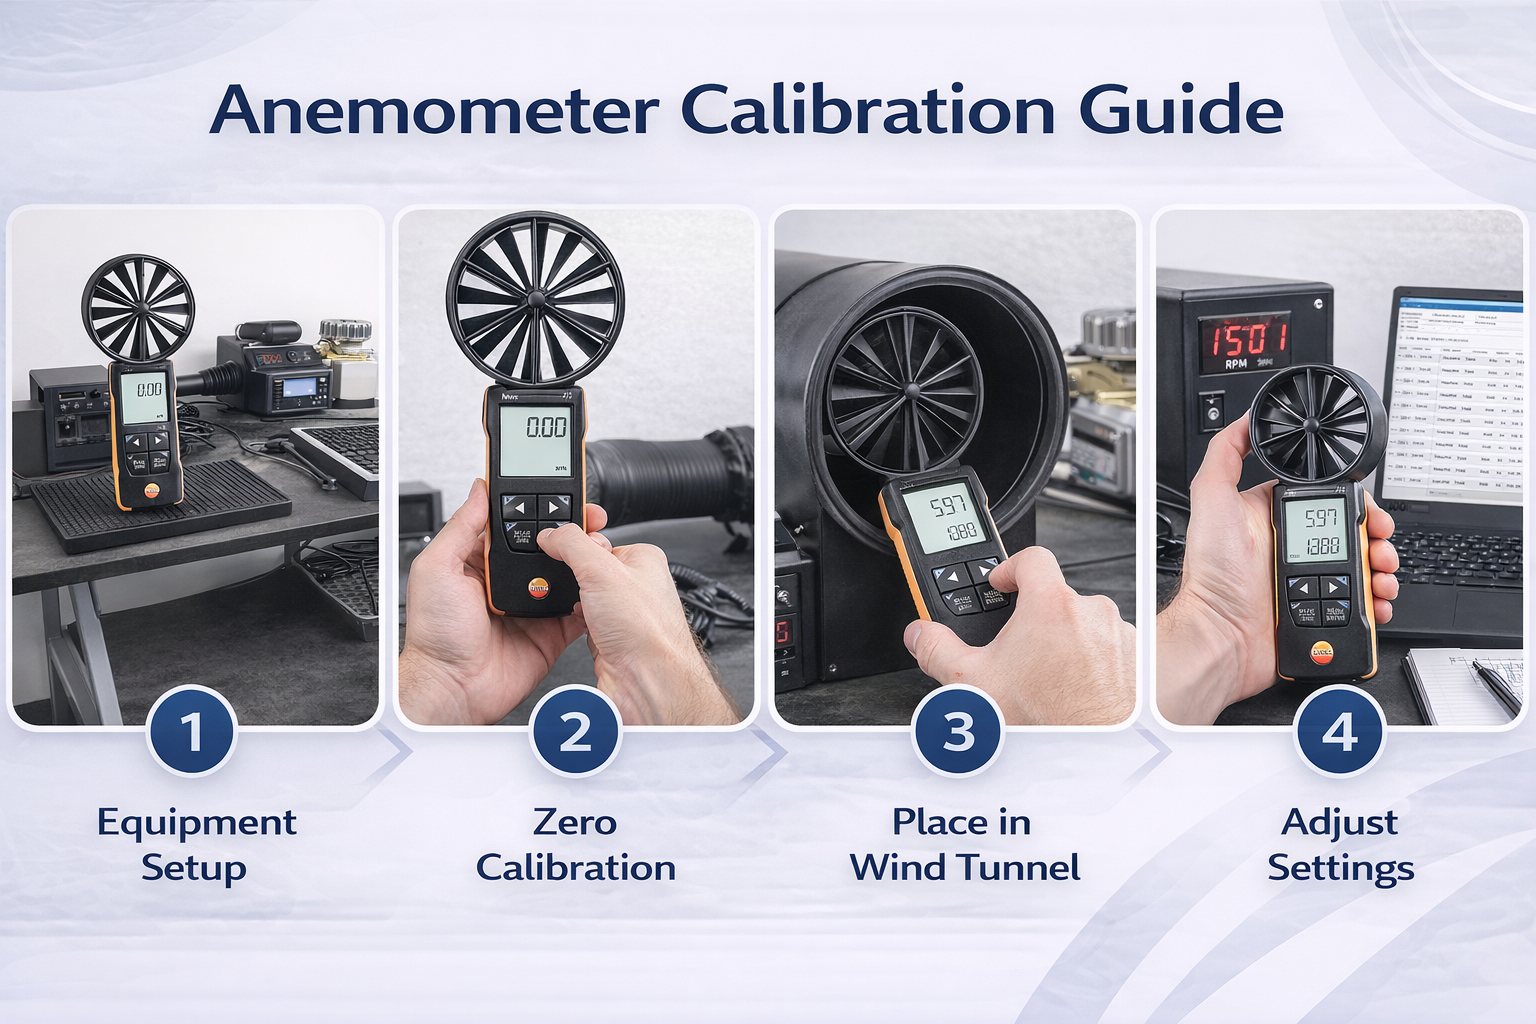
Zero-point checks
Start with the simple stuff. Does the tool behave sensibly at “no airflow”?
Depending on the sensor type, true zero can be tricky, but you should still see stable behaviour when the tool is not exposed to moving air. If the reading jumps around wildly in still air, that’s a red flag.
Be careful where you do this. If you’re standing under a ceiling fan, next to a supply grille, or in a breezy hallway, you won’t get a clean check.
Known-velocity testing
Field “known-velocity” checks are hard, because most sites don’t have a perfect reference airflow.
But you can still build practical checks. If you have a stable test setup in your workshop, like a controlled fan arrangement that repeats the same way every time, you can use it as a trend check. The goal is not absolute truth. The goal is repeatability.
If your tool used to read consistently in that setup and now it’s off, you have a drift signal.
Comparison with a calibrated unit
One of the best workshop habits is having one “reference” meter that is kept in good condition and calibrated on schedule.
Then you can compare your daily-use meters against it in a consistent setup. If the daily-use meter starts moving away from the reference, you can send it for service before it creates a job problem.
This approach also helps in teams. If multiple techs use multiple meters, comparison checks help keep the numbers aligned.
Drift monitoring
Drift monitoring is just pattern tracking.
If your anemometer readings slowly creep over months, you’ll usually see it if you record results consistently. This is one reason it helps to document airflow checks properly, especially on repeat maintenance sites.
If you want a simple measurement method that supports repeatable airflow checks, your CFM workflow matters as much as your calibration schedule. That’s why it can help to review proper measurement techniques and make sure the human side of the test is solid too.
When professional service is needed
Send the tool for professional calibration or service when any of these things happen.
If the tool is dropped hard. If it gets wet or contaminated. If you see unstable readings that don’t improve with good technique. If you see drift in your workshop comparison checks. Or if you’re about to do critical measurements and you want clean paperwork.
And remember: sometimes the tool is fine and the issue is setup. Return turbulence, grille swirl, and body blocking can make any meter look “wrong”. That’s why the verification checks should be done in a repeatable environment, not in the middle of a windy plant room doorway.
Did You Know?
A lot of “drift” complaints are actually contamination. In humid Brisbane summers or coastal Sydney sites, sensors can load up faster than you expect. Keeping the tool clean can keep it accurate longer.
Calibration Certificate & Documentation
If calibration is the work, the certificate is the proof.
On many sites, the certificate matters as much as the calibration itself. Because if you can’t show it, it didn’t happen.
Required certificate information
A strong calibration certificate makes your life easier. You want it to clearly match your tool to the record, with model and serial number.
You want calibration dates, including when it was done and when it is due again (if your system tracks due dates).
You want the test method and the results, and you want the uncertainty stated so the result is meaningful.
If the certificate does not clearly identify the instrument, it can become useless in an audit. That’s why matching serial numbers matters.
Storing calibration records
Don’t store certificates “somewhere in email”. That’s how they disappear when you need them.
Pick one storage method and stick to it. A simple folder system works. A maintenance platform can work too. The key is that you can quickly find the certificate for a specific serial number without searching for an hour.
If you run a team, store records in a shared system, not on one person’s laptop.
Audit trail requirements
An audit trail is just a clear story. What tool was used, when it was calibrated, and what evidence supports that.
On commercial sites, audits are often about consistency. They want to see that the process exists and is followed, not just that you can talk about it.
That’s why a simple calibration register can be valuable. Tool name. Serial number. Last calibration date. Due date. Certificate location. That’s it.
Insurance claim documentation
If something goes wrong on a site, paperwork becomes important fast.
Calibration records won’t solve every problem, but they can help show that your measurement and testing approach was reasonable and controlled. That can support you in the messy conversations that sometimes follow incidents and disputes.
WorkSafe compliance
Work health and safety is not just about PPE. It’s also about doing work in a safe, controlled way, including how you inspect, test, and maintain equipment and plant.
On some sites, maintenance records and inspection systems are part of meeting WHS expectations. If your airflow testing influences decisions about ventilation, plant operation, or access, having clean records is a smart move.
For general safety guidance and WHS framing in Australia, you can align your practices with workplace safety guidance while keeping your own site requirements and contract obligations front and centre.
Anemometer Calibration FAQs
What is anemometer calibration?
Anemometer calibration is a controlled check that compares your meter against known reference points, then documents the results. It’s how you prove your airflow readings are still accurate and repeatable, rather than relying on “it seems fine”.
How often should an anemometer be calibrated?
There isn’t one universal rule for every job in Australia. Many workplaces use annual calibration as a baseline, tighter sites may use 6-month intervals, and any hard drop or contamination event should trigger an immediate re-check before you trust the meter again.
What’s the difference between calibration and verification?
Verification is a practical field or workshop check that helps you spot drift between calibrations. Calibration is the formal process (often lab-based) that produces a traceable certificate suitable for audits, commissioning, and “prove it” reporting.
Do I need a NATA-accredited certificate?
If your airflow results are used for commissioning, audits, contract reporting, or disputes, a NATA-accredited calibration (within scope) is a strong way to support the credibility of your numbers. For general fault-finding, you may still calibrate, but the documentation requirement can be less strict depending on the site.
What should be on a calibration certificate?
You want clear instrument identification (model and serial), the calibration date, the method used, results at test points, and stated measurement uncertainty. If the certificate is vague, it often won’t help when someone checks your records.
What should I do if the anemometer is dropped or gets wet?
Assume risk until proven otherwise. A tool can be knocked out of spec without obvious damage. Do a repeatable comparison check if you have a reference meter, and if the reading is unstable or drifting, send it for professional service before you rely on it for decisions or reporting.
Maintain Accuracy with Proper Calibration
So here’s the simple truth.
Anemometer calibration is not about being “fancy”. It’s about protecting your diagnosis.
When your airflow reading is right, your job gets easier. You find restrictions faster. You prove improvements after cleaning. You reduce guesswork. And you cut down on the annoying call-backs that come from chasing the wrong fault.
The best approach is a layered system.
Use a sensible calibration schedule that matches your work. Do quick verification checks between calibrations. Keep records tidy. And treat your anemometer like a measurement tool, not a loose item in the toolbox.
And when you’re ready to standardize your airflow workflow across your service work, commissioning jobs, or maintenance contracts, set up with calibration-ready anemometers that support repeatable readings and clean documentation.
If you’re unsure what suits your workflow, talk to our team to confirm compatibility and get a quote based on how you actually test on site. The goal is simple: accurate readings you can trust, and a process that stays solid even when the job gets busy.