
Choosing the Right Airflow Tool
If you’ve ever walked off a job thinking “that unit should be pushing more air than this”, you already know why airflow testing matters. The tricky part is this: if the anemometer is the wrong type for the job, you can get a nice-looking number that’s still wrong. And a wrong airflow number leads to a wrong diagnosis.

It shows up on real Aussie sites all the time. A split system in Brisbane “feels weak” after a clean, but the tech used a tool that hates turbulence. A ducted system in Melbourne keeps tripping on low-temp because the return air is fine, but the supply airflow is down and nobody measured it properly. A coastal Sydney job has corrosion on grilles and dampers, and the readings bounce around because the face velocity is uneven and the instrument isn’t built for it.
Most people hear “anemometer” and think “wind speed meter”. In HVAC, it’s a workflow tool. It helps you check supply registers, balance air, confirm fan performance, and back up what you’re seeing with numbers you can put in a service report.
The problem is that there are a few common anemometer types, and each one behaves differently. Pick the wrong one, and you can waste time chasing ghosts. Pick the right one, and you can quickly prove what’s going on.
This guide is written for Aussie tradies and techs who want straight answers. We’ll break down the main types, explain when each one makes sense, and show you how to choose without overthinking it. The aim is simple: better airflow numbers, better decisions, fewer call-backs.
Before you buy anything, it helps to understand what anemometers do in HVAC and how airflow testing fits into normal fault-finding. This guide then takes you one step further: it compares the main types, explains where each one wins (and where it can trip you up), and gives you a simple way to choose the right tool for your day-to-day work across Australia.
What Makes Anemometers Different?
At the simplest level, an anemometer measures air velocity. In HVAC, that usually means the speed of air moving out of a grille, through a diffuser, past a coil, or along a duct opening.
But here’s the catch: the air you measure in HVAC is rarely a smooth, steady “breeze”. It’s often turbulent, uneven, and affected by grilles, dampers, bends, filters, coils, and fans. That’s why different anemometer designs exist. Each design “sees” airflow in its own way.
CFM vs m/s and why it matters
You’ll notice different units and outputs. Some models give you metres per second (m/s). Some can calculate airflow volume in cubic metres per hour (m³/h) or litres per second (L/s). You’ll still see CFM (cubic feet per minute) mentioned because a lot of HVAC tooling and training content is US-based, but in Australia you’ll typically work in metric for reports and commissioning.
Velocity is only part of the story. To turn velocity into airflow volume, you need area. That’s why you’ll hear techs talk about “face velocity” at a grille and then converting it based on grille size. On duct openings or large diffusers, you also need a decent sampling method. A single reading in the middle is rarely enough if the velocity profile is uneven.
Here’s a real-world example. A customer says the back bedroom is always warm. You measure one spot at the supply grille and it looks “okay”. But the airflow is actually hugging one side of the grille because the duct run is kinked or the damper is half shut. If you don’t sample properly, you miss the pattern and the room stays uncomfortable.
Why airflow matters in HVAC
Airflow changes everything. It affects coil temperature, superheat and subcooling behaviour, compressor run time, noise, customer comfort, and moisture control. Brisbane humidity makes low airflow feel worse because the coil can’t manage moisture properly. Sydney coastal air can add corrosion and restriction at grilles over time. Melbourne cold snaps can expose borderline airflow issues because heating mode needs the right air mass to move heat through the house.
Airflow also links directly to common faults. A dirty filter, matted return grille, blocked coil, undersized duct, crushed flex, stuck damper, failing fan capacitor, or a fan speed set wrong can all show up as “low airflow”. If you don’t measure it, you end up guessing. And guessing is how you get repeat visits.
Australian standards and job expectations
In Australia, airflow testing often sits inside broader compliance and building maintenance expectations. You’ll see AS/NZS standards referenced across ventilation, building services, and hygiene programs, especially in commercial work. You don’t need to quote standards on every job, but you do want a method that is repeatable and defendable when you’re doing work that affects ventilation and comfort.
That’s why an anemometer for HVAC isn’t just about “getting a number”. It’s about getting the right number, in the right spot, with a method that matches the airflow you’re dealing with.
If you’re building out your test kit, it also helps to see where airflow testing sits next to pressure, temperature, and electrical checks. This broader view is covered in our guide to essential HVAC testing tools, so you’re not relying on one measurement to tell the whole story.
Three Main Types: Vane vs Hot-Wire vs Thermal
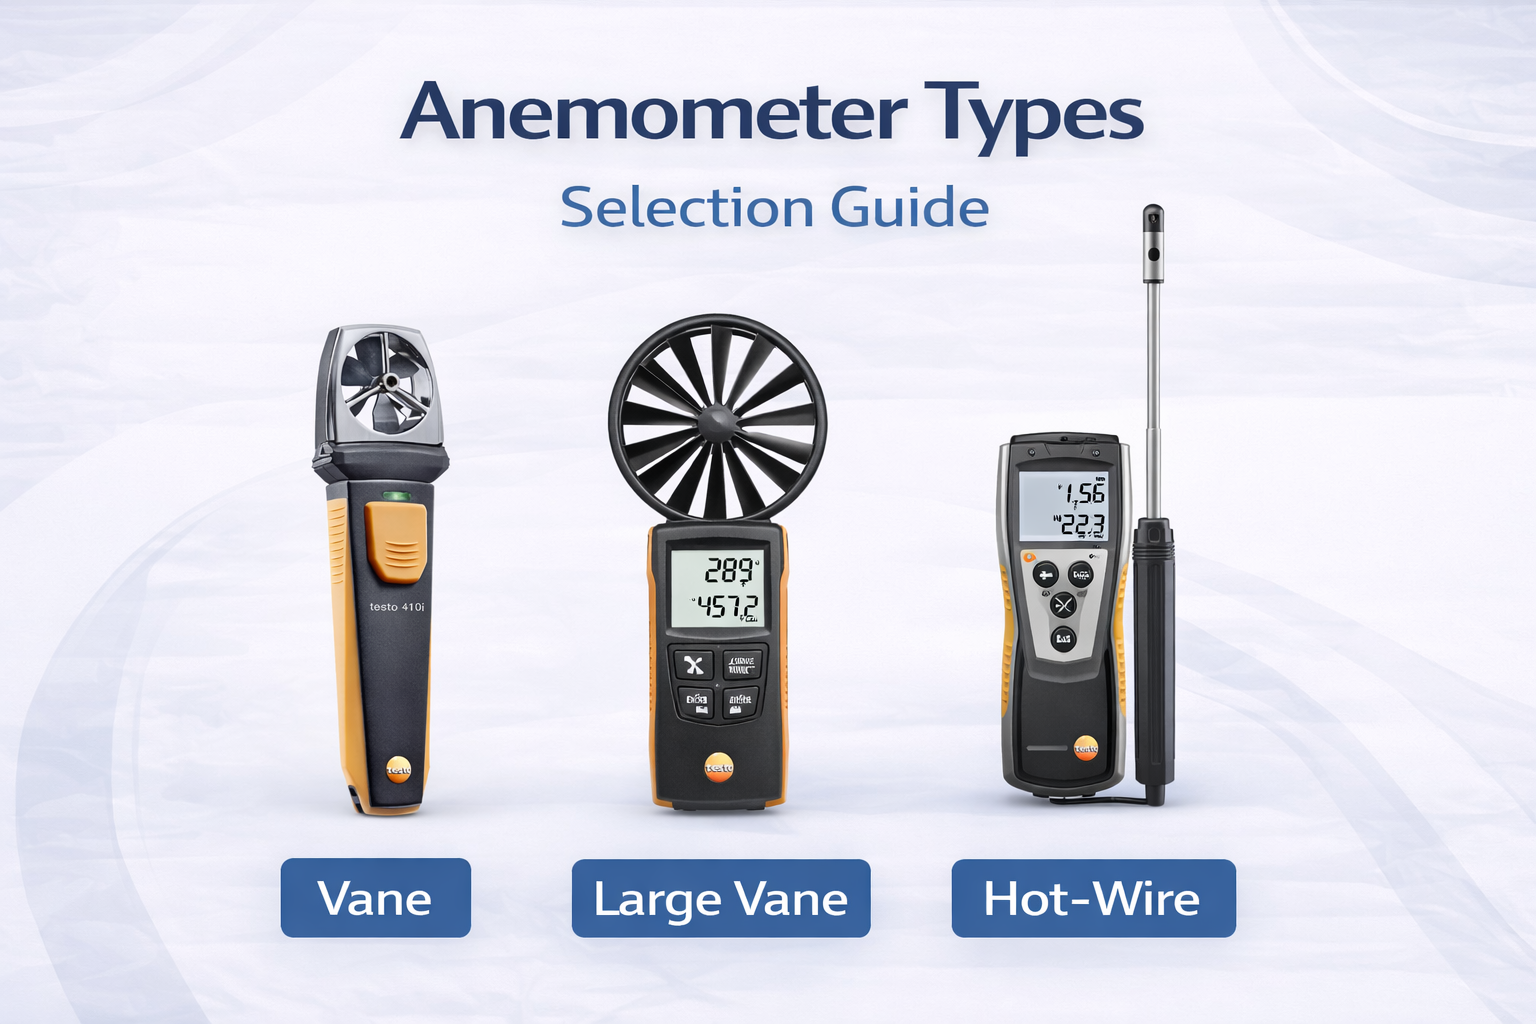
Most handheld HVAC airflow meters fall into three main groups: vane anemometers, hot-wire anemometers, and thermal (often “thermal mass” style) anemometers. They all measure air movement, but the way they sense the airflow changes how they behave on real jobs.
When people search “vane vs hot wire anemometer”, what they really mean is “which one will give me stable readings on the jobs I actually do?” The answer depends on where you measure and how tidy the airflow is.
Vane anemometers (rotating impeller)
A vane anemometer uses a small rotating fan (impeller). Air pushes the vane, it spins, and the meter converts that rotation into velocity. In HVAC, vane tools are popular because they’re simple, robust, and easy to use at grilles and diffusers.
On a ducted residential job, a vane anemometer can be a quick way to compare register airflow room to room. If one bedroom is weak and the others are strong, you can prove it in seconds. On commercial ceiling diffusers, it can help you check whether the airflow is roughly where it should be before you go deeper into balancing.
The main limitation is that the vane needs a decent, steady airflow to spin cleanly. Very low velocities, strong swirl, or awkward angles can make the reading jump. If the grille throws air sideways, the tool can under-read unless you position it carefully.
Technique matters more than most people think. If you jam the vane right up against a grille, you can block part of the flow. If you hold it off-centre, you can catch a “fast lane” and think the whole grille is like that. The practical fix is to take multiple readings across the face, hold each one steady for a moment, then average them.
Vane tools are also a nice choice for apprentices because they teach the basics. You can physically see and feel the airflow. That makes it easier to understand why a return restriction or a dirty coil changes the whole system.
Hot-wire anemometers (heated element)
A hot-wire anemometer uses a heated sensor. Moving air cools the sensor, and the meter converts that cooling effect into velocity. Hot-wire tools are known for being sensitive at low airflow and useful in tighter spaces.
In HVAC fault-finding, hot-wire can shine when you’re checking low air movement across a coil, around a return air path, or in a spot where a vane won’t spin properly. If you’ve got a return grille that “feels” weak but you want proof, hot-wire often gives you a clearer story.
Hot-wire is also handy when you need a slim probe. Some jobs don’t give you much room, like measuring near a coil face, inside certain duct access points, or around louvre setups where a larger vane head is awkward.
Because the sensor is sensitive, it can also be more affected by handling, dust, and poor technique. If you poke it into a turbulent stream or bump it around, you can get noisy readings. It’s also worth remembering that temperature and humidity can influence how stable the measurement looks on the screen, so it pays to let the sensor settle and take a few consistent readings rather than chasing the first number that pops up.
A common mistake is trying to measure right at the grille face where air is swirling. The probe sees turbulence instead of a clean flow, so your number jumps. If you can, step the probe back slightly and take a few points. Even small changes in position can calm the airflow enough to get a repeatable reading.
Thermal anemometers (bidirectional)
Thermal anemometers in HVAC often refer to sensors that can measure very low velocities and, in some designs, detect airflow direction (bidirectional). This can be useful when airflow reverses or pulses, or when you’re trying to confirm whether air is actually moving the way you think it is.
In plant rooms, risers, and ventilation troubleshooting, direction can matter. You might have pressure imbalances causing air to move the “wrong way” through a doorway gap or a relief path. A tool that can help you confirm direction can save you from chasing the wrong fix.
This type of sensing can also help when the airflow is subtle. Think of a space that feels stale, but there’s no obvious “blast” at any grille. Very low velocity measurement can be useful for confirming whether a supply is actually delivering anything, or whether a return path is doing its job.
Like hot-wire, thermal sensors reward good technique. They also benefit from sensible storage because contamination on the sensor can affect consistency. On dusty sites, or after a day in a roof space, a quick clean and a proper case can keep the tool behaving the same week to week.
Comparison table: accuracy range applications
Most HVAC meters have a usable velocity window and a preferred application range. The exact specs vary by model, so always confirm on the datasheet, but the practical differences below are the ones techs notice on jobs.
| Type | Best use on HVAC jobs | Where it struggles | What to watch for |
|---|---|---|---|
| Vane anemometer | Register and diffuser checks, quick comparisons room-to-room, general airflow confirmation | Very low velocities, strong swirl/turbulence, side-throw grilles if positioned poorly | Hold it square to airflow, average multiple points, avoid bumping the impeller on grilles |
| Hot-wire anemometer | Low airflow troubleshooting, tight spaces, checking airflow near coils and returns | Dirty environments without care, unstable technique, high turbulence right at the grille face | Let the sensor stabilise, keep it clean, take steady readings and average |
| Thermal (bidirectional) | Direction-sensitive checks, low velocity work, ventilation fault-finding with uncertain flow direction | Poor handling and contamination, rushed single-point readings | Confirm direction, stabilise before recording, document where you measured |
Pro Tip
On grilles and diffusers, don’t trust one spot in the middle. Take a few readings across the face and average them. It’s the fastest way to stop “false confidence” from a single lucky number.
So which one should you choose? If your daily work is mostly supply register checks and quick airflow comparisons, a vane tool is often the simplest and toughest option. If you do a lot of low airflow troubleshooting or tight-space checks, a hot-wire or thermal option can save you time. And if you regularly deal with uncertain flow direction in ventilation work, bidirectional thermal sensing can be a real advantage.
If you’re searching for the “best anemometer for HVAC Australia”, think of it this way: the best one is the one that stays stable in your most common measuring spots. A tool that’s perfect for low airflow near a coil might be overkill for simple register checks, and a tool that’s great at registers might be frustrating for subtle ventilation issues.
Digital vs Analog: The Modern Choice
Analog dial anemometers still exist, and you’ll see them in older tool kits or training rooms. They’re simple and they don’t rely on apps or menus. But in day-to-day HVAC work, digital is now the practical choice for most techs.
Analog dial anemometers (legacy) can be okay for rough checks, but they usually don’t give you the features you need for modern reporting. The scale can be harder to read in poor light. If you’re in a roof space, or you’re balancing diffusers off a ladder, you want a clear number you can trust at a glance.
Digital display advantages show up straight away. You can hold a reading, average readings, and switch units. Some tools can also show min and max values, which is handy when airflow is pulsing or unstable. You can take a few readings, settle the tool, and record the value that makes sense.
Wireless and smart options take this further. On bigger sites, it’s handy to leave a probe in place and step back to avoid blocking airflow with your body. On residential jobs, it’s useful when you want to show a customer a simple “before and after” without turning the job into a science lesson.
App connectivity benefits are mostly about workflow. Instead of writing numbers on your glove or hoping you remember later, you can log readings, add notes, and export a basic report. If you do maintenance contracts or you’re working for builders and facility managers, that paper trail can matter.
So when people ask “digital anemometer vs analog”, the practical answer is this: digital is easier to use, easier to document, and more repeatable. Analog can still function, but it’s rarely the best choice if you want clean job records.
Australian tech adoption is heading the same way as everything else in the trade: faster diagnostics, clearer reporting, less repeat work. If you want a broader view of how this shift shows up across HVAC testing gear, our guide to digital vs analog HVAC tools explains the practical differences in a way that matches real field use.
Key Features for HVAC Professionals
Once you’ve chosen the right anemometer type, the next step is choosing the right features for the way you work. This is where a lot of people get caught. They buy a meter that looks “pro”, but it doesn’t fit their jobs, or it’s annoying to use, so it ends up in the ute.
Measurement range and real job stability
Measurement range is the first checkpoint. Many handheld HVAC tools are commonly quoted with a broad velocity window, but what matters is how stable the tool is in the range you actually measure. If you mostly do supply register checks, you want a tool that sits steady there. If you do low airflow fault-finding, you want a tool that doesn’t drop out or jump around at the low end. Always confirm the stated range and behaviour on the model datasheet, because it varies by instrument.
Stability matters because it saves time. A tool that bounces forces you to take extra readings. Then you second guess yourself. Then you take more. That’s slow, and it can make you avoid measuring at all. A stable tool makes airflow testing a normal step, not a painful one.
Accuracy specs versus method
Accuracy specifications matter, but don’t get trapped by marketing numbers. On real jobs, your method and your measurement location can create more error than the instrument itself. A steady, repeatable method with a slightly less fancy tool can beat a top-end tool used badly.
The practical approach is to pick one measurement spot and repeat it three times. If your readings are close, you’ve got a method you can trust. If they jump wildly, change your position, step back from the grille a bit, and take multiple points. The goal is repeatability, not a perfect-looking number.
Data logging and reporting
Data logging capabilities can be a game-changer if you do commissioning-style checks, service reporting, or you’re trying to prove a change after cleaning or repairs. A quick “before and after” record can show that a filter change or coil clean improved airflow, not just noise or feel.
It also helps when a client questions results later. If you can pull up a date-stamped note and say “this was the airflow pattern on the day”, you look organized and credible. That’s a big deal in facilities maintenance, where you’re often one of many contractors on the site.
Battery life and field conditions
Battery life matters more than people think, especially in Australian field conditions. Heat in roof spaces, long days, and leaving tools in the ute can shorten real-world battery performance. If a tool chews batteries or dies mid-job, it becomes a frustration tool instead of a workflow tool.
A simple habit helps here. Keep spare batteries (or a charger, depending on the tool) and avoid storing the tool in full sun. It sounds basic, but it stops the “dead meter” moment when you actually need it.
Durability, IP ratings, and everyday knocks
Durability and IP ratings matter on actual sites. Dust in WA, humidity in QLD, and coastal salt air can be rough on gear. If you work around plant rooms, ceiling spaces, and outdoor units, you want a tool that handles knocks and doesn’t panic around a bit of dust and moisture.
IP ratings help you judge protection levels, but build quality and common sense matter too. Use a case. Don’t throw the probe loose in the toolbox. If the sensor is delicate, treat it like a gauge, not like a hammer.
Calibration and confidence
Calibration and confidence are part of “being able to stand behind the number”. If you’re doing work where results matter for documentation, it’s worth thinking about calibration intervals and using calibration services that align with Australian expectations. Many businesses prefer calibration through recognized processes (including NATA-aligned practices) when results are used for formal reporting.
Even if you’re not doing formal compliance work, calibration habits are still useful. If your readings start to drift or feel “off”, you want a way to check whether the tool is still behaving as expected.
Tech Specs
When you compare models, focus on what you’ll actually use: stable low-end readings, sensible unit options (m/s and metric airflow units), averaging, and clear logging. Performance “headline numbers” only help if they match your workflow.
A simple “good enough” airflow method for service work
If you want a quick method you can repeat, start with the same approach every time. Pick the same distance from the grille. Hold the tool steady. Take multiple points across the face. Average the results. Write down where you measured. That’s it.
On a ducted system, compare registers room to room rather than chasing one “perfect” value. You’re often looking for imbalance, not a textbook number. On split systems, airflow checks help you confirm whether the indoor fan and coil are doing their job, especially after a clean or a filter change.
If you want to see what’s available across different tool styles in one place, it can help to browse categories rather than chasing one brand name. Our range of airflow testing instruments is organized so you can compare options that fit the way Aussie techs actually test and report.
One more practical note: safety and documentation go together. If you’re working on sites that require clear service records, it’s worth aligning your reporting habits with workplace safety requirements and site expectations, especially when your measurements influence decisions about ventilation, access, and equipment operation.
Smart & Bluetooth Anemometers
Smart tools aren’t about being flashy. They’re about making the job smoother. Smart and Bluetooth anemometers can reduce rework, improve reporting, and make it easier to take consistent readings without standing in the worst possible spot.
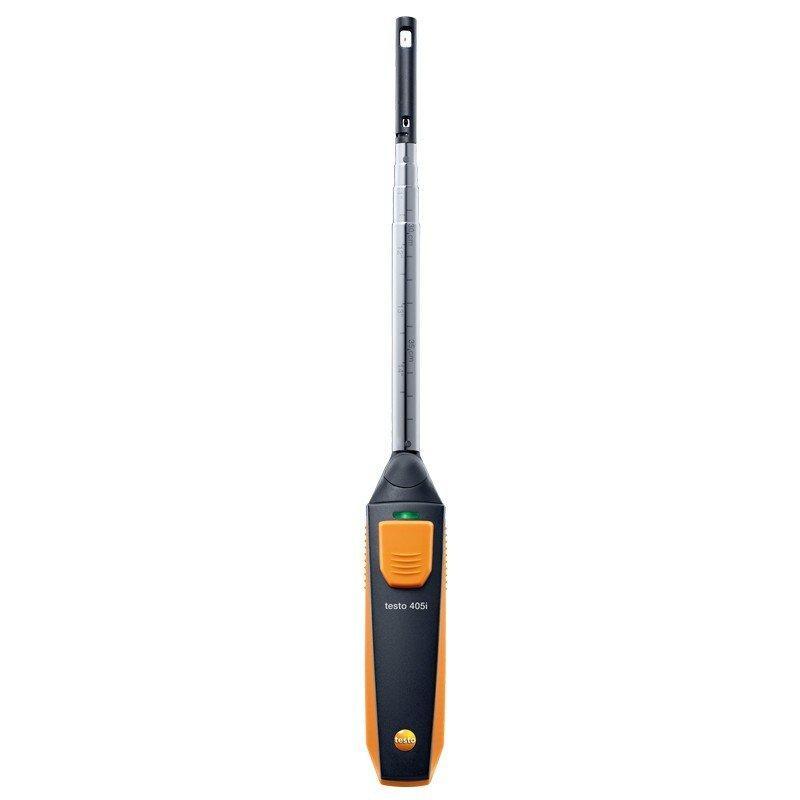
In HVAC, the common smart setups include vane and hot-wire options that connect to an app. A popular example is smart probe style gear, including options often discussed as Testo Smart Probes, such as the 410i vane-style and 405i hot-wire style in that ecosystem. You’ll also hear techs compare other wireless ecosystems, including Fieldpiece wireless options, because the workflow is similar even when the models differ.
The real benefit is how the app helps you work. App features and reporting often include unit switching, averaging, data logging, notes, and simple exports. On a maintenance job, that can be the difference between “I think it’s better” and “here are the readings before and after”.
Remote monitoring benefits show up when you want to avoid influencing the reading with your body position. This is a big one on supply grilles. If you’re right in front of the grille, you can block part of the flow. With a Bluetooth probe, you can set it up, step back, and let it read normally.
Cloud data storage can be useful if you manage larger sites or you want job records you can find later. This is especially handy for facilities maintenance work, where you may be asked months later, “what did you record last time?” A log with a date, a location note, and a few readings can save you from starting from scratch.
There’s also a simple truth: smart tools can help apprentices learn faster. When a senior tech can show a stable trend on a screen, and explain why the reading changes when you move the probe, it’s easier to teach good technique.
One caution that keeps things honest: don’t assume every app feature works the same on every phone, and don’t assume every smart tool suits every environment. If you work in plant rooms, roof spaces, and coastal outdoor sites, think about how you’ll protect the tool, keep the sensor clean, and keep your records consistent across jobs.
Did You Know?
A big chunk of “bad airflow readings” aren’t tool problems. They’re positioning problems. Bluetooth tools help because you can step back, keep the probe steady, and avoid blocking the grille face with your body.
If you’re exploring this style of kit, it’s easiest to start with a category view. Many technicians are now switching to Bluetooth smart anemometers for cleaner reporting and repeatable readings.
If your workflow specifically suits the Testo ecosystem, you can also compare options across Testo Smart Probe anemometers and related HVAC instrumentation in one place. The key is not the badge on the tool. The key is whether the workflow matches the jobs you do every week.
If you’d like a second set of eyes on your workflow, talk to our team to confirm compatibility with the way you test airflow and write reports. A quick chat can stop you buying something that looks good online but doesn’t suit your everyday jobs.
Budget Planning: Entry to Professional
Budget matters, and there’s no point pretending otherwise. The good news is that you can get a useful digital anemometer without going straight to top-shelf gear. The better news is that “best value” depends on the work you do, not just the sticker price.
Entry level models are usually basic digital tools. They can be fine for simple airflow checks, quick comparisons, and learning the basics. If you mainly want to confirm “is this register moving air or not?”, entry level can do the job. The risk is that cheaper-feeling meters can be frustrating if they bounce around, feel flimsy, or don’t average readings well. On busy days, annoying tools get ignored.
Mid-range models are often where you get better stability, stronger build, and more helpful workflow features. This is also where wireless features may start to appear, depending on the tool ecosystem. For many tradies, mid-range is the sweet spot because it gives you consistent readings and decent reporting without turning the job into a full “system”.
Professional models are typically built for reporting-heavy work, maintenance contracts, and more advanced workflows. The real question is not “is it expensive?” The question is “does it make me faster and reduce call-backs?” If the answer is yes, it can pay for itself quickly through saved time and fewer return visits.
Here’s a simple way to think about it. If you do mostly residential service, you want speed and stability. If you do commercial maintenance, you want reporting and repeatability. If you do balancing and performance work, you want the tool to behave well across a wider range of conditions and to record what you did without fuss.
ROI on data logging is the quiet winner here. If you do jobs where you need to prove airflow before and after a change, logging saves time. It also makes you look organized and confident, which matters in front of builders, facility managers, and commercial clients who want evidence, not opinions.
Australian pricing shifts over time and stock can vary, so the practical approach is to set your budget based on your workflow. If you’re an apprentice or you mainly do residential service, start with a solid digital tool that’s stable and easy to use. If you do commercial work, balancing, or reporting-heavy maintenance, lean towards models with better logging and repeatability.
When you’re ready to compare options side by side, you can browse anemometer range within our test and measurement collection and pick the style that matches your jobs. If you’re unsure, reach out for a quote or a quick recommendation based on what you actually do week to week.
Choose Your Perfect Anemometer
Choosing the right airflow tool isn’t about chasing the fanciest meter. It’s about matching the tool to the airflow you measure and the way you work.
If your bread-and-butter is register checks and general airflow confirmation, a vane anemometer is often the simplest and most rugged choice. If you do low airflow troubleshooting, tight-space checks, or you want better sensitivity, a hot-wire anemometer can be a smart move. If direction matters, or you’re dealing with tricky ventilation fault-finding, thermal and bidirectional options can give you clarity when the airflow isn’t doing what you expected.
Digital is the modern default because it’s easier to read, easier to repeat, and easier to record. If you want better reporting and less mucking around, Bluetooth and app-connected options can help, as long as the workflow fits the jobs you do every week.
In Australia, airflow testing has a simple professional benefit: it helps you make decisions you can stand behind. When you can measure, record, and explain what you found, you reduce guesswork and cut down on repeat visits. That’s good for the customer and good for your time.
If you want to compare options and get set up with a tool that suits your jobs, you can shop anemometers Australia-wide through our test and measurement range. If you’re not sure what fits your workflow, contact us for a quote or talk to our team to confirm compatibility before you commit.