How to Read Mastercool Manifold Gauge Set: Step-by-Step Guide
Reading a manifold gauge is a core skill. Learn it well, and diagnosing a system becomes much easier and faster.
This guide covers three things:
- How to read the gauge layout and scales
- How to calculate superheat and subcooling
- How to use pressure readings to diagnose system problems
Still choosing a manifold? Check our Mastercool manifolds digital vs analog guide first. It covers model selection. This guide covers how to read the gauge once you have one.
Written by Rica Francia Macaspac, HVAC Shop content writer, in consultation with Aussie HVAC tradies and industry experts. Published: June 2026 · Last reviewed: June 2026.

Gauge Layout and Scale Reading
First, learn what each gauge shows. Then learn how the scales relate to how refrigerant behaves. This is the base for everything else in this guide.
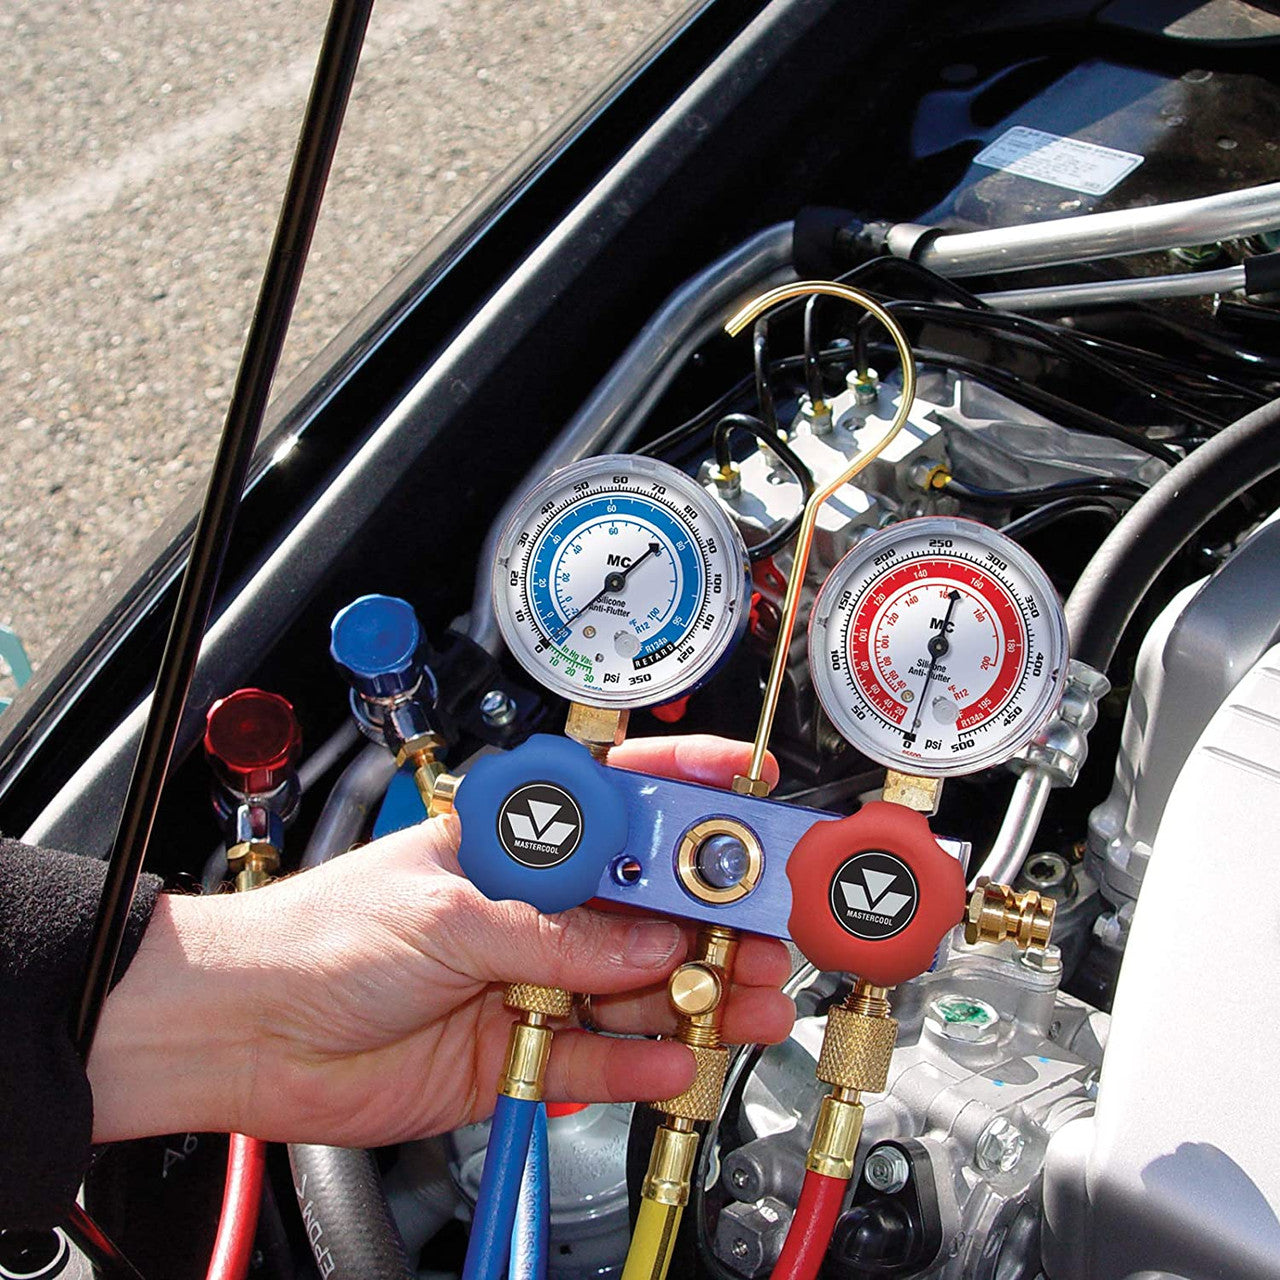
High-Side Gauge: Scale and Ranges
- Colour: usually red
- Measures: pressure between the compressor outlet and the metering device
- This is the high-pressure side of the system
- It shows the pressure at which refrigerant turns back to liquid in the condenser
On a digital manifold, like the Mastercool 2-valve digital manifold with thermocouples, the high-side pressure shows as a number. No need to read a needle. On an analog gauge, the high-side scale covers a wider range than the low-side, since pressures run higher on that side.
Low-Side Gauge: Scale and Ranges
- Colour: usually blue
- Measures: pressure between the metering device and the compressor inlet
- This is where refrigerant evaporates and absorbs heat
- It shows the evaporating temperature inside the indoor coil
Low-side ranges are narrower than high-side ranges on most manifolds. Suction pressure stays in a smaller band under normal conditions. Many analog low-side gauges also have a vacuum scale below zero, since the same port is used during evacuation.

Saturation Pressure Concept
Saturation pressure is the pressure at which refrigerant switches between liquid and vapour at a set temperature. Each refrigerant has its own pressure-temperature relationship. That's why gauges include printed scales, or digital lookup tables, for common refrigerant types.
Every pressure reading matches a saturation temperature for the refrigerant in that system. This link is the base for every calculation that follows, including superheat and subcooling.
Temperature Relationship to Pressure
As pressure goes up, saturation temperature goes up too. And the reverse is true. This relationship is not a straight line. That's why we use pressure-temperature charts or digital lookup tables, instead of a simple formula. Different refrigerants have different curves. So always confirm the refrigerant type before you read a chart.
A common mistake: reading the wrong refrigerant's chart. This gives a wrong saturation temperature that looks correct. It then throws off every calculation after it. Always check the refrigerant type on the data plate first.
Reading the Gauge Needle Accurately
- Look at the needle straight on, not at an angle. This avoids parallax error, where the needle looks like it's pointing somewhere else.
- Wait for a stable reading. Don't react to small changes as the compressor cycles.
- Digital displays skip this step and show a direct number.
- Digital readings can jump around during unstable conditions. Let the system settle for a minute or two before taking a reading, especially right after start-up.

Understanding Pressure Scales
Most manifolds in Australia show pressure in kilopascals (kPa) or pounds per square inch (PSI). Many analog gauges show both scales on one face. Always check which unit you're reading. Mixing up PSI and kPa makes a normal system look badly wrong.
If you work across older and newer gear, or brands that default to different units, make it a habit to confirm the unit every time. This avoids a common and easy mistake.
Tradie Pro Tip: Before you connect your manifold, check the data plate for the refrigerant type. It takes ten seconds. It stops the most common cause of wrong readings: using the wrong refrigerant's chart.
Superheat and Subcooling Calculation
Superheat and subcooling turn raw pressure and temperature numbers into a real diagnosis of system charge. Learn both well for accurate charging and troubleshooting.
Temperature Probe Reading: Pipe Surface Technique
Your calculation is only as good as your pipe surface reading. Good contact matters. Keep the probe away from insulation and other heat sources that could throw it off.
The Mastercool differential thermometer with two probes is useful here. It reads two points at once. You can check suction line temperature against liquid line temperature in one pass.
- Clip the probe securely to bare copper pipe
- Insulate the probe and pipe junction from ambient air, where you can
- Wait a few minutes for the reading to settle before you record it
A loosely attached probe reads ambient air, not pipe temperature. The result looks fine but is wrong.

Saturation Pressure Lookup from the Gauge
- For superheat: convert the low-side pressure to its saturation temperature.
- For subcooling: convert the high-side pressure to its saturation temperature.
On a digital manifold with the right refrigerant selected, this happens automatically. On an analog manifold, read the pressure, then check it against a printed pressure-temperature chart for that refrigerant. This is where digital manifolds save time on every job.
Superheat Formula and Typical Range
Superheat is the gap between the actual suction line vapour temperature and the saturation temperature at the same pressure.
Example: Suction line reads 15°C. Low-side pressure converts to a saturation temperature of 5°C. Superheat = 15 − 5 = 10°C.
- Measure suction line temperature at the outdoor unit, near the service valve.
- Look up saturation temperature from the low-side gauge, using the correct refrigerant chart, or read it directly on a digital manifold.
As a rough guide, fixed-orifice systems often target 8–12°C superheat at the outdoor unit. Some manufacturers set a wider 5–15°C range, depending on ambient temperature and system design. Always check the manufacturer's own charging chart. A figure that's right for one system may be wrong for another.
Subcooling Formula and Typical Range
Subcooling is the gap between the saturation temperature at condensing pressure and the actual liquid refrigerant temperature leaving the condenser.
Example: High-side pressure converts to a saturation temperature of 45°C. Liquid line temperature reads 40°C. Subcooling = 45 − 40 = 5°C.
- Measure liquid line temperature close to the outdoor unit, before the line has had a chance to cool further.
- Look up saturation temperature from the high-side gauge, using the correct refrigerant chart, or read it directly on a digital manifold.
TXV systems often target 5–10°C subcooling, though targets vary by manufacturer. Always check the manufacturer's chart rather than using one generic figure for every unit.
Why These Measurements Matter for Charging
Pressure alone doesn't tell you if a system is charged correctly. Ambient temperature, airflow, and other factors all change pressure, separate from refrigerant charge. Superheat and subcooling remove these variables. That's why they're the standard way to fine-tune a charge, not pressure alone.
Charging by weight gets you close fast. But superheat and subcooling checks confirm the system is actually working well under real conditions — including line length and elevation, which weight alone can't account for.
Normal Ranges for Efficient Operation
- A reading inside the manufacturer's target range = the system is charged correctly.
- A reading well above or below target = undercharge or overcharge. Which one, and by how much, depends on the exact figures — see the troubleshooting section below.
Get to know what normal readings look like on the systems you service most. This makes spotting an abnormal reading much faster.
Tech Specs Note: Target superheat and subcooling figures depend on the manufacturer and model. Always check the charging chart on the data plate or installation manual. A figure that's right for one brand's fixed-orifice system may be wrong for another.
Troubleshooting System Pressure Readings
Once you can read the gauges and calculate superheat and subcooling, the next step is understanding what abnormal readings mean. This is where gauge reading becomes real diagnostic skill.
Abnormal High-Side Pressure Causes
High-side pressure too high often means:
- Restricted airflow through the condenser — a dirty coil, blocked fins, or a unit with no clearance (common in tight side-yards or behind dense landscaping)
- Overcharge
- Trapped air from an incomplete evacuation
High-side pressure too low often means:
- Undercharge
- A restricted metering device
- A failing compressor not building enough discharge pressure
Check the low-side reading and superheat or subcooling too. The cause usually becomes clearer once you look at all of them together.
Abnormal Low-Side Pressure Causes
Low-side pressure too high often means:
- Overcharge
- A restricted condenser, backing up refrigerant
- Too much heat load on the evaporator — poor indoor airflow, a dirty filter, or undersized ductwork
Low-side pressure too low often means:
- Undercharge
- A restricted metering device
- Low evaporator airflow, or a partly blocked filter or drier
In QLD's humid conditions, a clogged filter shows up fast as low evaporator pressure. The coil can't absorb heat well from air that isn't moving. Check the filter before you assume a refrigerant problem.

Pressure Relationship Interpretation
Read both pressures together with superheat and subcooling. This narrows down the cause far better than any single number alone.
- High superheat + low subcooling → points to undercharge
- Low superheat + high subcooling → points to overcharge
Even experienced fridgies check all four figures — both pressures, superheat, and subcooling — before settling on a diagnosis, rather than jumping to a conclusion from one number.
Air in the System Indicators
Trapped air (a non-condensable gas) from an incomplete evacuation shows up as higher-than-expected high-side pressure. It doesn't match a simple overcharge or airflow issue.
Quick check: compare high-side pressure against the expected saturation pressure for the current outdoor ambient temperature, with the system off. A reading well above expected suggests trapped air or other non-condensables.
This is a good reason to evacuate thoroughly on every job. Air trapped well after commissioning is much harder to trace back to the cause.
Overcharge and Undercharge Indicators
- Fixed-orifice system: low superheat + high low-side pressure → overcharge. High superheat + low low-side pressure → undercharge.
- TXV system: subcooling is the better charge indicator. Low subcooling → undercharge. High subcooling → overcharge.
Always check the manufacturer's own target figures, not just generic rules of thumb. Confirm airflow and other non-charge factors are normal before you adjust refrigerant charge based on readings alone.
When to Stop Charging vs Continue
- Stop adding or removing refrigerant once superheat or subcooling hits the manufacturer's target range.
- Let the system settle for a few minutes, then take a final confirming reading.
- Adjusting charge too fast, without letting it settle, is a common cause of overshooting the target.
If readings won't settle in range despite reasonable adjustment, stop. Look for a non-charge cause instead — airflow restriction, a failing part, or trapped air. Don't keep adding or removing refrigerant chasing a target that charge alone won't fix.
Use this table as a quick field reference, alongside proper manufacturer charging charts.
| Reading Pattern | Likely Cause | Next Diagnostic Step |
|---|---|---|
| High superheat, low low-side pressure | Undercharge or metering device restriction | Check for leaks; verify airflow before adjusting charge |
| Low superheat, high low-side pressure | Overcharge or excess evaporator heat load | Check indoor airflow and filter; verify charge against weight |
| High-side pressure higher than expected for ambient | Restricted condenser airflow or non-condensable gas | Check condenser coil cleanliness and clearance; consider re-evacuation |
| Low subcooling on TXV system | Undercharge | Confirm against manufacturer target; check for leaks before adding charge |
| High subcooling on TXV system | Overcharge | Confirm against manufacturer target; recover excess charge carefully |
| Both pressures low, normal superheat ratio | Low indoor airflow or restricted filter | Check filter, ductwork, and blower operation before touching charge |
Did You Know? A common trap is adjusting charge to chase a target superheat or subcooling figure, when the real problem is restricted airflow. Always rule out the filter, coil cleanliness, and ductwork first. Charge adjustment won't fix an airflow problem — it can hide it for a while and make things worse.
Working safely around refrigerant systems and electrical parts matters on every job. See the Safe Work Australia resources for broader guidance on HVAC-R diagnostic and service work.
For ARCtick-licensed techs, accurate readings and proper charging practice support both safe refrigerant handling and your compliance record. Strong gauge reading skills help with both.
For the full Mastercool manifold and gauge range, including digital units with built-in thermocouples, visit the refrigerant gauges collection at HVAC Shop or browse the broader Mastercool collection for the full tool range.
Choosing the right manifold? See our Mastercool Manifolds: Digital vs Analog Guide for a comparison of digital and analog models, plus R32 compatibility.
Frequently Asked Questions: Reading Mastercool Manifold Gauges
To view the full Mastercool manifold and gauge range, including digital models with built-in thermocouples for faster readings, visit the refrigerant gauges collection at HVAC Shop or contact our team to confirm which tool suits your diagnostic workflow.