Need the right tool before your next service call? Browse the full refrigerant leak detector range for electronic detectors, UV dye options and bubble solutions suited to day-to-day Australian HVAC work.
Technique Still Beats Guesswork
If you have ever gone back to the same site for the same leak, you already know the hard truth. It is not always the detector that let you down. Most of the time, the problem is the process. Probe speed was too fast. The coil was scanned in the wrong order. The area was contaminated before testing. Or the first beep got treated like final proof. That is how small refrigerant leaks turn into wasted labour, repeat travel, cranky customers, and an arvo that blows out for no good reason.
This matters even more in Australia now that R32 is common on split systems and technicians are expected to work cleanly, safely, and with proper records. Whether you are on a humid Brisbane QLD rooftop, in a tight Sydney ceiling space, on a coastal Melbourne replacement job, in a hot Perth plant room, or diagnosing a hard-working unit in Darwin, leak detection has to be methodical. No worries if you are still refining your process. The good news is that the steps are simple when you stick to them.
This guide is built around real HVAC practice, not brochure fluff. It shows how to use a leak detector HVAC method properly on R32, R410A, and older R22 systems, how to confirm what you found, how to avoid common false alarms, and how to document the job so it stands up professionally. It also explains where electronic detectors fit, where bubble solution makes more sense, and when UV dye can save a difficult diagnosis.
The aim is not just to make the detector beep. The aim is to find the exact fault, repair it properly, verify the repair, and move on without a callback. Fair dinkum, that is what good leak detection is really about.
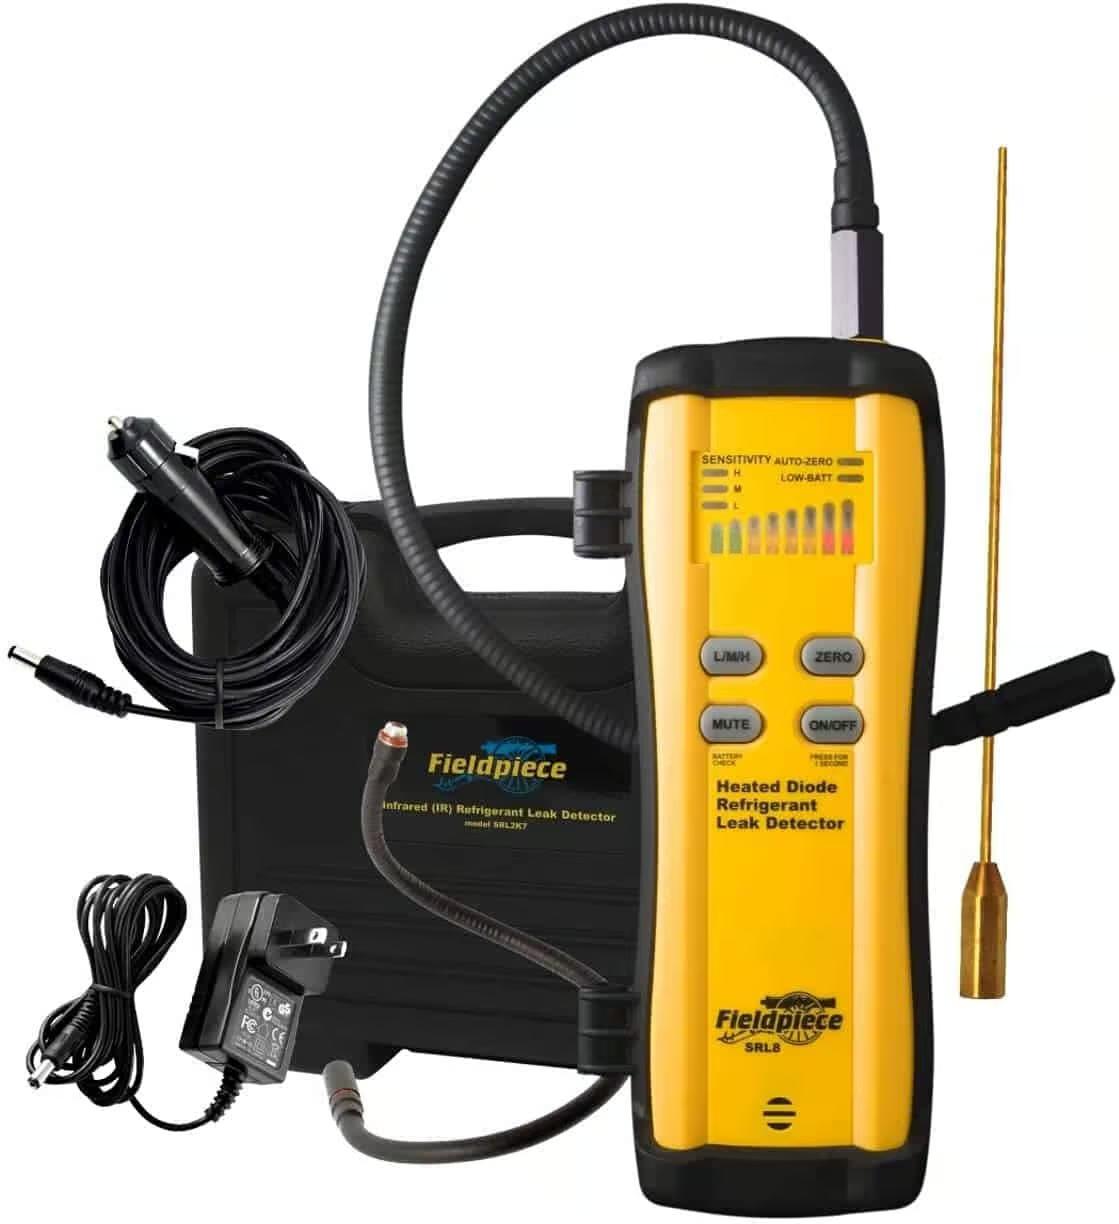
 Electronic detectors are ideal for narrowing down the general leak area before you confirm the exact point.
Why Leak Detection Matters on Australian Jobs
On paper, a refrigerant leak is simple. Gas gets out. Charge drops. Performance suffers. In the field, it is rarely that tidy. A small flare leak might only show under load. A Schrader core may seep after service. A coil pinhole can be invisible until oil staining builds up over time. In warm, salty, or humid conditions, especially around Sydney coastal installs, Darwin heat, and Brisbane moisture, corrosion and thermal movement can make small leaks harder to catch early.
That is why leak detection should never be treated like a quick once-over. On R410A and R32 systems, a slow leak can lead to poor cooling, bad superheat and subcooling numbers, nuisance trips, and compressor stress. On older R22 equipment still in service, parts may already be under strain, so missing a leak can turn a repairable problem into a full replacement discussion. A proper leak search protects the customer, the equipment, and your own time.
It also protects your professional standing. Customers might not understand the finer points of refrigerant diagnostics, but they do understand repeat visits. When you find the real fault the first time, explain it clearly, and document it properly, trust goes up. When the same system leaks again because the original location was never confirmed, trust disappears just as fast.
For most day-to-day work, a mixed method is the best method. An electronic detector helps you scan quickly. A visual confirmation product like Viper Big Blu bubble solution helps you prove the exact point. If the leak is slow, hidden, or intermittent, a dye product such as Errecom Brilliant UV dye can be the difference between guessing and knowing.
Start every leak job with a plan. Scan first, confirm second, repair third, verify fourth, document last. When techs mix those steps up, that is when callbacks sneak in.
Before You Start: Safety, Prep, and Compliance
Preparation is where good leak detection begins. If the area is contaminated, the detector is not warmed up, and the system condition is unknown, you are already behind. Before scanning, confirm the refrigerant type, the likely leak history, and whether the system is under enough pressure to give you a meaningful result. A detector cannot find what is not escaping.
Safety is part of that same process. R32 is widely used and needs to be handled with proper caution because it is an A2L refrigerant. You do not need drama around it, but you do need good practice. Ventilate the area, especially in ceiling spaces, cupboards, and plant rooms. Keep ignition risks controlled. Wear eye protection and gloves. Follow site procedures. If you are refreshing your PPE kit for service work, suitable HVAC safety equipment belongs in the van before the next job starts.
Compliance matters too. ARCtick requirements, site paperwork, and safe handling expectations are not extras. They are part of professional refrigerant work in Australia. The practical side is simple: identify the refrigerant, note the symptoms, record the leak location once confirmed, and document the repair and final verification. For broader hazardous chemical handling guidance on site safety, use Safe Work Australia hazardous chemicals guidance as your external reference point.
You also need to control the test environment. Freshly vented refrigerant, cleaning sprays, oil vapours, and poor airflow can all confuse the detector. Let the area settle if a service port was just opened. Keep the probe out of pooled oil. Do not rush straight from one contaminated spot to another. A few calm seconds here can save fifteen wasted minutes later.
Lastly, make sure the detector itself is ready. Warm it up per the product instructions, let it zero in clean air, and check that the sensor is behaving normally. A detector such as the Javac Tek-Mate refrigerant leak detector is useful on everyday service calls, but even a good detector gives poor results if the sensor is contaminated or the baseline is unstable.
A lot of so-called bad detectors are actually good detectors used in bad conditions. Fresh refrigerant in the air, poor probe control, and sensor contamination cause more confusion than most techs want to admit.
Step-by-Step: How to Use a Leak Detector HVAC Method Properly
Start by confirming the system is under pressure. If the charge is completely gone, you may need a separate pressure-testing process before electronic leak searching makes sense. Once the system is in a valid state for testing, begin at the most likely leak points rather than wandering all over the system. On split systems and package units alike, that usually means flare joints, service valves, caps, Schrader cores, brazed joints, filter driers, distributor areas, and coils that have shown oil staining or corrosion.
Move the probe slowly. That sounds basic, but it is the part people most often get wrong. A good working pace is roughly 25 to 50 millimetres per second. Too quick and the detector never gets enough time to react to a small leak plume. Too slow and you risk overloading the sensor or convincing yourself that a general background concentration is a pinpoint location. Keep the tip close to the surface without touching it. Touching oily joints is a fast way to dirty the sensor and ruin your next few readings.
Use a clear scan pattern. Go around the full circumference of fittings, not just the front side you can see easily. Work low to high where practical because refrigerant can collect in lower areas before dispersing. On an indoor head, do not just hover around the valves and call it done. Scan the coil edges, bends, and any visible tubing joints. On outdoor units, check rub points, service valves, braze repairs, and areas where vibration may have worked a joint loose.
When the detector alarms, do not declare victory too early. Pull back, let it clear, and come in again from a different angle. A real leak will keep reacting in the same place when your approach is controlled. A contaminated air pocket will not. This is where calm re-approach technique separates real diagnosis from guesswork.
Once you have a suspected point, confirm it physically. That is where bubble solution earns its keep. Apply a neat film over the suspect spot and watch patiently. Tiny leaks may take time to form white foam clusters. On a hot Perth rooftop or in a warm plant room, the product can dry faster, so apply enough to hold a proper film. On cooler Melbourne work, give it time. The main thing is not to rush the confirmation stage just because the detector beeped first.
If the leak is not obvious and the system has an intermittent history, step up to UV dye. A dye method is especially handy on awkward coil leaks, tucked-away tubing runs, and repeated call-back sites where the fault only presents after operating time. Inject the correct amount, circulate it properly, and inspect with suitable UV light. The bright trail left at the escape point takes a lot of argument out of the diagnosis.
 Bubble solution is one of the easiest ways to confirm the exact leak point after the electronic detector narrows the area.
Where Leaks Usually Show Up First
The fancy part of leak detection gets most of the attention, but the smart part is knowing where to start. Some components fail more often than others. Flare connections are near the top of the list, especially on split systems where workmanship, torque, re-used flares, vibration, and thermal cycling all come into play. Schrader cores and service valves are also repeat offenders. They are small, they are touched often, and they are easy to overlook once the cap goes back on.
Indoor coils deserve serious attention as well, especially on systems in humid or coastal conditions. Sydney and Brisbane sites can be rough on equipment over time, and older coils may develop tiny leaks that are slow enough to be annoying but steady enough to hurt performance. Outdoor coils and braze joints can also leak after vibration, corrosion, or poor previous repairs. Reversing valves, filter driers, and distributor assemblies all deserve a proper scan on systems with unclear symptoms.
R32 and R410A systems are common enough now that most technicians have seen repeated leak patterns around line-set joints and service points. Older R22 systems can be trickier because you are often dealing with aged equipment, prior patch repairs, and components that have already lived a full working life. That is another reason technique matters more than brand talk. The detector helps, but the search pattern still wins.
| Leak Location | Why It Fails | What to Look For | Best Confirmation Method |
|---|---|---|---|
| Flare connections | Poor torque, damaged flare face, vibration, re-used fittings | Detector reaction at nut edge, oil staining, repeat callbacks after install | Electronic scan first, then bubble solution |
| Schrader cores and service valves | Wear, dirt, damaged core, disturbed after service | Intermittent loss, detector response around access port, cap area staining | Direct probe pass and bubble confirmation |
| Brazed joints | Poor braze quality, vibration, heat stress | Small pinpoint response, visible oil film, repeat alarms after repair | Slow circumference scan and bubble film |
| Indoor evaporator coil | Corrosion, age, coil fatigue | Hard-to-pinpoint loss, recurring low charge, scattered oil marks | Electronic scan plus UV dye for hidden areas |
| Outdoor coil or rub point | Corrosion, vibration, physical damage | Detector response near bends and contact points | Electronic scan and visual confirmation where accessible |
| Filter drier or reversing valve area | Thermal cycling, connection stress | Response around joints during operation | Electronic scan, then bubble solution when safe |
Heated diode and other electronic detectors are excellent for fast search work, but they are strongest when paired with a second confirmation method. That combination is built for Aussie conditions because it balances speed with proof.
When to Use Electronic Detection, Bubble Solution, and UV Dye
There is no prize for using one method for every job. Electronic detection is the main workhorse because it lets you cover ground quickly. That is why most technicians start there. The leak detector collection at HVACShop is built around that day-to-day workflow, with electronic options, UV dye tools, bubble products, and tracer-gas gear all grouped by method. If you are shopping by workflow rather than hype, that is the right way to look at leak tools.
Bubble solution is not old-fashioned. It is practical. Once you think you know the spot, you still need a visible confirmation before quoting a repair with confidence. That is where a product like Big Blu earns respect. It is clean, easy to apply, and gives you something you can physically show the customer.
UV dye is best used when leaks are small, awkward, intermittent, or buried in spots where a detector response alone is not convincing. Coil leaks are the classic example. You may get a soft response with the detector but no exact point that you are happy to stand behind. A dye trace gives you that extra layer of evidence after the system has run.
None of these methods replace judgement. If a system is empty, badly contaminated, or obviously damaged, you may need to step back and sort the bigger issue first. But for normal service work, the strongest workflow is simple: use the electronic detector to find the area, use bubbles or dye to confirm the exact point, repair the fault, then verify again before leaving.
 UV dye is useful on hidden, intermittent, or hard-to-repeat leaks where a single detector pass is not enough evidence.
How to Avoid False Positives and Wasted Time
False alarms chew through time faster than almost anything else on a leak job. Cooking fumes, cleaning sprays, background refrigerant from nearby systems, and even poor airflow can all create noise. If you work in commercial sites, this is common. One unit is the real job, but three others in the area are making the air messy. That is why you need to isolate mentally as well as physically. Know which system you are checking and control the area as much as possible.
Sensor contamination is another big one. If the probe tip gets dragged through oil, dirt, or wet residue, the next few readings can become unreliable. Keep the tip close, not touching. Let the detector clear in fresh air after a strong hit. Re-approach from another angle. A genuine leak signal should repeat at the same location under the same conditions.
Probe speed matters here too. Too fast and you miss the leak. Too slow and you start reading the whole area as suspicious. The trick is steady movement with deliberate overlap. Work like you are painting a narrow line, not waving a wand around. That alone improves results more than most technicians expect.
Another common problem is scanning straight after refrigerant was released during service. That fresh cloud can drift and fool you into blaming the wrong fitting. Let the area settle first. No worries if that costs you a minute. It is quicker than repairing the wrong joint and finding out later.
Repair Verification and What to Do After the Fix
Finding the leak is only half the job. After the repair, you still need to prove the system is sound. Re-scan the repaired area with the electronic detector. Re-apply bubble solution if that was your confirmation method. On systems where the leak history was vague or there were several suspect spots, broaden the scan and make sure you have not fixed one issue while missing another.
Then move into the rest of your commissioning mindset. Evacuation quality, standing vacuum behaviour, and final running checks all matter after leak work. If the job flows into evacuation and commissioning, tools such as vacuum gauges help verify the system condition after repair and before final charging decisions are locked in. That is especially important when moisture, repeated opening, or long repair times were part of the job.
Use the results to explain the job properly. Show the customer where the leak was. Explain what failed. Explain what was repaired. Let them know what was re-tested. Customers do not need a lecture, but they do value clarity. A clean explanation cuts down questions and builds confidence in the repair.
Documentation, ARCtick Expectations, and Good Job Records
Good records are not there to make life harder. They are there to protect you, the customer, and the quality of the job. Once the leak is confirmed, note the system type, refrigerant used, the exact location of the leak, how it was confirmed, what repair was completed, and what verification steps followed. If photos help, take them. On warranty work and repeat sites, photos are gold.
For Australian HVAC/R technicians, ARCtick-related record keeping and safe refrigerant handling expectations are part of normal professional practice. That means the documentation should be clear enough that another competent tech could understand what happened if the system is seen again later. It should also be clear enough that you can defend the work if questions come back months later.
Keep the language practical. “Leak confirmed at liquid-line flare connection at outdoor unit using electronic detector and bubble solution” is useful. “Possible issue somewhere near outside” is not. One sounds professional. The other sounds like guesswork. Fair dinkum, the difference matters.
Choosing the Right Leak Tool for Your Usual Work
Not every technician needs the same setup. If you mostly do residential split service, you want something reliable, quick to deploy, and easy to verify with a second method. If you do more refrigeration, larger commercial work, or odd repeat faults, a broader leak kit may make more sense. The live HVACShop leak detector range includes handheld electronic tools, UV dye options, bubble solutions, and method-based choices for technicians who need gear that matches real job flow rather than just catalogue specs.
If you are building a kit from scratch, think in terms of workflow. One electronic detector. One proven confirmation product. One backup method for awkward leaks. That setup covers a lot of ground without overcomplicating the van stock. It also makes you more consistent because the process stays familiar from site to site.
And remember, the best detector is not the one with the flashiest sales line. It is the one that fits the kind of work you actually do, works well with your confirmation method, and helps you get through jobs cleanly. Built for Aussie conditions is not just marketing language when you are bouncing between humid coast, dusty heat, and packed ceiling spaces in the same week.
Find It Once, Fix It Properly, and Move On
A proper leak detector HVAC process is not complicated, but it does need discipline. Prepare the area. Use the right safety habits. Scan in a clear pattern. Re-check every alarm. Confirm the exact point. Repair it properly. Verify again. Record the result. That workflow works on R32, R410A, and R22 systems because it is built on good field practice, not shortcuts.
If you follow that method, you will miss fewer leaks, waste less labour, and look more professional every time you hand the customer the final explanation. That is good for your reputation and good for the business. No worries, it does not require magic. It just requires consistency.
When you are ready to upgrade or replace your setup, browse the full leak detector collection and choose a kit that suits the jobs you actually do, not the jobs a brochure pretends you do.
Ready to tighten up your leak-finding workflow? Shop HVAC leak detectors, bubble solutions, and UV dye tools that suit real Australian service work.