How to Get Accurate Vacuum Measurements with a Micron Gauge
Getting a system below target micron level is one thing. Knowing that the reading is real is another. A good vacuum process does not stop at turning on the pump and waiting for the numbers to drop. If you want reliable evacuation results, you need the right measurement method, the right gauge placement, and fittings that do not introduce leaks or unstable readings.
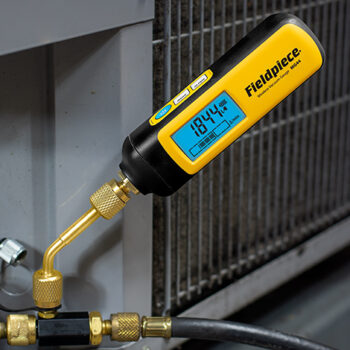
For technicians working on split systems, refrigeration circuits, and general HVAC service work, a digital micron gauge is one of the simplest tools for improving commissioning quality and reducing call-backs. It tells you whether the system is genuinely dry and tight or whether moisture, trapped refrigerant, or a small leak is still affecting the evacuation.
This guide breaks the process down step by step — why micron readings matter, how to connect the gauge properly, where fittings and adapters help, and how to perform a useful vacuum decay test instead of guessing based on pump runtime alone.
Table of Contents
- 1. Why Vacuum Measurement Matters
- 2. Choosing the Right Micron Gauge
- 3. Preparation
- 4. Evacuating the System
- 5. Monitoring the Vacuum
- 6. Performing a Vacuum Decay Test
- 7. Finalising the Process
- 8. Expert Tips
Why Vacuum Measurement Matters
Vacuum measurement is not just about hitting a number. It is how you confirm whether the system is actually ready for commissioning. Air and moisture left inside the circuit can create long-term issues including acid formation, oil breakdown, poor system performance, and repeat service problems that show up later as unstable operation or reduced component life.
That is why technicians use micron gauges instead of relying on manifold readings alone. Standard compound gauges are not precise enough for deep evacuation work. A dedicated micron gauge tells you what is happening at the low-pressure end of the process, where the real quality of the evacuation is judged.
In practical terms, a proper micron reading answers three questions. Has the system been evacuated deeply enough? Is it dry enough? And when the pump is isolated, does the system hold its vacuum or start climbing because of leaks, contamination, or moisture still boiling off?

A stable and believable micron reading is one of the clearest signs that the job has been done properly. That is why good technicians treat the micron gauge as a decision-making tool rather than just another accessory clipped into the rig.

Browse digital micron gauges at HVAC Shop
AccuTools BluVac, Fieldpiece MG44, Robinair, Testo, JAVAC, and Mastercool — the only way to prove the system is dry before you charge it. Ships Australia-wide.
Choosing the Right Micron Gauge
What matters most in the field is stable response, believable readings, and a setup that makes it easy to mount the gauge where it should actually be used. A good digital micron gauge should respond quickly enough for decay testing, remain readable during pull-down, and give you confidence that a drifting number is a real system issue rather than a bad connection or unreliable tool.
Accuracy matters, but so does consistency. A gauge that jumps around because of poor connection points, awkward placement, or contamination in the sensor wastes time. For most technicians, the best gauge is the one that can be connected cleanly, isolated easily, and trusted during the final stages of evacuation.
What to look for in a micron gauge:
Stable, repeatable low-micron readings for final evacuation decisions. Fast response for vacuum decay testing. Clean connection options — a good gauge performs better paired with quality T-fittings and adapters that reduce turbulence and instability at the measurement point.
Browse Micron Gauges →The other part of the buying decision is how you connect the gauge. Good fittings and adapters are not just convenience items — they affect measurement quality. A poor connection point can introduce leaks, turbulence, or instability that makes the reading harder to trust. Many technicians improve their workflow by pairing the gauge with clean T-fittings and adapters instead of relying on awkward hose arrangements.
Step-by-Step Guide to Using a Micron Gauge
1. Preparation
Start with a clean setup. Make sure the system is isolated, the service valves are in the correct position, and the vacuum pump oil is in good condition. Poor pump oil can slow evacuation and make it harder to reach a stable final reading.
The next priority is gauge placement. The micron gauge should be placed as far from the vacuum pump as practical — ideally on the system side rather than right at the pump. The closer the gauge is to the pump, the less representative the reading becomes of the actual system condition. A pump-side reading can look better than the system-side reality.
This is where fittings make a difference. A good connection point using a coupler, core tool port, or a clean T-fitting or adapter arrangement helps isolate the gauge from pump turbulence and gives the reading a better chance of reflecting the actual vacuum level in the system. Many bad readings come from bad connection logic, not bad tools.
2. Evacuating the System
Once connected correctly, start the vacuum pump and begin evacuation. The micron gauge will usually drop quickly at first as bulk air is removed, then slow as the system moves into deeper vacuum territory. That slower phase is where the quality of the evacuation matters more than the speed.
For many HVAC systems, technicians commonly aim to pull below 500 microns before isolation testing, but the number alone is only part of the story. A quick drop below target means little if the system rises sharply the moment the pump is isolated. Good evacuation always includes both pull-down and hold testing.
During this stage, keep an eye on hose restriction, core removal, and pump condition. If evacuation is dragging, the issue may not be the system — it may be the setup.
3. Monitoring the Vacuum
As the evacuation deepens, the micron gauge becomes more valuable. Unstable readings can tell you something useful. If the number bounces around, climbs unexpectedly, or refuses to stabilise, the cause is usually one of three things: a leak, trapped moisture, or poor connection quality.
The gauge needs time. Technicians sometimes rush the process and treat every fluctuation as a system fault. In reality, the reading may simply be stabilising after a change in flow or temperature. Let the system settle before making the call.
At this stage, a trustworthy digital micron gauge and a clean fitting arrangement are what make the process readable instead of frustrating.
4. Performing a Vacuum Decay Test
The decay test is where the micron gauge proves its value. Once the target vacuum has been reached, isolate the system from the pump and watch what the reading does. If the micron level rises sharply and keeps rising, that usually points to a leak or significant moisture still inside the system. If it rises slightly and stabilises, that is a sign the system is dry and tight enough for commissioning.
A small rise after isolation is normal in many setups. What matters is the pattern — a stable settle is very different from a continual climb.
Decay testing is also why connection quality matters. A poor fitting or unstable adapter can make the gauge appear to show a system problem when the issue is actually at the measurement point. Using proper T-fittings and adapters removes that doubt.
5. Finalising the Process
Once the system has passed the evacuation and decay stages, disconnect the equipment carefully, reopen valves as required, and move into the next part of commissioning or charging. A good evacuation process loses its value if the system is reopened or contaminated through careless disconnection.
If the reading never behaved the way it should, do not force the job through. Recheck connections, fittings, valves, and the system itself before moving on.
Expert Tips for Accurate Vacuum Measurements

Use reliable equipment
A consistent digital micron gauge saves time because it makes the numbers easier to trust. Unreliable readings create second-guessing, which slows the job and makes diagnosis harder.
Place the gauge at the system side
The further the gauge is from the pump, the more useful the reading becomes. A pump-side reading can flatter the result and hide what is really happening in the system.
Use proper fittings and adapters
Adapters and T-fittings help create a cleaner gauge position, reduce turbulence effects, and support more stable measurement. Good T-fittings and adapters can make a noticeable difference in how believable the final reading is.
Keep the pump and gauge maintained
Clean oil, good storage, and sensible handling all improve measurement confidence. A neglected vacuum pump or contaminated sensor makes every evacuation harder to interpret.
Do not judge the job by time alone
A system that has been on the pump for a long time is not automatically ready. The gauge tells you more than the clock does.

Pair your micron gauge with the right vacuum pump
Two-stage pumps from Fieldpiece, JAVAC, Mastercool, and Robinair — sized from 30 L/min for residential splits to 283 L/min for large commercial systems. A micron gauge and a matched pump are the complete evacuation rig.
FAQ: Micron Gauge Best Practices
What is a good vacuum level in HVAC?
Below 500 microns is a common target for many HVAC evacuations, but the more important test is how the system behaves after isolation. A good final reading should also hold reasonably well during a decay test.
Why is my micron reading rising?
A rising reading usually points to leaks, moisture, or poor connection quality. Sometimes it is a fitting issue rather than a system issue, which is why gauge setup matters as much as the reading itself.
Where should a micron gauge be placed?
As far from the vacuum pump as practical, ideally on the system side. This gives a more realistic picture of actual system vacuum instead of pump-end conditions.
Do I need a digital micron gauge?
Yes, for modern evacuation work it is the most practical way to verify deep vacuum and hold testing accurately. Standard manifold gauges are not precise enough for that job.
Do fittings really affect accuracy?
Yes. Poor fittings can leak, create unstable readings, or place the gauge in the wrong part of the setup. Good adapters and T-fittings improve measurement quality and confidence.
Using a micron gauge properly turns evacuation from a rough process into a measured one. With the right gauge, the right fittings, and the right method, you get cleaner vacuum measurements, better decay testing, and more confidence that the system is actually ready for commissioning.
Build a complete evacuation rig at HVAC Shop
Digital micron gauges and two-stage vacuum pumps — stocked locally, ships Australia-wide. Everything you need to pull a verified deep vacuum on every job.