
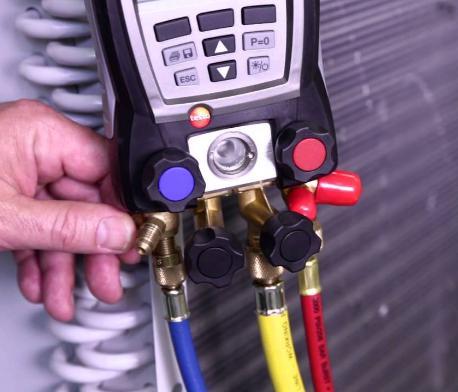
Automotive Air Conditioning Gauges Guide: Choosing the Best for Your Needs
Refrigerant gauges are essential to air conditioning equipment that can assist you in diagnosing and correcting air conditioning and stationary refrigeration devices that aren't cooling effectively. Let's check out what HVAC Shop's Automotive Air Conditioning Gauges can do for you.
Do you intend to work in the HVAC field? Perhaps you'd like to grasp the fundamentals of this trade to gain an advantage in the market? If you answered yes, one of the first things, you should discover how HVAC gauges function.
The heating, ventilation, and air conditioning (HVAC) industry continues to expand rapidly. If you're an HVAC professional, there are a lot of job prospects out there right now.
Automotive Air Conditioning Gauges
A pressure-checking system is a manifold gauge. They're one of the most fundamental HVAC tools. You can use them for both diagnostic and service purposes.
Automotive Air Conditioning Gauges in diagnostics notifies an HVAC professional whether the system is running properly or if there is an issue that needs addressing.
You can use a manifold gauge to remove polluted refrigerants from the system and release moisture and sludge when used as a service tool.
You've probably encountered the need for manifold gauges while working as a heating, ventilation, air conditioning, and refrigeration service technician. And it's not just HVAC/R technicians who need to know how to use them. For various specialists in a wide range of fields, a dependable set of gauges is a useful asset.
Technicians use gauges to measure the pressure of various liquids and gases in a cooling system and vacuum pressure during testing and charging. The number of ports, also known as manifolds needed to attach accessories varies. In addition, gauges can be classified based on the pressure they can withstand, which is critical when working with various refrigerants.

How do Professionals Use It?
Professionals use gauges to track the pressure of refrigerants in heating and cooling systems. They use it to regulate the flow of gas or pressure.
HVAC gauges can range from small handheld devices to larger machines found in professional HVAC shops.
The following are some examples of how you can use manifold gauge sets:
- Checking the pressure in the air conditioning lines
- Identifying whether or if there is a leak
- Adding small amounts of refrigerants
- Evacuation of refrigerant
- Recharging6 \sTroubleshooting3
- Repairing and maintaining air conditioning and heating systems
The refrigerant used in the HVAC system must be compatible with the manifold gauge. It will stamp every heating and cooling system with the refrigerant type utilized. Although you can use most gauges to measure any refrigerant pressure, each gauge's function and specifics may differ. Some gauge sets can read multiple refrigerants. You'll want to double-check that you're using the correct gauge for the refrigerant reading.
UNDERSTANDING HOW IT WORKS
A manifold gauge operates by allowing gas to flow past it. Depending on the situation, it will correctly connect the low-pressure blue and high-pressure ones. You can attach an external source, including a vacuum pump or a refrigerant bottle, to the yellow hose.
A few illustrations of how gauges function are as follows:
- Pressure Readings: Link the red hose to an HVAC high-pressure line. It attaches the blue hose to an HVAC low-pressure line while taking pressure readings. The HVAC technician would then examine the gauges and take note of the readings.
- Vacuuming: The yellow hose is connected to a vacuum pump, while the blue hose is connected to the unit. The blue valve would be left open to allow the pump to function.
- Adding Refrigerant: When adding refrigerant to an air conditioner, the yellow hose is connected to an external source, the refrigerant bottle, and the red hose is attached to the unit. The HVAC specialist would track how much refrigerant was being introduced to the system and switch it off when it reached the level.

What are readout gauges?
There will be two readout gauges on an HVAC gauge. It shows the low-pressure and high-pressure chambers. Some models introduced the third gauge to measure compressor output. However, in today's market, this is not the case.
Readout gauges have two categories:
GAUGE FOR ANALOG READOUT
The analog (indicator needle) is the most popular on the market. The needle's position indicates the amount of vacuum/pressure in the AC system or another device.
They're simple to operate, and most mechanics prefer them over more modern gauges. Analog readout gauges, on the other hand, are prone to inaccuracies.
Many technicians struggle with pressure conversions even after understanding the fundamentals of HVAC gauges.
GAUGES DIGITAL
These are numeral-based gauges that provide vacuum and pressure readings. Analog readout gauges are less accurate than digital readout gauges.
These gauges also have extra functions to make a technician's job easier. You don't have to convert the readings, which decreases the chance of making mistakes.
Many technicians, however, are unfamiliar with this technique. The addition of extra features by HVAC manufacturers further complicates digital readings.
What are the hoses for?
It transports pressurized gas using hose connections. To distinguish between high and low-pressure hoses, manufacturers colour-code them.
The low-side hoses are blue, and the high-side hoses are red. The blue hose has a pressure range of 0 to 99.9 psi, whereas the red hose has a pressure range of 999 psi.

How to connect it?
An HVAC contractor's ability to install HVAC gauges is critical. After learning how HVAC gauges function, it makes the proper link is crucial for the job.
Flexible hoses with connectors on both sides are used in an HVAC gauge.
Many people who attempt DIY HVAC repair make mistakes. The hoses have the maximum pressure specified in PSI or bar for safety and make work easier. The increased pressure may cause the hose to explode.
The following are the steps to make the proper HVAC gauge connection:
- Make sure that you connect the hose and ports correctly. The red port and the red gauge are complementary. These are the gauges for high pressure.
- Then, the low-pressure side of the gauge is connected to the blue port. You should use a blue hose to link the lower pressure side to the blue pressure gauge.
- You'll need a disposal hose attached to the middle of the manifold HVAC gauge to discharge a unit. Use a coolant recovery bottle fitted to the manifold and the bigger black low-pressure pipe. It avoids breaking federal restrictions about refrigerant disposal in the environment.
- Additional ports are available for connecting other gauges or a micron meter. There are more ports on the manifold to attach these gauges. These ports are open if you need to connect a vacuum pump when servicing the air conditioner.
- Pressure and temperature charts are included in the AC gauges. Temperature scales and numerous types of AC refrigerant pressure are included in the charts. Using the graph given, you can determine the refrigerant pressure.
Buy Manifold and Automotive Air Conditioning Gauges at HVAC Shop
HVAC gauges are available in various styles and sizes here at the HVAC Shop in Australia. Thanks to this in-depth knowledge, you may now use any HVAC gauge on the market.
It's critical to have these essential items on hand for any HVAC servicing operation. Also, it's the only method to improve your work's correctness and efficiency. Continue browsing our site for more pressure measurement equipment if you're looking for the greatest HVAC gauge set.